Why AI Video Editing Is Growing So Fast
- 91% of businesses use video as a marketing tool, showing how central video has become to marketing and communication.
- 63% of video marketers have used AI tools to create or edit marketing videos, up from 51% the previous year.
- 69% of video marketers create social media videos, making social content one of the biggest drivers of ongoing video production.
- Short-form video delivers the highest ROI for 49% of marketers, while 30% plan to invest heavily in the format in 2026.
Video teams are being asked to produce more content, in more formats, for more platforms—and often without adding more editing time or resources.
A single recording may need to become a full YouTube video, several Shorts or Reels, captioned social clips, promotional edits and platform-specific versions. That means hours spent reviewing footage, removing pauses, cleaning dialogue, generating captions, finding highlights, reframing shots and rebuilding the same content for different channels.
This is where AI video editors are becoming increasingly useful.
The best tools no longer rely on one-click automation alone. An AI-powered video editor can now help transcribe and edit spoken video, identify useful moments in long recordings, generate short-form clips, clean speech, create captions, organize footage and even assist with building a rough cut.
But there is no single best AI video editor for every workflow.
Descript is built around transcript-based editing. CapCut prioritizes fast social content. Adobe Premiere Pro integrates AI into a professional editing environment. OpusClip focuses on repurposing long videos into shorter clips, while Filmora combines AI assistance with a more approachable traditional timeline.
Even the idea of a free AI video editor varies considerably between platforms. Some offer genuinely useful free editing features, while others restrict AI credits, export quality, watermarks or advanced tools behind paid plans. We look at those limitations as part of each review rather than treating “free” as a simple yes-or-no feature.
For this guide, we selected five AI video editing tools that solve different production problems and tested the workflows that matter most in actual editing.
For each tool, we look at what the AI actually does, which prompts and features are worth using, where manual editing is still required, what you can do on the free plan and which type of video the editor handles best.
The goal is not simply to find the software with the longest feature list.
It is to answer a more useful question: Which AI video editor can remove the most repetitive work from the way you actually create videos?
Best AI Video Editors at a Glance
AI Video Editor | Best For | Main AI Advantage | Best Fit |
Descript | Podcasts, interviews & talking-head videos | Edit video through the transcript | Dialogue-heavy creators |
CapCut | Reels, TikTok & YouTube Shorts | Fast social-first editing, captions and automation | Social media creators |
Adobe Premiere Pro | Professional video editing | AI assistance inside a full professional timeline | YouTubers, agencies & professional editors |
OpusClip | Turning long videos into Shorts | Automatically finds and repurposes useful moments | Podcasters, webinars & long-form creators |
Wondershare Filmora | Beginner-friendly AI editing | AI assistance inside an easy traditional editor | Beginners & growing creators |
We evaluated each editor around the work a creator actually has to do, not around the number of buttons labelled AI. The main checks were:
- Workflow fit: Does the tool solve the type of editing job it claims to solve?
- Real time saved: Does AI remove repetitive work or simply move it somewhere else?
- Control and recovery: Can you review, undo or manually correct what the AI changes?
- Output cleanup: How much transcript, pacing, framing, caption or timeline cleanup is still required?
- Instruction quality: Can you give the AI enough context to get a predictable first pass?
- Free/trial usefulness: Can you meaningfully evaluate the workflow before paying, and what are the practical limits?
Which AI Video Editor Should You Choose in 2026?
After reviewing all five tools, the most useful comparison is not feature count. It is where each editor removes the most friction from a real workflow.
DECISION RULE
Start with your bottleneck. If dialogue cleanup is slow, choose for dialogue. If finding clips is slow, choose for discovery. If finishing quality is the priority, choose for control.
Tool | Best For | Biggest Advantage | Main Trade-Off |
Descript | Podcasts, interviews, talking-head videos | Transcript-first editing | Less depth for colour, motion graphics and frame-level finishing |
CapCut | Reels, TikTok and YouTube Shorts | Fast social-first workflow | Not ideal for complex professional post-production |
Adobe Premiere Pro | Professional YouTube, documentaries, branded and client work | Deepest control with AI around the workflow | Highest learning curve |
OpusClip | Repurposing podcasts, webinars and long videos | Finds moments worth clipping | Not a full replacement for a complete editor |
Filmora | Beginners, YouTubers, tutorials and everyday creator work | Traditional editing with a lower learning barrier | Less depth than Premiere for advanced finishing |
HOW TO USE THIS TABLE
A trade-off is not a flaw. It usually means the tool is optimized for a different job. The goal is to pick the editor whose strongest area matches the work you do most often.
Side-by-Side Workflow Scorecard
Scores below reflect the workflow we evaluated in this guide, not an absolute quality rating. Use them to compare fit for a specific task.
Editing Need | Descript | CapCut | Premiere | OpusClip | Filmora |
Dialogue-heavy editing | 5/5 | 3/5 | 5/5 | 2/5 | 4/5 |
Reels / Shorts workflow | 4/5 | 5/5 | 4/5 | 5/5 | 4/5 |
Long-form editing | 4/5 | 3/5 | 5/5 | 2/5 | 4/5 |
Automatic clip discovery | 3/5 | 3/5 | 2/5 | 5/5 | 2/5 |
Transcript-based editing | 5/5 | 4/5 | 5/5 | 2/5 | 4/5 |
Manual timeline control | 3/5 | 4/5 | 5/5 | 2/5 | 4/5 |
Professional colour/audio | 2/5 | 2/5 | 5/5 | 1/5 | 3/5 |
Beginner friendliness | 4/5 | 5/5 | 2/5 | 5/5 | 5/5 |
AI-guided workflow | 5/5 | 4/5 | 4/5 | 5/5 | 5/5 |
Client / professional work | 3/5 | 3/5 | 5/5 | 3/5 | 4/5 |
QUICK INTERPRETATION: 5/5 means the task is a core strength in the workflow we reviewed. A 2/5 or 3/5 does not mean the tool cannot do it; it means another tool in this shortlist is usually a better first choice.
Same 45-Minute Interview, Five Different Winners
One project makes the differences easier to see. Imagine you have a 45-minute expert interview. The best tool changes depending on what you need to do next.
Next Job | Best Choice | Why |
Clean the complete interview | Descript | The bottleneck is spoken content: false starts, repeated answers, filler words and restructuring. |
Turn it into a polished 15-minute YouTube episode | Adobe Premiere Pro | The job now needs B-roll, graphics, audio, colour, pacing and precise finishing. |
Make one already-selected moment into a Reel | CapCut | The remaining work is trim, reframe, caption, style and export. |
Find 10 possible Shorts inside the original interview | OpusClip | The hard part is discovery: identifying complete standalone moments quickly. |
Edit it yourself without a steep professional learning curve | Filmora | You still get a real timeline, while AI Mate and task-specific tools reduce the learning barrier. |
Choose Based on Your Biggest Bottleneck
If You're Thinking… | Start With |
“Finding and cutting dialogue takes forever.” | Descript |
“I need to produce Shorts and Reels quickly.” | CapCut |
“I need complete control over a professional edit.” | Adobe Premiere Pro |
“I spend too long searching long videos for clips.” | OpusClip |
“I want a proper editor that is not overwhelming.” | Filmora |
“I repurpose podcasts or webinars every week.” | OpusClip |
“I edit for clients, brands or commercial projects.” | Adobe Premiere Pro |
“I want AI help but still want to learn a normal timeline.” | Filmora |
Our Picks by Category
| Descript: Best for Podcasts & Interviews | Pick it when the words are the edit. Transcript-first cutting removes the most friction from dialogue-heavy footage. |
| CapCut: Best for Reels, TikTok & Shorts | Pick it when speed to a social-ready vertical video matters more than advanced post-production depth. |
| Adobe Premiere Pro: Best for Professional Editing | Pick it when you need the highest ceiling for timeline control, audio, colour, graphics and client-ready finishing. |
| OpusClip: Best for Long Video → Shorts | Pick it when finding the right 30–60 seconds is more time-consuming than editing those seconds. |
| Wondershare Filmora: Best for Beginners | Pick it when you want a conventional editor with enough AI guidance to reduce the learning curve. |
Which One Would We Choose?
If we had to choose one tool for the widest range of professional editing work, we would choose Adobe Premiere Pro. It has the highest ceiling and the most room to grow. But that does not make Premiere the smartest choice for every workflow. A podcaster may finish faster in Descript. A social creator may get more value from CapCut. A content team repurposing long recordings may save more time with OpusClip. A newer editor may be more productive in Filmora.
FINAL RECOMMENDATION: Do not choose the AI editor with the longest feature list. Choose the one that removes the most expensive or repetitive part of your current workflow.
Before You Pay: Three Checks That Prevent the Wrong Choice
| 1. Test your real footage, not a demo file | A tool can look impressive on a polished sample and still struggle with your accent, audio quality, interview format or shooting style. |
| 2. Measure cleanup after AI | Do not judge only how quickly the first result appears. Count how much manual correction is still required before you would publish it. |
| 3. Check the access model you will actually use | Free plans, AI credits, watermarks, export limits and beta features can change. Confirm the current plan before building a recurring workflow around one feature. |
1. Descript — Best for Podcasts, Interviews and Talking-Head Videos
BEST FOR: Podcasts, interviews, talking-head videos, webinars, tutorials and screen recordings STANDOUT FEATURE: Edit video by editing the transcript AI ASSISTANT: Underlord FREE PLAN: Yes — 60 media minutes/month, 100 one-time AI credits, 720p export SKIP IT IF: Your edit depends heavily on colour grading, motion graphics or frame-level timing |
Descript is a text-based AI video editor built for workflows where speech drives the edit.Its transcript-based video editing workflow lets you remove or rearrange spoken content by working directly with the transcript. Upload or record your footage and it generates a transcript linked directly to the media. Delete a paragraph and the corresponding video disappears. Move a sentence and the clip moves with it.
If you have ever scrubbed through a timeline just to find where someone restarted a sentence, this transcript-first workflow is the reason Descript feels different.
Underlord sits on top of that workflow as Descript's AI co-editor. Instead of only clicking individual editing tools, you can describe the video you want, who it is for, what should stay and what should be removed. The more context you provide, the more useful the edit becomes.
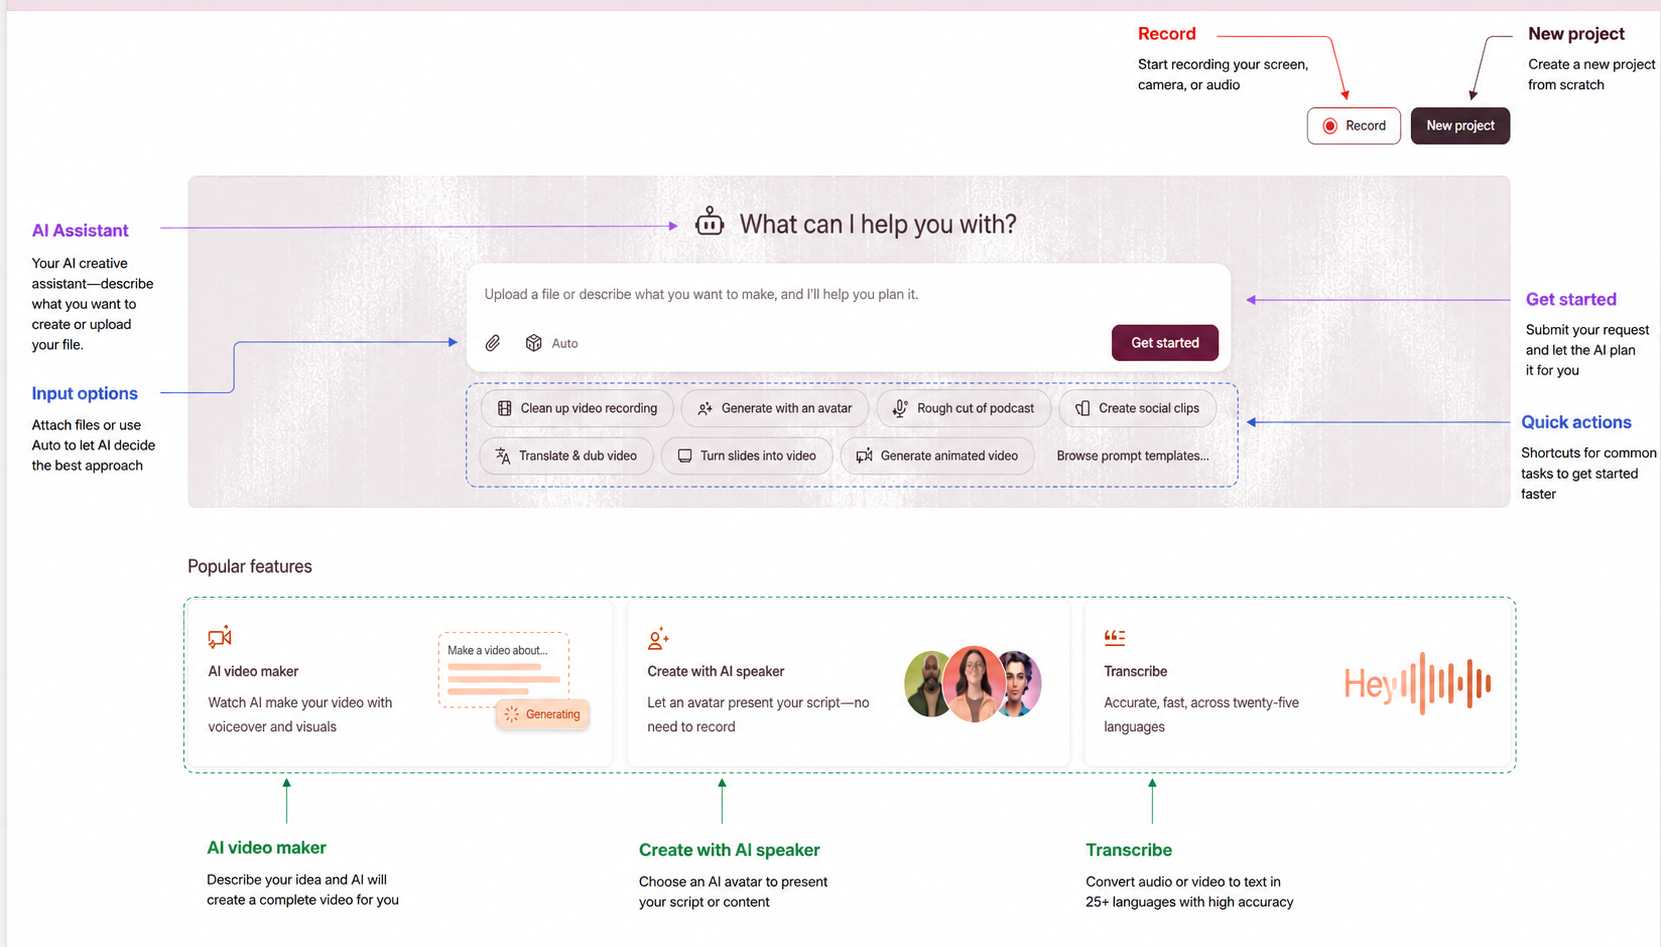 Figure 1. Descript home screen: AI assistant, upload/record options and common quick actions.
Which Feature Does Which Job?
Use the feature that matches the editing problem instead of running every AI tool on every project.
If you need to… | Use | Best for / Why |
Cut mistakes or unnecessary dialogue quickly | Text-Based Editing | Best first step for dialogue-heavy footage |
Give AI a broader editing task | Underlord | Rough cuts, cleanup and iterative edits |
Remove ums, uhs and verbal clutter | Remove Filler Words | Unscripted interviews and podcasts |
Remove repeated or abandoned takes | Remove Retakes | Talking-head videos and tutorials |
Tighten awkward pauses | Shorten Word Gaps | Slow or uneven spoken delivery |
Improve weak recorded dialogue | Studio Sound | Home, remote or noisy recordings |
Pull short clips from longer footage | Create Clips | Podcasts, webinars and long-form video |
Add subtitles | Captions | Reels, Shorts, tutorials and accessibility |
Record a tutorial from scratch | Screen / Webcam Recording | Demos, walkthroughs and training |
Make precise finishing changes | Timeline Editor | B-roll, music, transitions and final timing |
FREE-PLAN REALITY: Underlord and Descript's other AI-powered editing actions use AI credits. If Underlord calls another AI tool while completing a request, that action can consume additional credits too. Treat the Free plan as a test bench for short projects, not a way to process an entire podcast season. |
Descript Prompt Playbook: Match the Prompt to the Job
A useful Underlord prompt answers three questions: What can go? What must stay? What is the finished video for? That last point matters. Removing “unnecessary content” from a beginner tutorial requires very different judgment from cutting a 40-second Reel.
Podcast, Interview or Webinar: “Tighten this recording by removing false starts, repeated answers and unrelated tangents. Keep complete answers and enough surrounding context to preserve the speaker's meaning. Remove distracting filler words but keep natural pauses and conversational pacing.” WATCH FOR: A sentence that gives an answer its context being removed along with the tangent. |
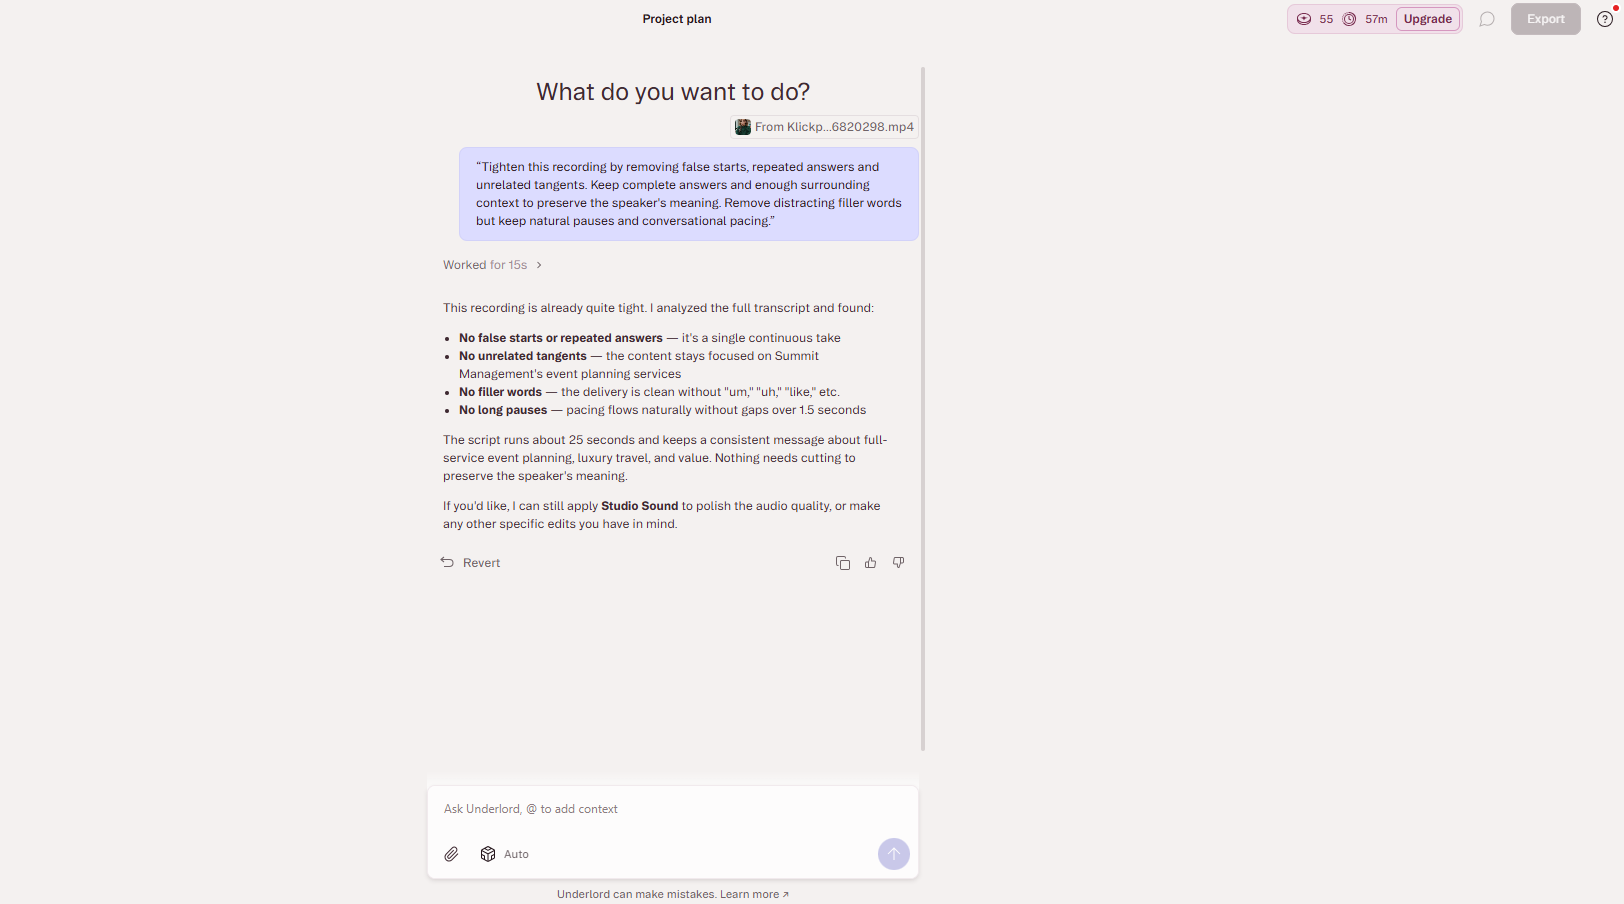 Figure 2. Underlord reviewed a clean recording and correctly found no filler words, repeated answers or long pauses worth cutting.
TIP: If Underlord says the recording is already clean, don't keep rewriting the prompt just to force a shorter edit. Move to the next genuine problem — audio, captions, framing or visual polish. |
Talking-Head YouTube Video “Turn this into a concise YouTube video for beginners. Keep the main explanation, practical examples and important supporting points. Remove failed takes, repeated explanations and unnecessary setup. Tighten long pauses but keep the speaker natural and conversational.” TIP: If you genuinely need a target runtime, include it. “Reduce this 8-minute recording to approximately 5–6 minutes” gives Underlord a real editing target. “Make it shorter” does not. |
Tutorial or Course Video “Edit this as a beginner-friendly tutorial. Keep every required step in the correct order and preserve demonstrations viewers need to complete the task. Remove failed attempts, waiting time and repeated explanations. Leave enough time around important on-screen actions for viewers to follow them.” WATCH FOR: Over-trimmed loading screens or demonstrations that genuinely need a few seconds of dwell time. |
What Happens When Your Prompt Doesn't Match the Video?
Underlord does not always blindly execute the instruction. In one of our tests, we gave it a tutorial-editing prompt, but the uploaded file was actually a short real-estate promotional video. Instead of pretending to perform a tutorial edit, it identified the mismatch and explained that the footage contained no step-by-step demonstration, screen actions, failed attempts or waiting time to remove.
It suggested edits that better matched the footage:
- tighten pacing
- clean filler words or retakes
- add captions
- apply Studio Sound
- add background music or graphics
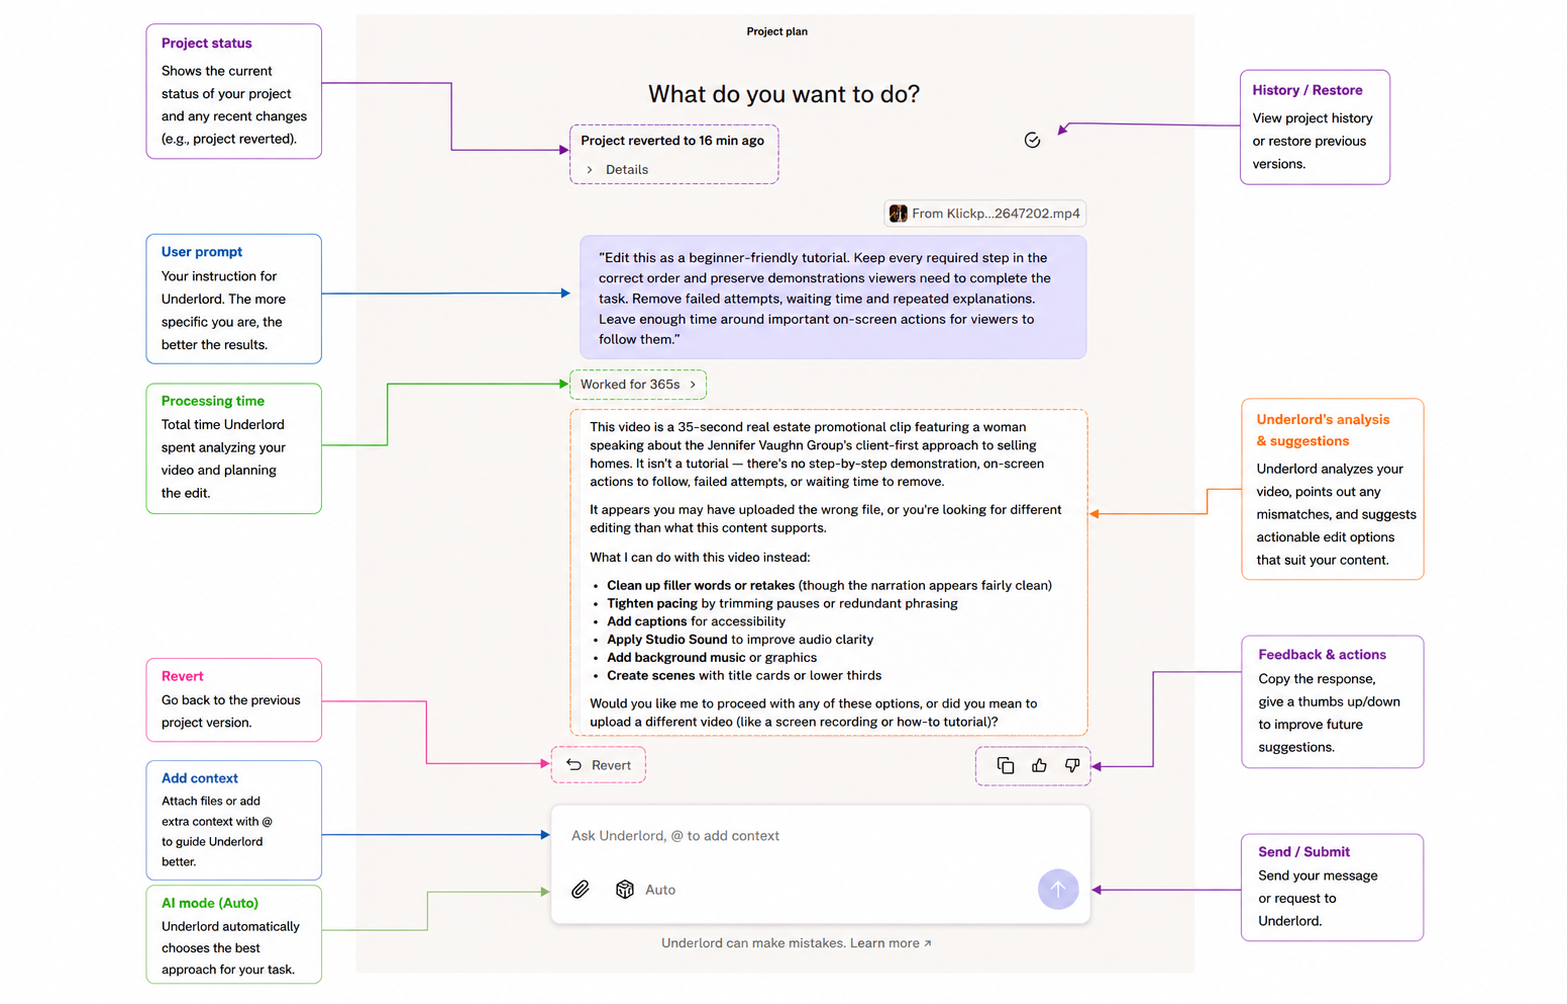 Figure 3. Underlord recognised that the tutorial prompt did not match the promotional footage and suggested more relevant editing actions.
TIP — MATCH THE PROMPT TO THE FOOTAGE: Interview: ask for answer cleanup and context preservation. Tutorial: protect the steps and demonstrations. Promotional video: focus on pacing, message clarity, captions and visual polish. Long podcast: ask for highlights, repetition removal or standalone clips. A detailed prompt is only useful when it describes the job that actually exists in the footage. |
Shorts and Reels “Find three standalone moments between 30 and 50 seconds. Each should begin with a statement or question that makes sense immediately, cover one complete idea and end with a useful takeaway. Do not select clips that depend on something said earlier.” WATCH FOR: Clips beginning with “as I mentioned earlier…”. The quote may be strong, but the Short will lack context. |
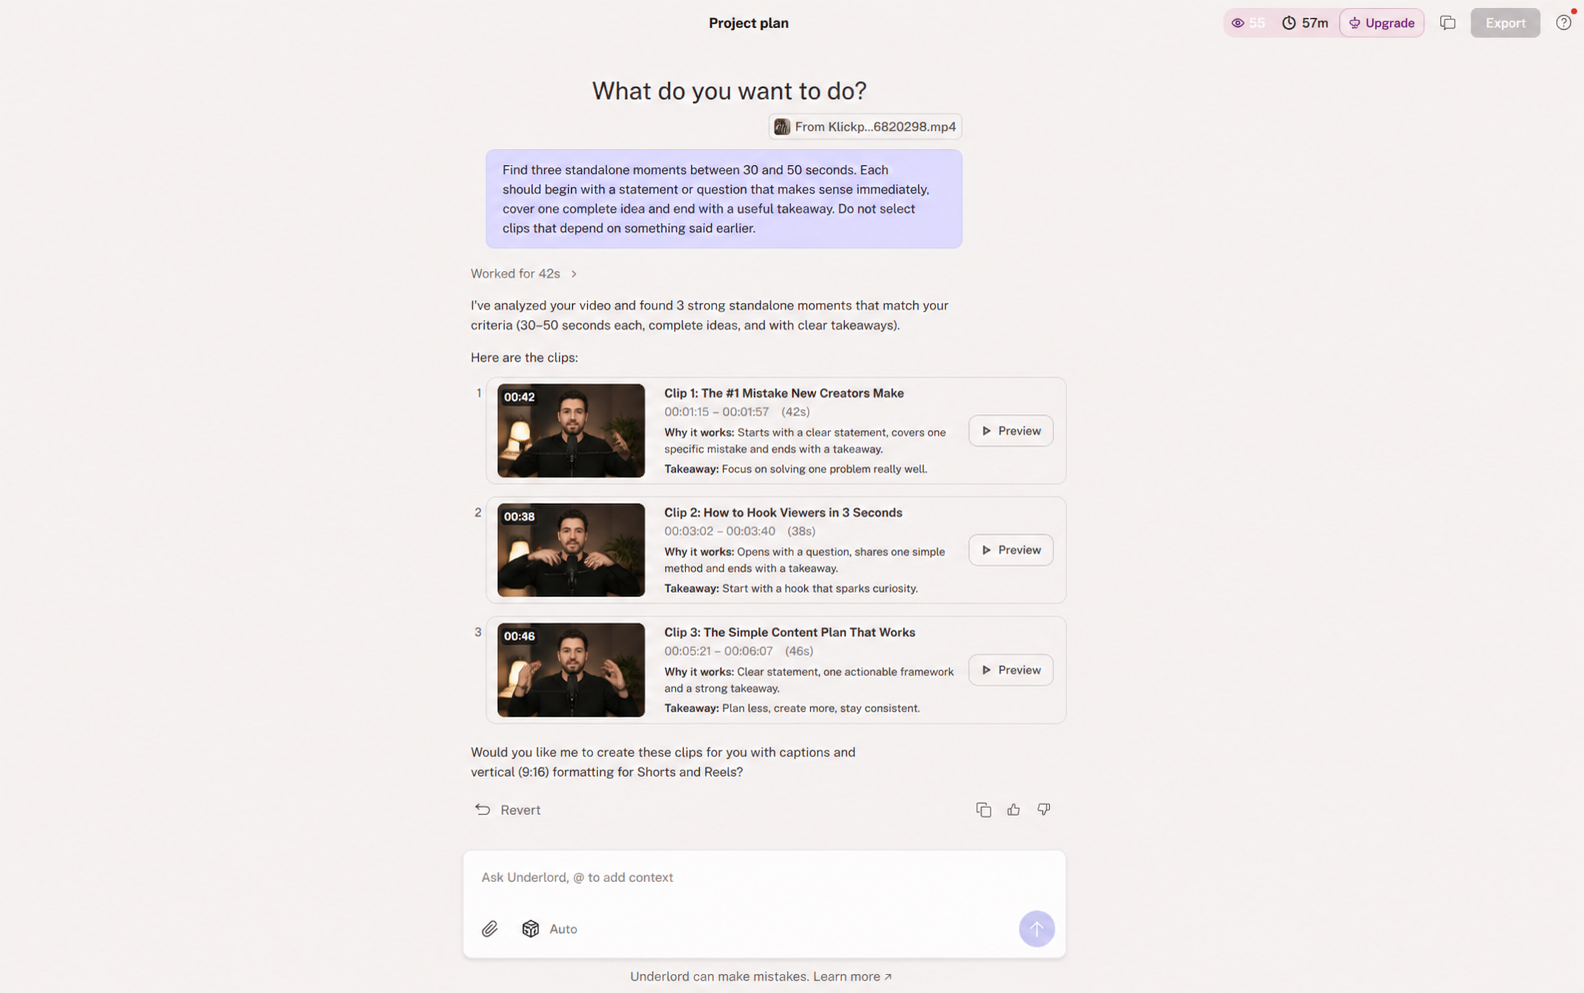 Figure 4. Example result: Underlord identifies three standalone moments and explains why each clip works.
What If Descript Can't Detect the Speech?
One test exposed an important limitation. Underlord could see the video, but Descript failed to generate a usable speech transcript. Without that transcript, it could not reliably identify failed takes, repeated explanations or specific tutorial steps.
It could still suggest basic cleanup such as Studio Sound, trimming dead air and checking long pauses, but transcript-dependent editing was effectively blocked.
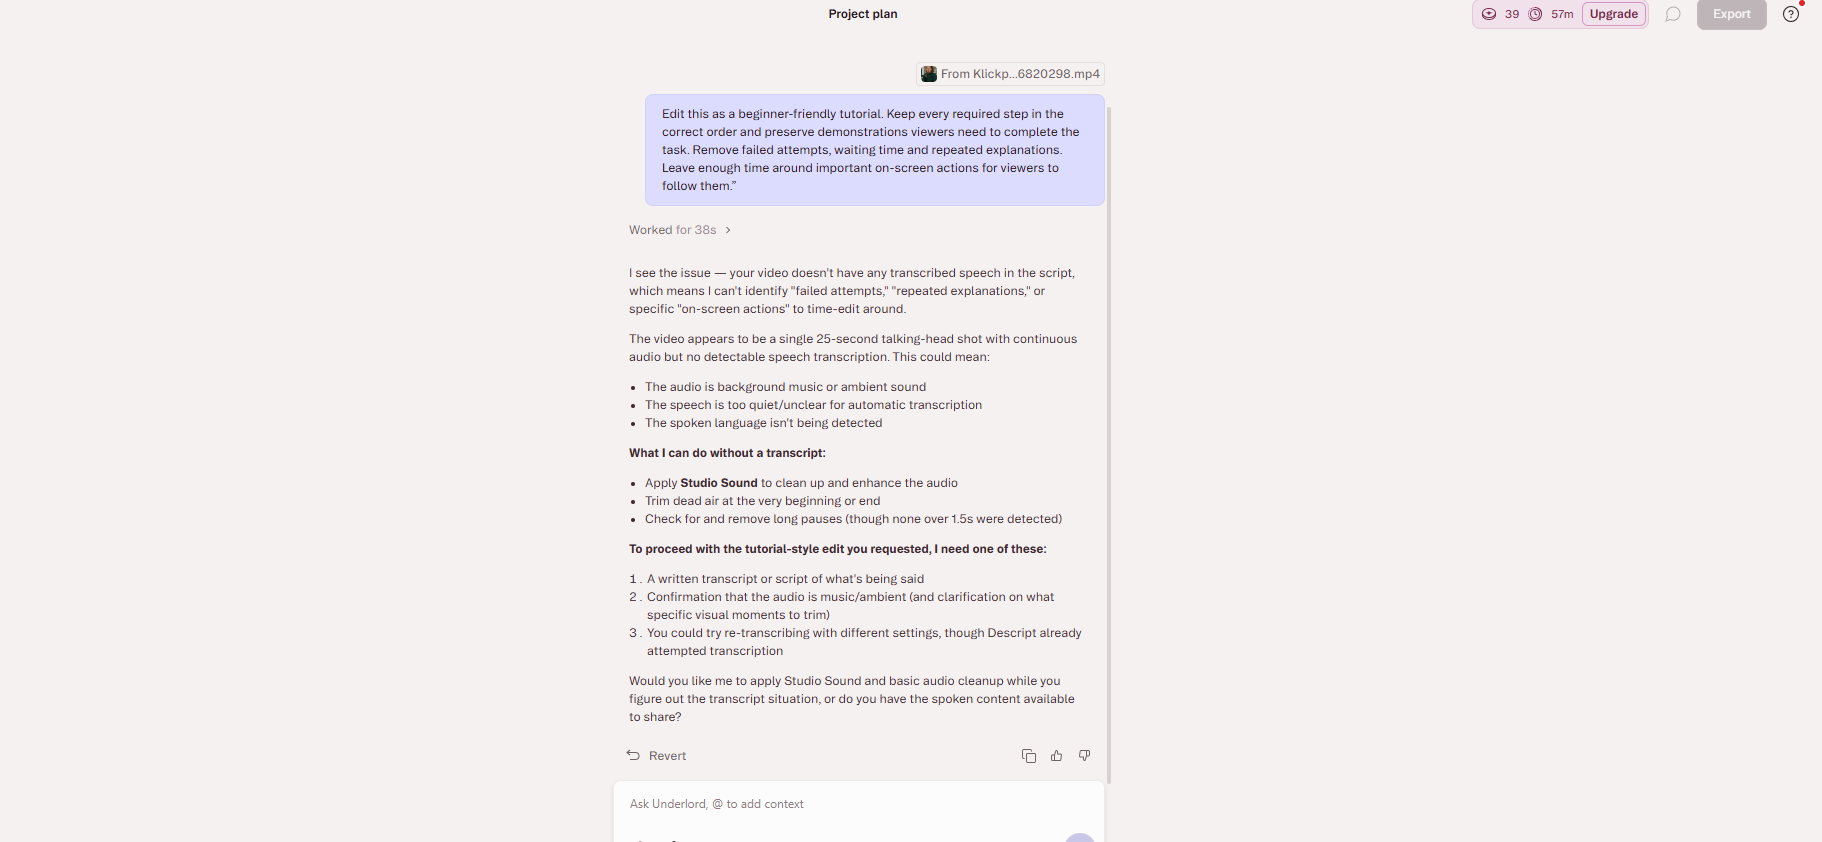 Figure 5. When Descript could not detect a usable transcript, Underlord limited itself to audio and timing cleanup instead of pretending it could perform transcript-based edits.
TIP: Before spending AI credits on a detailed editing prompt, confirm that Descript has correctly transcribed the speaker. If the transcript is missing or inaccurate, fix the language or audio issue first.
Two Follow-Up Prompts Worth Saving
If Underlord cuts too deeply “Keep the current shorter edit, but restore any examples, qualifications or sentences required to understand the main point.” |
If you are not sure what went wrong “Review the current edit and identify any abrupt cuts, repeated ideas, missing context or pacing issues. Suggest changes before applying them.” TIP: This turns Underlord into a co-editor that diagnoses the problem before changing the project. |
We tested Descript with a short 9:16 talking-head video using the Free plan. First, we uploaded the clip and checked the automatically generated transcript for obvious errors.
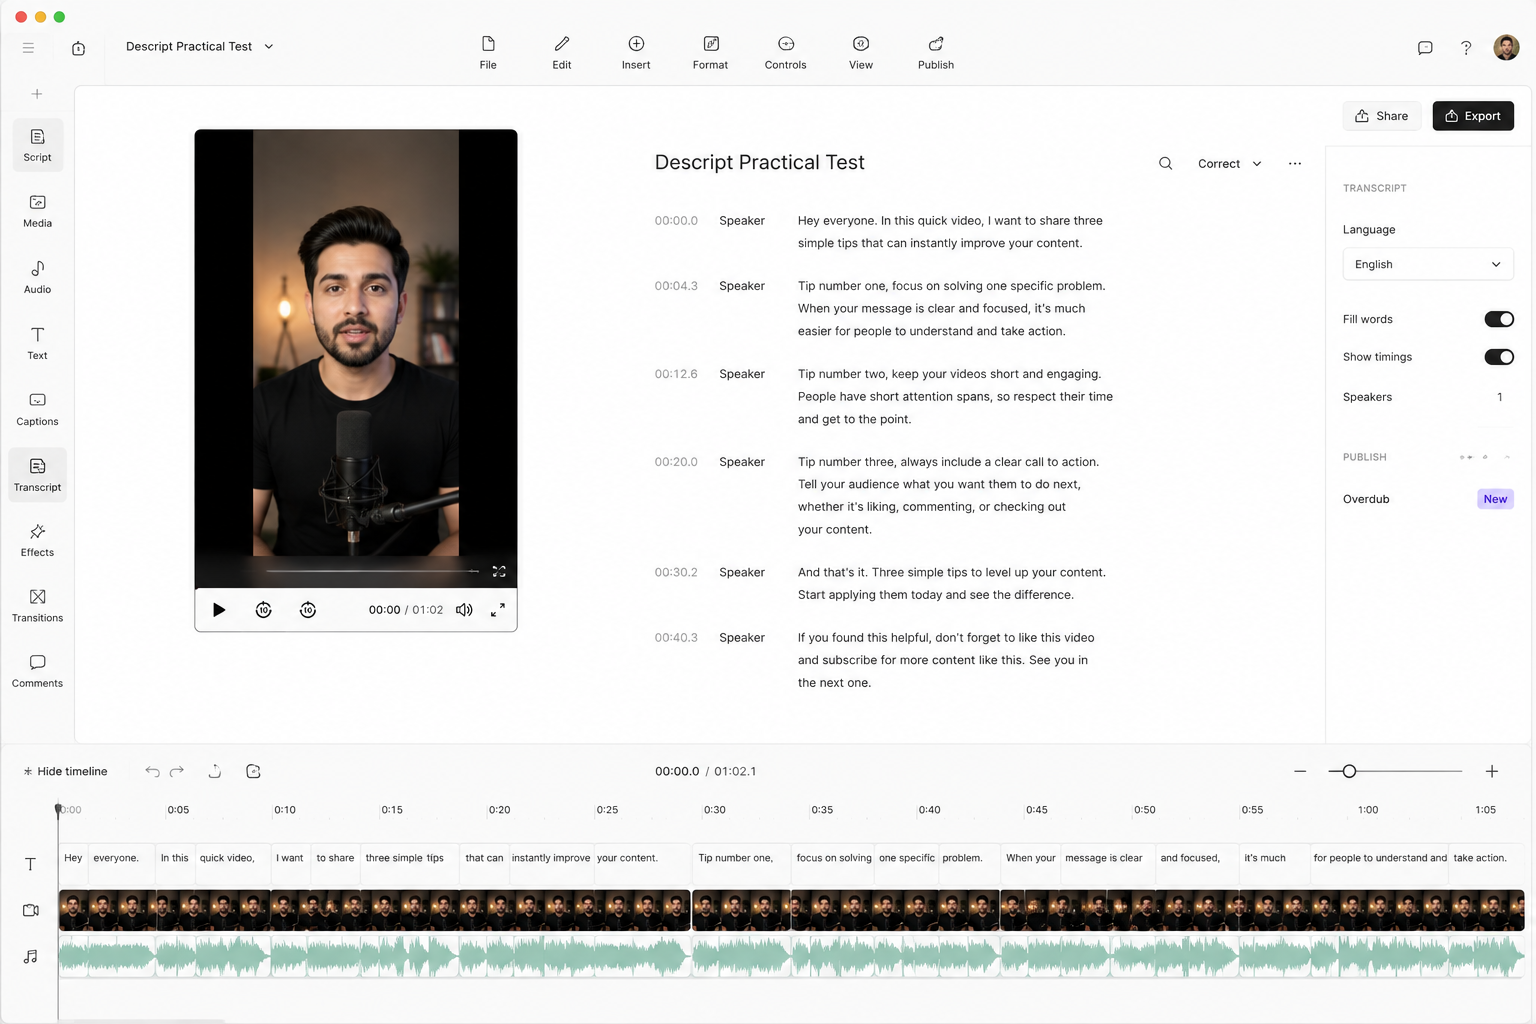 Figure 6. Original talking-head clip with the generated transcript and timeline visible.
Then we gave Underlord one focused task:
| Test prompt: “Edit this short vertical talking-head video for Instagram Reels and YouTube Shorts. Remove unnecessary pauses, false starts and repeated words, but keep the speaker's explanation complete and natural. Preserve the 9:16 format and avoid cuts that make the speech sound rushed or change its meaning.” |
TEST RESULT • The footage was already fairly clean, so Underlord did not force a dramatic edit. • It mainly tightened word gaps and reduced the runtime slightly while leaving the dialogue largely intact. • The useful outcome was less manual cleanup — not a maximum number of AI changes. |
The goal is not to make AI change as much as possible. It is to remove editing work where a change is actually useful. On decent source footage, a slightly tighter version of the edit you would have made manually can be the better outcome.
ESSENTIAL CHECK: Correct misheard names, technical terms and important phrases in the transcript before making larger edits. A transcript error can easily become a caption error — or a bad edit later in the workflow.
Descript Tips Worth Knowing
Delete the obvious yourself. Do not spend AI credits asking Underlord to remove one sentence you can highlight and delete from the transcript in seconds. |
Protect important context explicitly. For interviews, medical content, technical tutorials or expert videos, tell Underlord which explanations, qualifications or steps must remain. |
Do not remove every filler word. A transcript can look cleaner while the actual speaker starts sounding robotic. Remove distracting filler, not every natural imperfection. |
Give one major editing task at a time. Start with the rough cut. Review it. Then improve audio, captions or clips. This makes it easier to see which action caused a poor result. |
Refine, then finish on the timeline. If the edit is 80% right, tell Underlord what the remaining 20% needs. Re-running the original prompt wastes credits. Use the timeline for precise B-roll timing, music, transitions and small audio fixes. |
2. CapCut — Best for Reels, TikTok and YouTube Shorts
BEST FOR: Reels, TikTok, YouTube Shorts, talking-head social videos, vlogs, product clips and quick tutorials
STANDOUT FEATURE: Auto Cut for fast social-first edits
AI WORKFLOW: Auto Cut + Auto Captions + Transcript-Based Editing
FREE ACCESS: Core editing and captions are available; some advanced AI tools require Pro or credits
SKIP IT IF: You need deep long-form post-production, advanced colour work or highly precise professional audio control |
CapCut is one of the strongest AI video editors for social media, particularly when the goal is to move quickly from raw footage to Reels, TikTok videos or YouTube Shorts. You still have a normal timeline for trimming, layering, text, audio and manual adjustments, but its AI tools can remove repetitive work around pacing, captions and repurposing.
The most useful example is Auto Cut. On Desktop, it can build an automatic edit using Beat Sync for music-driven footage, Speech Pause Detection for talking-head or vlog content and, in supported versions, AI Script Mode for text-led instructions. Auto Cut is available on Desktop and Mobile, but not on CapCut Web.
ACCESS NOTE: CapCut is not available locally in India. The interface images in this guide are illustrative CapCut-style mockups based on current Desktop workflows, so menus and feature availability may vary by version, account and region.
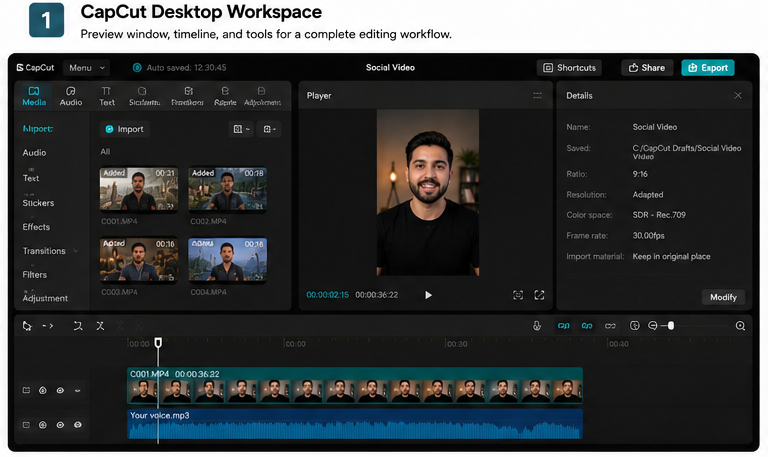 Figure 1. CapCut Desktop-style workspace showing the preview, media library and timeline. Illustrative UI mockup; interface may vary by version or region.
Which Feature Does Which Job?
Use the feature that matches the editing problem instead of running every AI tool on every clip.
If you need to… | Use | Best for / Why |
Turn raw clips into a fast social edit | Auto Cut — Beat Sync | Music-driven montages, travel, fashion and lifestyle clips |
Tighten a talking-head or vlog | Auto Cut — Speech Pause Detection | Spoken videos where pauses slow the pace |
Describe an automatic edit | AI Script Mode (where available) | Prompt-led edits in supported versions/accounts |
Cut spoken content through text | Transcript-Based Editing | Interviews, talking-heads and tutorials |
Remove filler words from dialogue | Transcript-Based Editing | Unscripted speech and quick cleanups |
Generate subtitles quickly | Auto Captions | Reels, Shorts, TikTok and accessibility |
Turn a long video into several Shorts | Long Video to Shorts / AI Clip Maker | Podcasts, webinars and long YouTube videos |
Keep a subject centred when reframing | Auto Reframe — Pro | Changing aspect ratios while tracking the subject |
Fix AI cuts or caption timing precisely | Timeline Editor | Final manual cleanup and pacing |
Free vs Paid: What Actually Matters
Free access is enough to understand the core CapCut workflow. The bigger difference is that some advanced AI functions are Pro-gated or credit-based, so check the badge or credit prompt before building a workflow around a specific feature.
Free access | Pro / paid access |
Importing, timeline editing, transcription, Auto Captions and core social editing | Advanced AI tools, higher limits, Pro-gated features such as Auto Reframe and some credit-based actions |
Best for testing the workflow and creating straightforward social edits | Best when AI automation, subject tracking or premium effects materially save time |
PRACTICAL RULE: Do not pay for an AI feature just because it exists. If a simple manual crop, trim or caption correction takes seconds, use the basic tool. Upgrade when the automation genuinely saves repeated work. |
CapCut Prompts for Different Editing Jobs
CapCut is less universally prompt-driven than Descript. Use these instructions directly when AI Script Mode or a prompt field is available; otherwise treat them as an editing brief for Auto Cut, transcript and caption settings.
Talking-Head Reel or YouTube Short “Turn this into a 35–45 second vertical video. Keep one complete idea and the strongest takeaway. Remove repeated setup, unnecessary pauses and failed starts, but keep the speaker natural. Start with the strongest statement that makes sense without earlier context.” Use: Speech Pause Detection + Auto Captions Watch for: AI making every pause disappear. A short video can still sound rushed. |
Vlog or Lifestyle Reel “Create a 25–30 second energetic highlight reel using the strongest visual moments. Keep shots varied, avoid placing similar clips back-to-back and cut naturally around the music beat. End on the clearest final moment.” Use: Auto Cut — Beat Sync Watch for: A visually fast edit with no story. Beat-matched cuts are useful, but not every beat needs a new shot. |
Podcast or Interview Clip “Create a 45–60 second vertical clip around one complete answer. Keep enough context for viewers to understand the point without hearing the full conversation. Remove repetition and long pauses, but do not cut the speaker in a way that changes the meaning.” Use: Transcript-Based Editing + Auto Captions Watch for: Clips starting halfway through an answer. |
Tutorial or Product Demo “Turn this into a concise vertical tutorial. Keep every action viewers need to follow the process. Remove waiting time, failed attempts and repeated explanation, but leave enough time for viewers to see each important click or product action.” Use: Timeline + Transcript-Based Editing + Auto Captions Watch for: Cutting screen actions faster than someone can actually follow them. |
Product or Promotional Reel “Create a short product video that starts with the problem or finished result, then shows how the product solves it. Keep the clearest demonstration and strongest benefit. Remove setup or repeated shots that do not support the message.” Use: Auto Cut + manual timeline refinement Watch for: AI prioritising flashy shots instead of the footage that actually proves the product benefit. |
Long Video to Shorts “Find several standalone moments from this recording. Each clip should focus on a different idea, begin with enough context to understand the topic and end with a clear takeaway. Avoid creating multiple clips that repeat the same point.” Use: Long Video to Shorts / AI Clip Maker Watch for: A well-cropped clip that still starts without context or ends before the takeaway. |
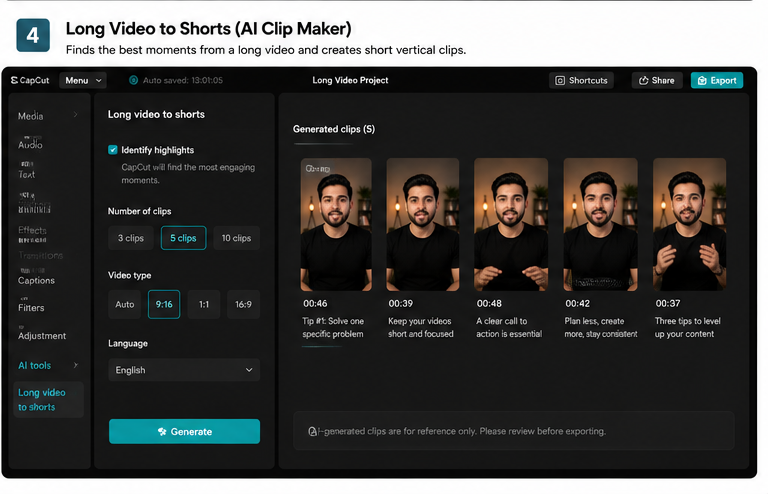 Figure 2. Long Video to Shorts-style workflow showing several generated vertical clips from one longer source. Illustrative UI mockup.
Choose the Right Auto Cut Mode
Auto Cut becomes more useful when the mode matches the footage. Do not simply press Generate and assume every mode solves the same problem.
| BEAT SYNC: Use it for travel, fashion, food, lifestyle, montages and other visually driven footage where music sets the rhythm. |
| SPEECH PAUSE DETECTION: Use it for talking-head videos, interviews, vlogs and voiceover-heavy clips where pauses are the main pacing issue. |
| AI SCRIPT MODE: Use it when your version exposes a text-command workflow and you have a specific brief, such as: “Make a 30-second energetic highlight reel. Start with the strongest visual moment, keep the pacing fast and avoid repeated shots.” |
Figure 3. Auto Cut-style panel with Speech Pause Detection selected for a talking-head edit. Illustrative UI mockup.
WATCH FOR: AI text-command features are still version- and account-dependent. If the option is missing, use the instruction as a manual editing brief rather than assuming the feature is broken. |
Auto Captions: Useful, but Never Publish Them Blindly
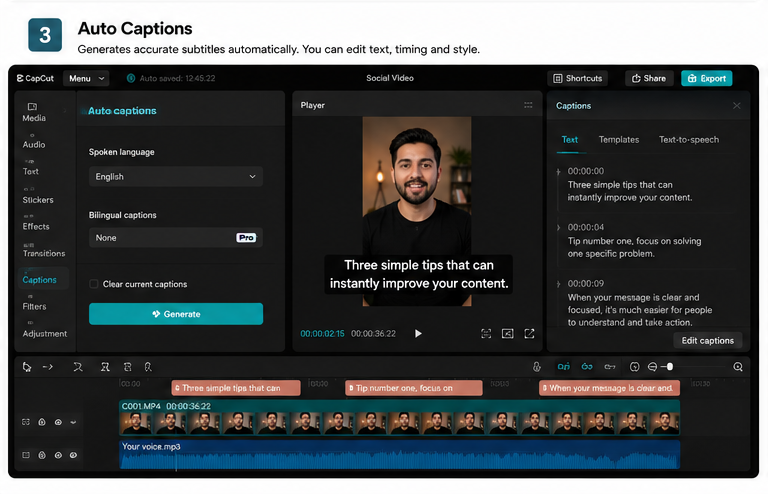
For social video, Auto Captions are one of CapCut's most practical features. On Desktop, the workflow is straightforward: Captions → Auto Captions → choose the audio source and language → Generate. Then correct the wording, timing and styling before export.
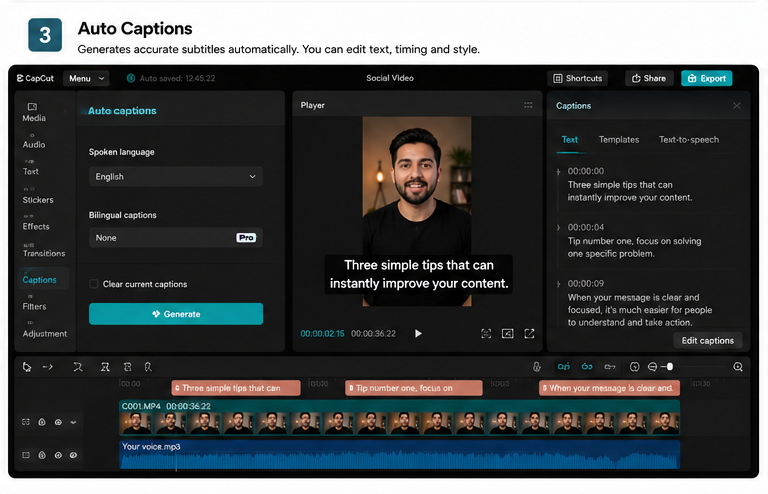 Figure 4. Auto Captions-style workflow with generated subtitle text beside a vertical talking-head clip. Illustrative UI mockup.
Before exporting, check:
- Names and product names
- Technical terminology
- Numbers, prices and dates
- Punctuation and awkward caption breaks
- Captions covering the speaker or important visuals
- Too much text appearing at once
TIP: Fix the words first, then style them. There is little value in perfect animation around an incorrect subtitle.
Practical Workflow: How to Test CapCut on a Short Social Video
Because CapCut is not locally available for our India-based test environment, use this as a reproducible test setup rather than a claimed hands-on result. Use the same short 9:16 talking-head clip you tested in Descript so the comparison stays fair.
Step 1 — Import and Generate Captions
Import the vertical clip into CapCut Desktop and generate Auto Captions. Correct names or important terms before testing any pacing automation.
WHY FIRST?: Caption errors are easier to fix before you start cutting. If the transcript is wrong, an AI-assisted spoken edit may remove or retain the wrong material. |
Step 2 — Test the Social Edit
If Auto Cut → Speech Pause Detection is available, use it to create a tighter first pass. If AI Script Mode is available, try:
Test prompt: “Create a tighter version of this vertical talking-head clip for Instagram Reels and YouTube Shorts. Remove unnecessary pauses and repeated setup, but keep the speaker's complete explanation and natural delivery. Do not cut context just to make the video faster.” Use: Speech Pause Detection or AI Script Mode Watch for: Cuts that improve speed but damage context or natural delivery. |
Review the result against five questions:
- Did the edit reach the main point faster?
- Were the removed pauses genuinely unnecessary?
- Did any cut make the speaker sound rushed?
- Are captions accurate and easy to read on a phone?
- Would you have made fewer manual cuts yourself?
SIMPLE WORKFLOW: Import → Auto Captions → Auto Cut → Manual Review |
CapCut Tips Worth Knowing
- Choose the Auto Cut mode that matches the footage. Beat Sync suits music-driven edits; Speech Pause Detection is more relevant to spoken video.
- Do not confuse fast with engaging. Removing every pause or adding a transition every second can make a Reel harder to follow.
- Treat Auto Cut as the first pass. Review the generated sequence and manually trim, replace or delete clips where the AI made weak choices.
- Check captions manually. Names, jargon, prices and fast speech are common places for automatic subtitles to fail.
- Do not pay for Auto Reframe if a simple crop solves the job. Use subject-tracking automation when it genuinely saves repeated reframing work.
- Check the platform before looking for a feature. Auto Cut is currently associated with Desktop and Mobile workflows rather than CapCut Web.
- Watch AI-credit prompts. Some advanced AI actions can consume credits in addition to any Pro subscription.
- Review the idea, not just the crop. A perfectly reframed Short is still weak if it starts without context or ends before the takeaway.
BEST TAKEAWAY: Use CapCut when the repetitive work is social formatting: tightening pauses, generating captions, cutting to rhythm and repurposing footage. Let the AI build the first pass; keep the final pacing and storytelling decisions manual.
3. Adobe Premiere Pro — Best for Professional AI-Assisted Video Editing
BEST FOR: Professional YouTube, interviews, documentaries, branded content, commercials and multi-clip projects STANDOUT FEATURE: AI-assisted project setup and rough assembly without giving up the professional timeline AI ASSISTANT: Premiere AI Assistant — public beta FREE ACCESS: No permanent free desktop plan; 7-day full trial SKIP IT IF: You mainly need quick one-click social edits and do not need detailed timeline, colour or audio control |
Premiere Pro is the strongest fit here when AI should remove setup and repetitive work without taking creative control away from the editor. The timeline still matters, but newer AI features can organize footage, generate transcripts, find shots, build stringouts, clean dialogue, isolate subjects and even generate missing media inside the edit.
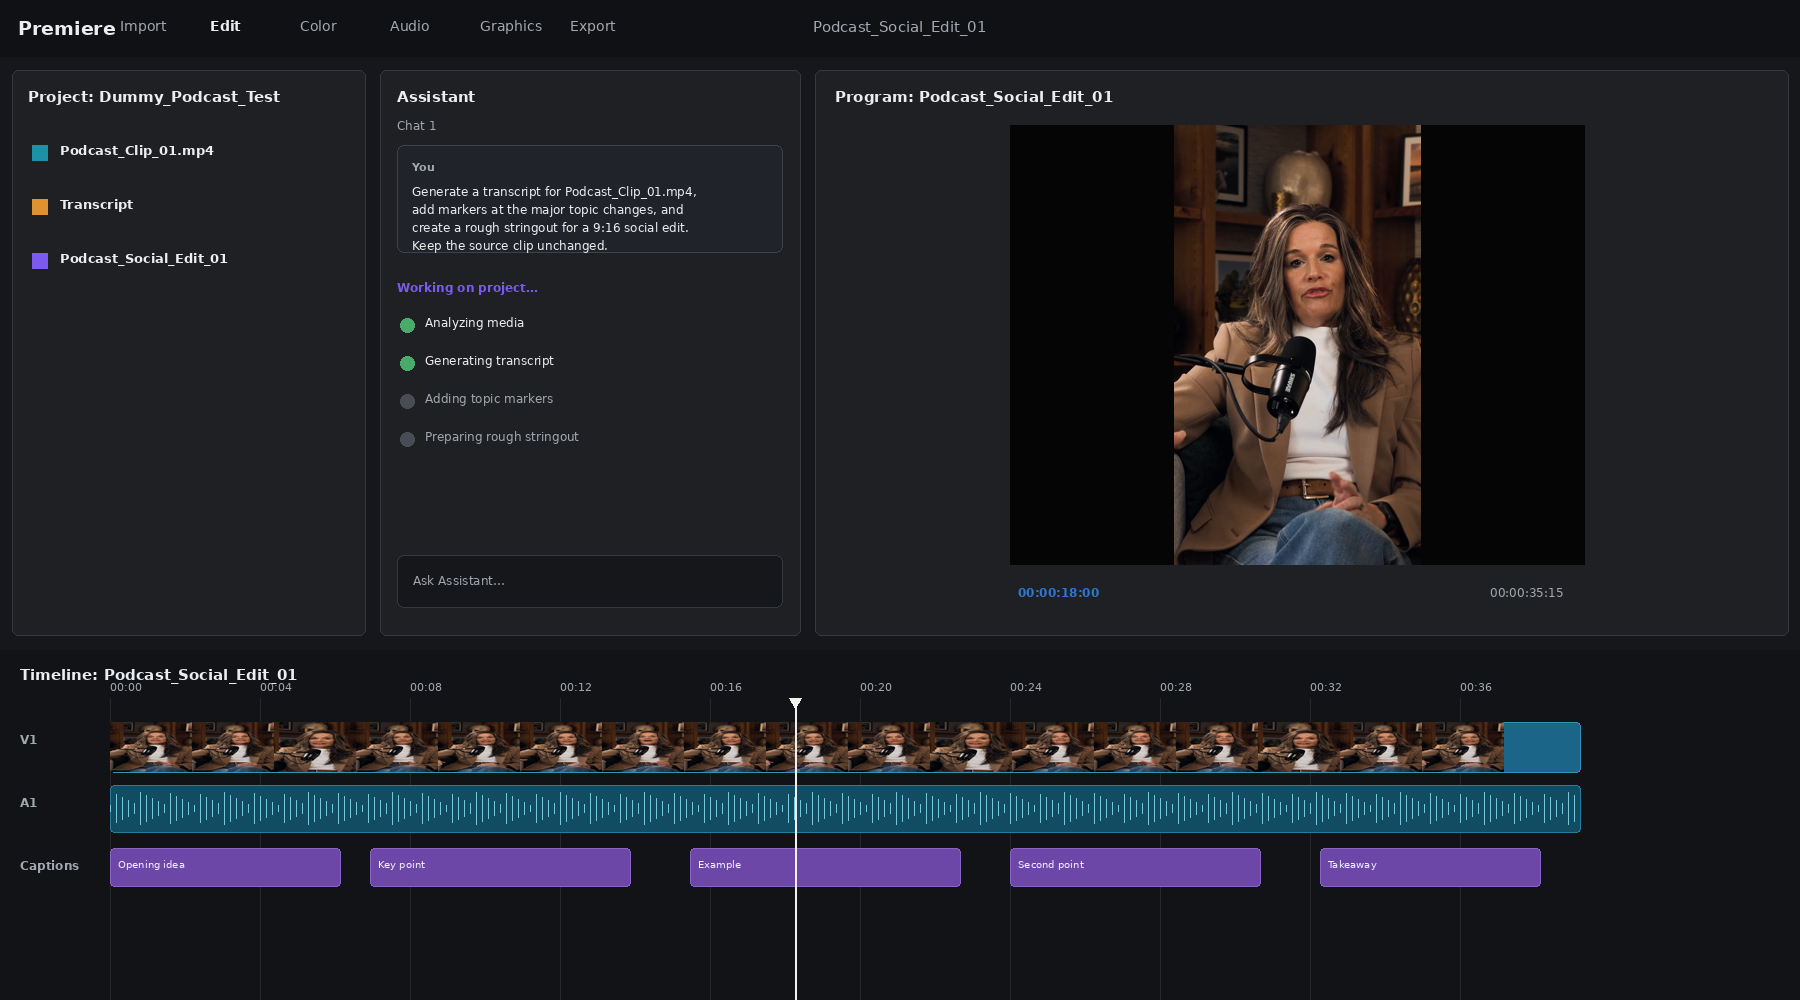
The biggest 2026 change is Premiere AI Assistant. In the current public beta, you can describe project tasks in natural language — for example, organizing clips into bins or building a rough stringout — and Premiere performs those actions directly inside the project. Every action stays editable and appears in Undo and History.
Figure 1. Premiere AI Assistant workflow recreated with the 35-second vertical dummy talking-head clip used in this guide. Interface layout follows Adobe's current Premiere documentation.
Which Feature Does Which Job?
Use the AI feature that matches the bottleneck. Premiere is most useful when each tool solves one specific part of a professional workflow.
If you need to… | Use | Why it matters |
Organize footage, create bins or prepare a rough assembly | AI Assistant (beta) | Removes repetitive project setup while keeping the sequence editable |
Cut dialogue from a transcript | Text-Based Editing | Fast rough cuts for interviews, documentaries and talking-head footage |
Find a specific shot in a large project | Media Intelligence | Search visuals, spoken text, metadata and audio instead of scrubbing every clip |
Find alternate takes that look similar | Search Similar Frames | Useful after you find one good frame and want related shots |
Improve weak dialogue | Enhance Speech | Reduces noise and improves vocal clarity inside Premiere |
Isolate and track a person or object | Object Mask | Speeds up blur, colour correction and selective effects |
Add a small amount of missing media | Generative Extend | Adds up to 2s of video or 10s of supported audio when a shot ends too early |
Generate new video or sound effects in the timeline | Generative Media Tool (beta) | Creates editable generated clips without leaving Premiere beta |
Make final creative decisions | Premiere Timeline | Full control over pacing, audio, colour, graphics and finishing |
BETA REALITY: Premiere AI Assistant is still in public beta and is currently optimized for English. Adobe provides complimentary daily AI Assistant credits during the beta; those credits are separate from the generative credits in a paid Premiere plan.
Free vs Paid: What Actually Matters
Premiere desktop does not have a permanent free plan. Adobe's 7-day trial is the full desktop application, so it is enough to test the workflow properly if you prepare the footage before the trial starts.
Access | 7-day trial | Premiere paid plan |
Desktop editing | Full app during trial | Full app + ongoing updates |
Generative credits | Trial follows current entitlement | 25 monthly on the standalone Premiere plan |
AI Assistant beta | Complimentary daily beta credits for eligible users | Same beta credits; separate from plan generative credits |
TRIAL TIP: Prepare your sample footage, interview clips and B-roll before starting the 7-day trial. That gives you the full week to test AI Assistant, search, Text-Based Editing and finishing tools instead of spending the first day hunting for media.
Premiere AI Prompt Playbook: Ask It to Prepare the Edit
Premiere AI Assistant is currently strongest at organization, media preparation and rough assembly. Ask it to build a better starting point — then use the timeline for the creative edit.
Podcast or Interview Use: AI Assistant + Text-Based Editing “Generate transcripts for the selected interview footage. Organize clips by speaker and create a stringout containing the usable interview sections in recording order. Add markers where the conversation moves to a new major topic.” Watch for: The stringout may be technically correct without being the best story. Review structure, pacing and context yourself. |
Talking-Head YouTube Video Use: AI Assistant + Text-Based Editing “Generate transcripts for these talking-head takes and build a rough assembly using the usable takes in recording order. Add markers at each major topic change so I can review the structure before tightening the edit.” Watch for: Do not let a rough assembly become the final cut by default. Use it to reach the creative decisions faster. |
Tutorial or Course Video Use: AI Assistant + project bins “Organize the selected media into talking-head, screen-recording and demonstration bins. Generate transcripts for spoken clips and build a rough assembly that follows the original instructional sequence.” Watch for: AI does not know how long a learner needs to see a menu, click or demonstration. Review instructional timing manually. |
Product or Brand Video Use: AI Assistant + Media Intelligence “Organize the footage into product close-ups, presenter shots, lifestyle footage and B-roll. Create a stringout containing the strongest usable shots from each group so I can review them before building the edit.” Watch for: Ask AI to organize and surface options first. Creative emphasis, shot order and brand tone still need human judgment. |
PROMPT RULE: For Premiere AI Assistant, prompts work best when they describe a project action: organize, transcribe, mark, string out, assemble. Vague creative requests such as “make this cinematic” are less useful than a concrete preparation task.
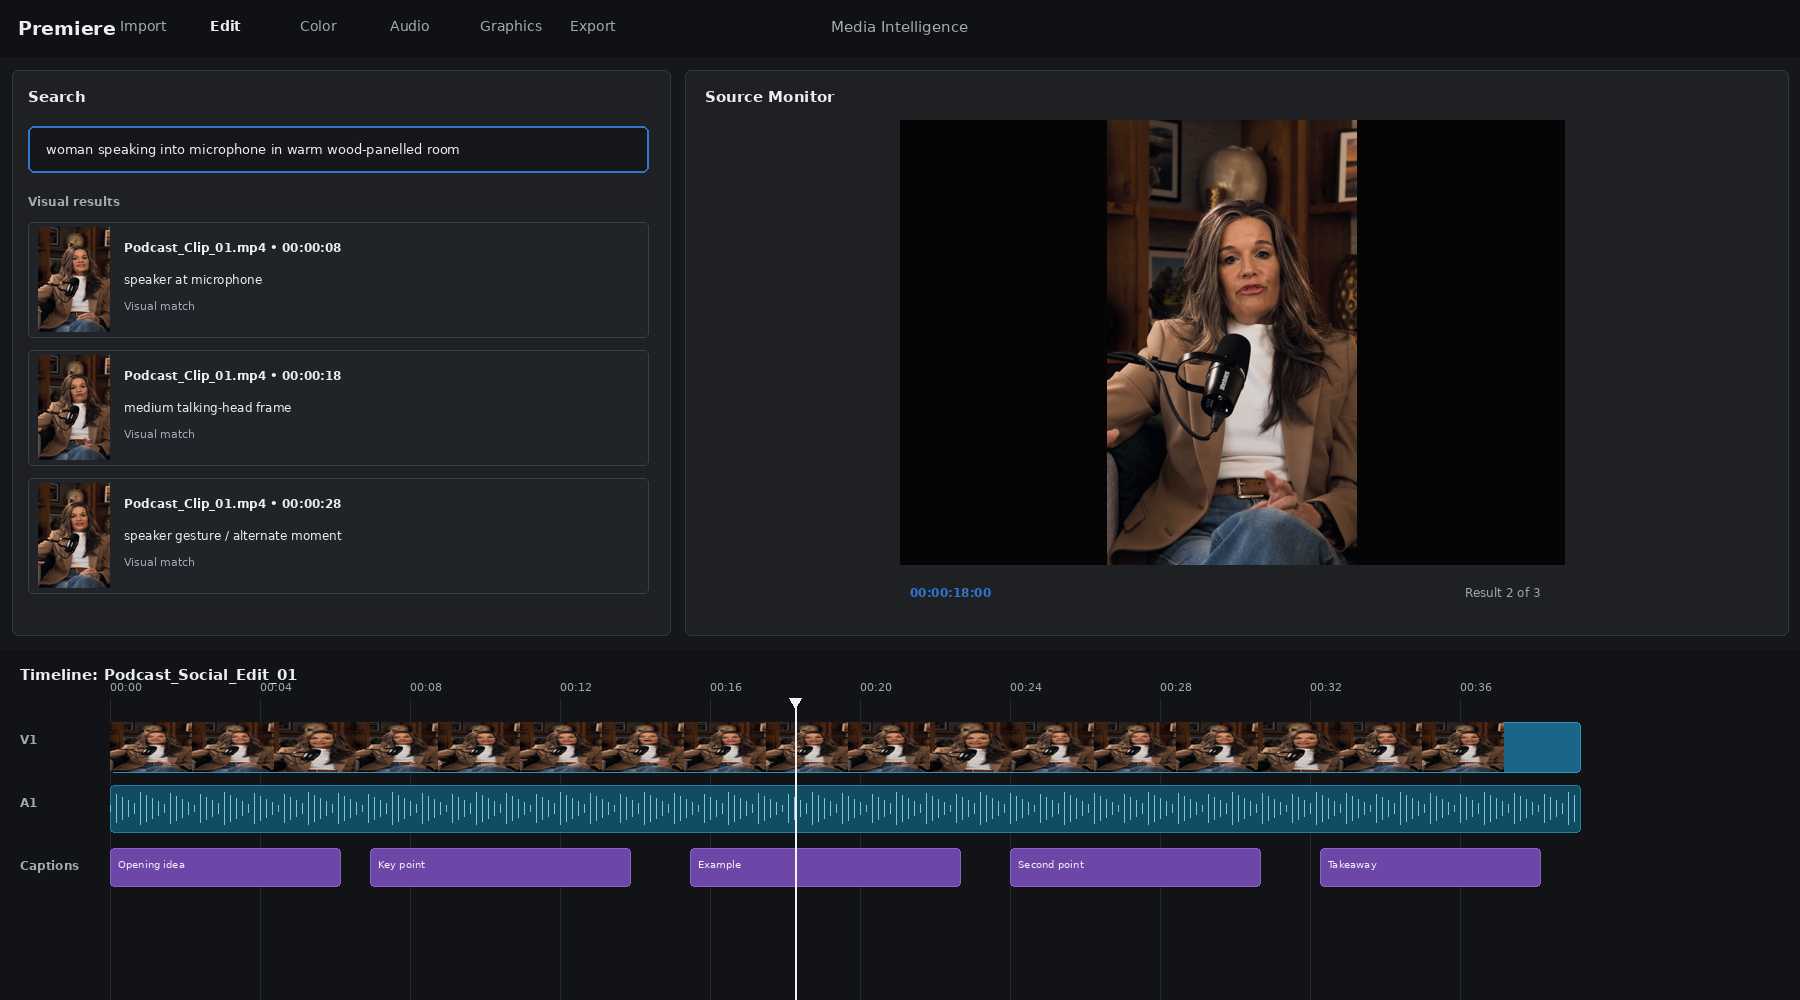
Media Intelligence is one of Premiere's most practical AI features for larger projects. The Search panel can search visual content, spoken text, metadata and audio. Visual search understands natural-language descriptions, while transcript and metadata search use exact text matching.
Figure 2. Media Intelligence visual-search workflow recreated with real frames from the dummy clip, using a descriptive shot query rather than transcript terms.
Useful visual searches include:
- “wide shot of two people talking in a bright office”
- “close-up of person holding product near window”
- “red car driving at night in rain”
- “person walking into office carrying laptop”
| SEARCH TIP: Describe the subject, action, setting, lighting or camera angle. “Office” is weak. “Wide shot of two people talking in a bright office” gives Media Intelligence much more visual information. |
| PRIVACY NOTE: Adobe states that Media Intelligence analysis and search run locally on your computer, and Adobe does not see or train on your footage or search queries. |
Text-Based Editing: When Reading Is Faster Than Scrubbing
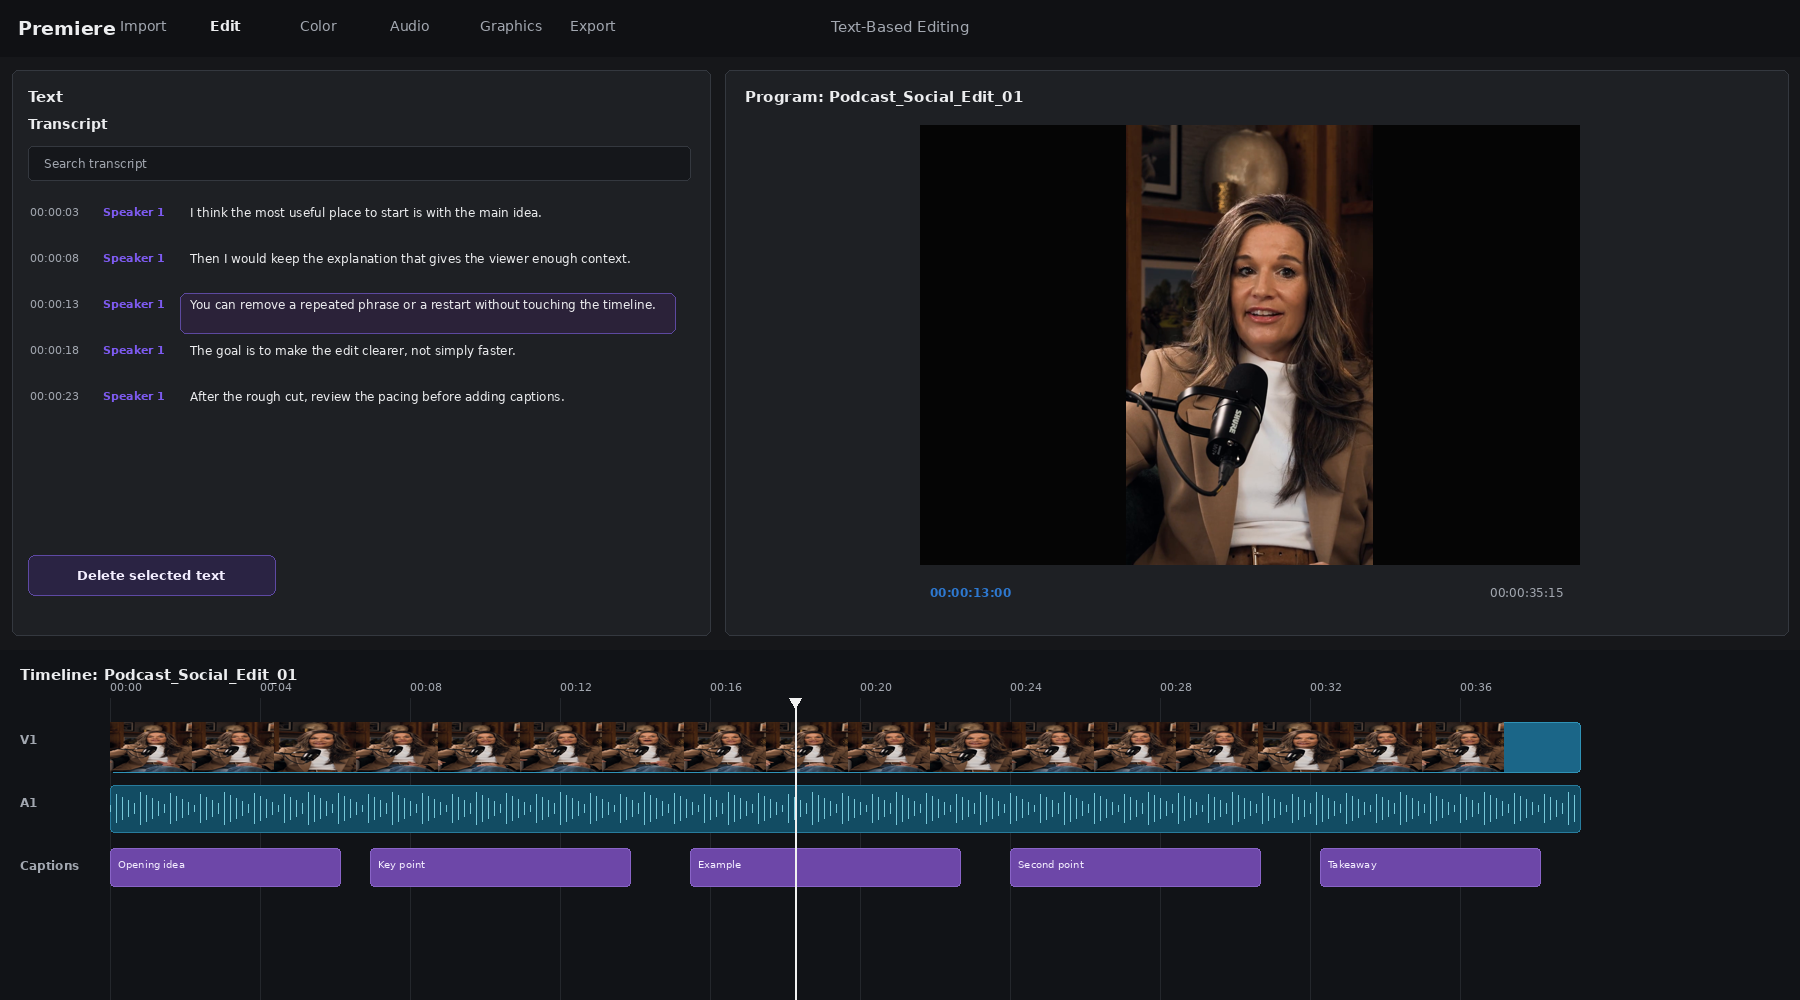
For dialogue-heavy projects, Premiere can transcribe source media and let you build or refine a sequence from text. It can detect filler words such as “uh” and “umm,” bulk-delete them, and filter dialogue by speaker.
Figure 3. Text-Based Editing workflow recreated with the actual dummy footage. Transcript wording shown here is illustrative so the workflow can be demonstrated without claiming a verbatim transcript.
IMPORTANT Text-Based Editing and captions are separate workflows. Adobe recommends generating captions from the final edited sequence, not from the unedited source transcript. |
These tools solve narrower problems after the rough cut. They are useful because you can apply them only when the footage actually needs them.
| ENHANCE SPEECH: Select dialogue on the timeline and run Enhance Speech from Essential Sound. After processing, use the Mix Amount control to balance the enhanced result against the original rather than automatically accepting the strongest setting. |
| OBJECT MASK: Premiere's AI-powered Object Mask can identify and track people or objects so you can blur, colour-correct or apply effects to a moving subject without drawing every mask frame manually. |
| GENERATIVE EXTEND: Use it when a shot ends slightly too early. Adobe currently allows up to 2 seconds of generated video and up to 10 seconds of supported audio. It cannot create or extend spoken dialogue, and clips containing music are not eligible. |
NEW IN PREMIERE BETA: GENERATIVE MEDIA TOOL: Premiere beta can now generate video clips and custom sound effects directly in the timeline from text prompts, using Adobe Firefly and supported partner models. Results are added as editable clips so you can continue cutting immediately.
Practical Test Protocol: Can AI Assistant Remove the Setup Work?
For this hands-on check, we use one 35-second vertical dummy talking-head clip so the workflow stays reproducible. The goal is to see whether Premiere can transcribe, mark and prepare the clip faster before manual editing begins.
TEST MEDIA: For this version, we use one 35-second vertical dummy talking-head clip to demonstrate transcription, topic markers, Media Intelligence search and stringout creation. For a fuller production test, add several takes and B-roll clips.
Open Window → Assistant and try:
Practical AI Assistant prompt
Use: Premiere AI Assistant
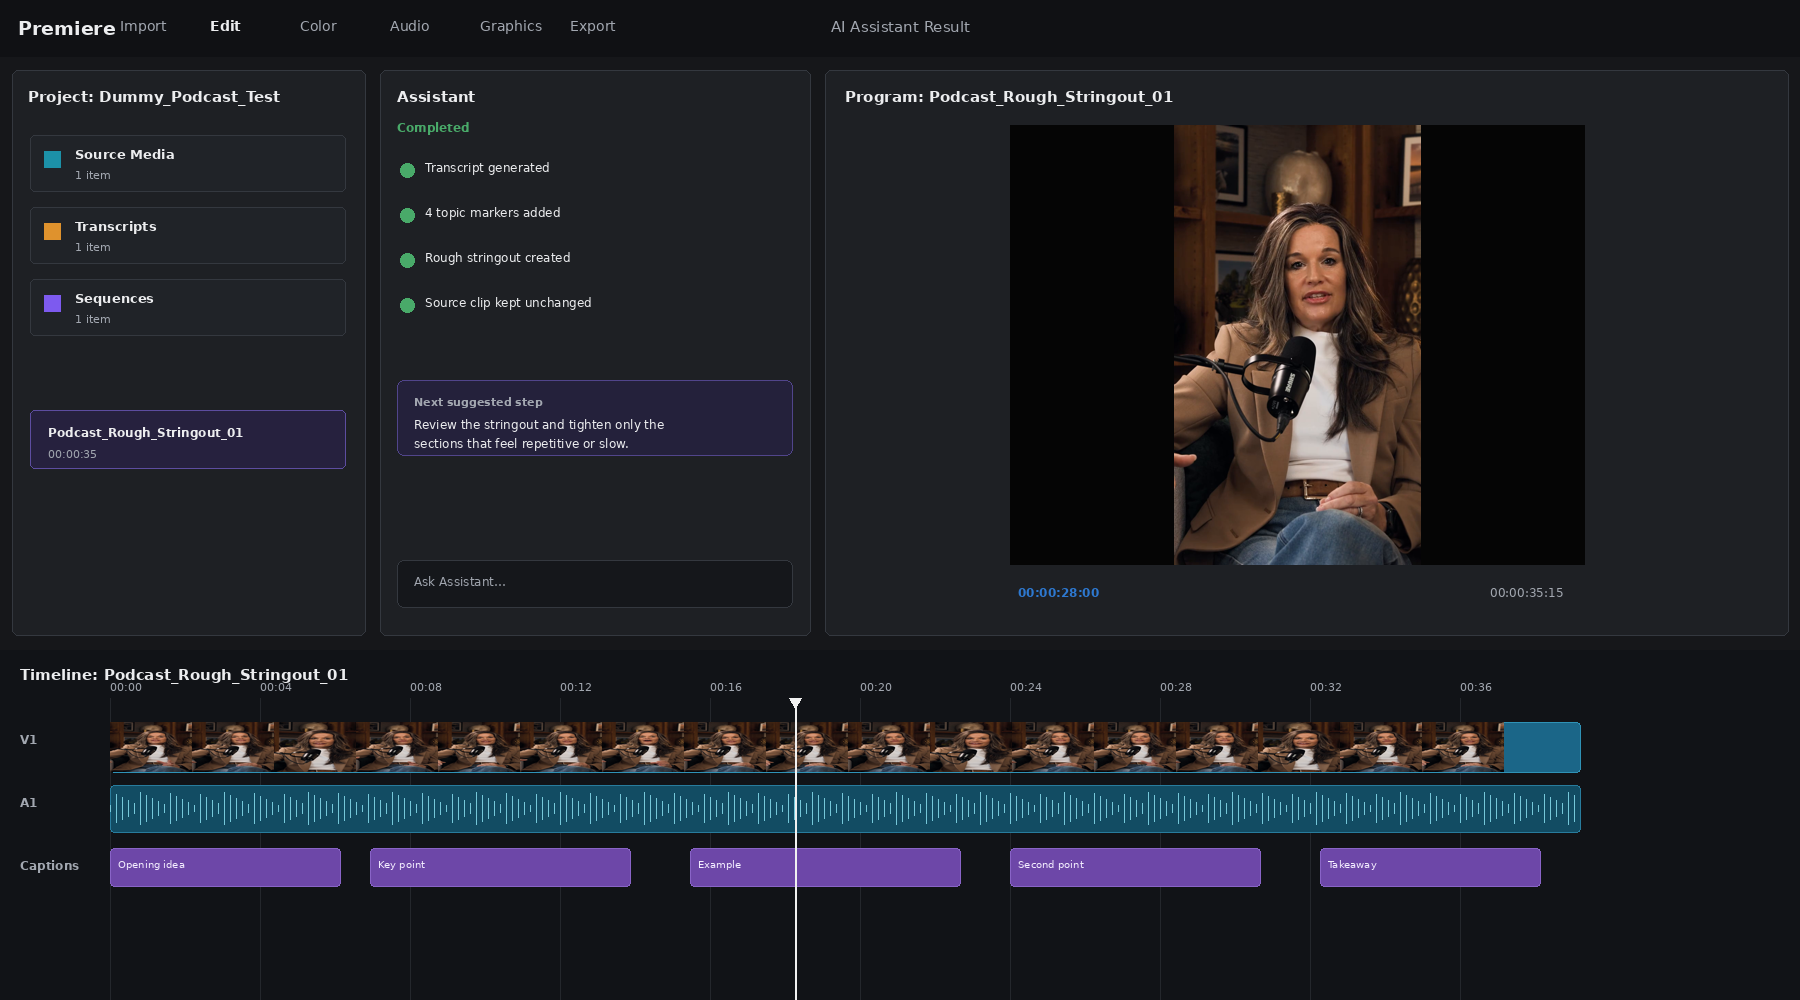
“Generate a transcript for the selected talking-head clip, add markers at major topic changes and create a rough stringout for a 9:16 social edit. Keep the source clip unchanged.”
Watch for: Check whether the transcript is usable, topic markers land in sensible places, and the rough stringout actually saves setup time. The result is still a starting point, not the final edit.
Figure 4. AI Assistant result recreated with the dummy footage: transcript generated, topic markers added and a rough stringout prepared for review.
Score the result on five things:
Check | What good looks like |
Project setup | Transcript, topic markers and rough stringout are created correctly from the source clip |
Transcript quality | Spoken clips are usable without heavy correction |
Stringout usefulness | The sequence saves setup time even if it still needs creative editing |
Edit safety | Source media stays intact and changes remain undoable |
Time saved | You reach actual editorial decisions faster than organizing everything manually |
HONEST EXPECTATION: Premiere AI Assistant should be judged on how much repetitive setup it removes before the creative edit begins. A useful rough assembly is a win even when you still re-cut most of the sequence yourself.
Premiere Tips Worth Knowing:
- Keep separate Assistant chats for separate jobs. Adobe recommends focused conversations. Use one chat for organization, another for a rough assembly, and another for a specific refinement.
- Use Undo and History aggressively. Everything AI Assistant changes is added to Premiere's normal Undo and History stack, so you can compare versions rather than worrying about destructive edits.
- Transcribe only what needs transcription. If only the interview footage contains dialogue, transcribe those files instead of processing every B-roll clip.
- Use Search Similar Frames after finding one good shot. It is faster than writing another search query when you already have a frame whose look or composition you want to match.
- Generate captions after the picture edit is stable. Text-Based Editing helps build the cut; captions should come from the final edited sequence.
- Do not use Generative Extend as a dialogue repair tool. It cannot generate or extend spoken dialogue, and music clips are not eligible for extension.
- Compare Enhance Speech before applying it everywhere. Use the Mix Amount control and keep the original tone if the source already sounds good.
- Treat beta features as beta. AI Assistant and Generative Media Tool are evolving. Build your workflow so a beta limitation does not block the entire project.
Quick Premiere Prompts and Searches to Save
| Organize footage: “Organize the selected media into interview, B-roll, product and screen-recording bins. Keep the original clips unchanged.” |
| Prepare an interview: “Generate transcripts and add markers at the beginning of each major answer.” |
| Build a first assembly: “Create a stringout from the selected talking-head clips in recording order.” |
| Find B-roll: “Search for: wide shot of two people talking in a bright office.” |
| Find an alternate take: “Use Search Similar Frames on the selected frame and show the closest visual matches.” |
| Review the starting sequence: “Review the rough assembly for missing clips, duplicated takes or obvious ordering problems. Do not make creative cuts yet.” |
BEST WORKING SEQUENCE: Import → Let Media Intelligence analyze → Organize with AI Assistant → Transcribe spoken footage → Build a stringout → Make the human creative edit → Use Enhance Speech / Object Mask / Generative Extend only where needed → Generate final captions → Export.
4. OpusClip — Best for Turning Long Videos Into Shorts
BEST FOR: Podcasts, interviews, webinars, long YouTube videos, livestreams, vlogs and event footage STANDOUT FEATURE: ClipAnything — prompt AI to find specific moments inside long videos FREE PLAN: 60 processing minutes/month, YouTube + local file imports, AI captions and 1 brand template SKIP IT IF: You need to build a full video from scratch or require deep timeline-based finishing |
For creators looking for an AI workflow to turn long videos into Shorts, OpusClip is the most specialized tool in our shortlist. OpusClip solves a narrower problem than Descript, CapCut or Premiere Pro: finding the right short-form moments inside footage you have already recorded. The useful question is not “How do I edit this 45-minute video?” but “Which 30–60 seconds are actually worth turning into a Short?”
Its ClipAnything model is designed to use visual, audio and sentiment cues, so it can look for topics, actions, reactions, scenes and emotional moments—not only spoken keywords. That makes the workflow relevant beyond podcasts and talking-head videos.
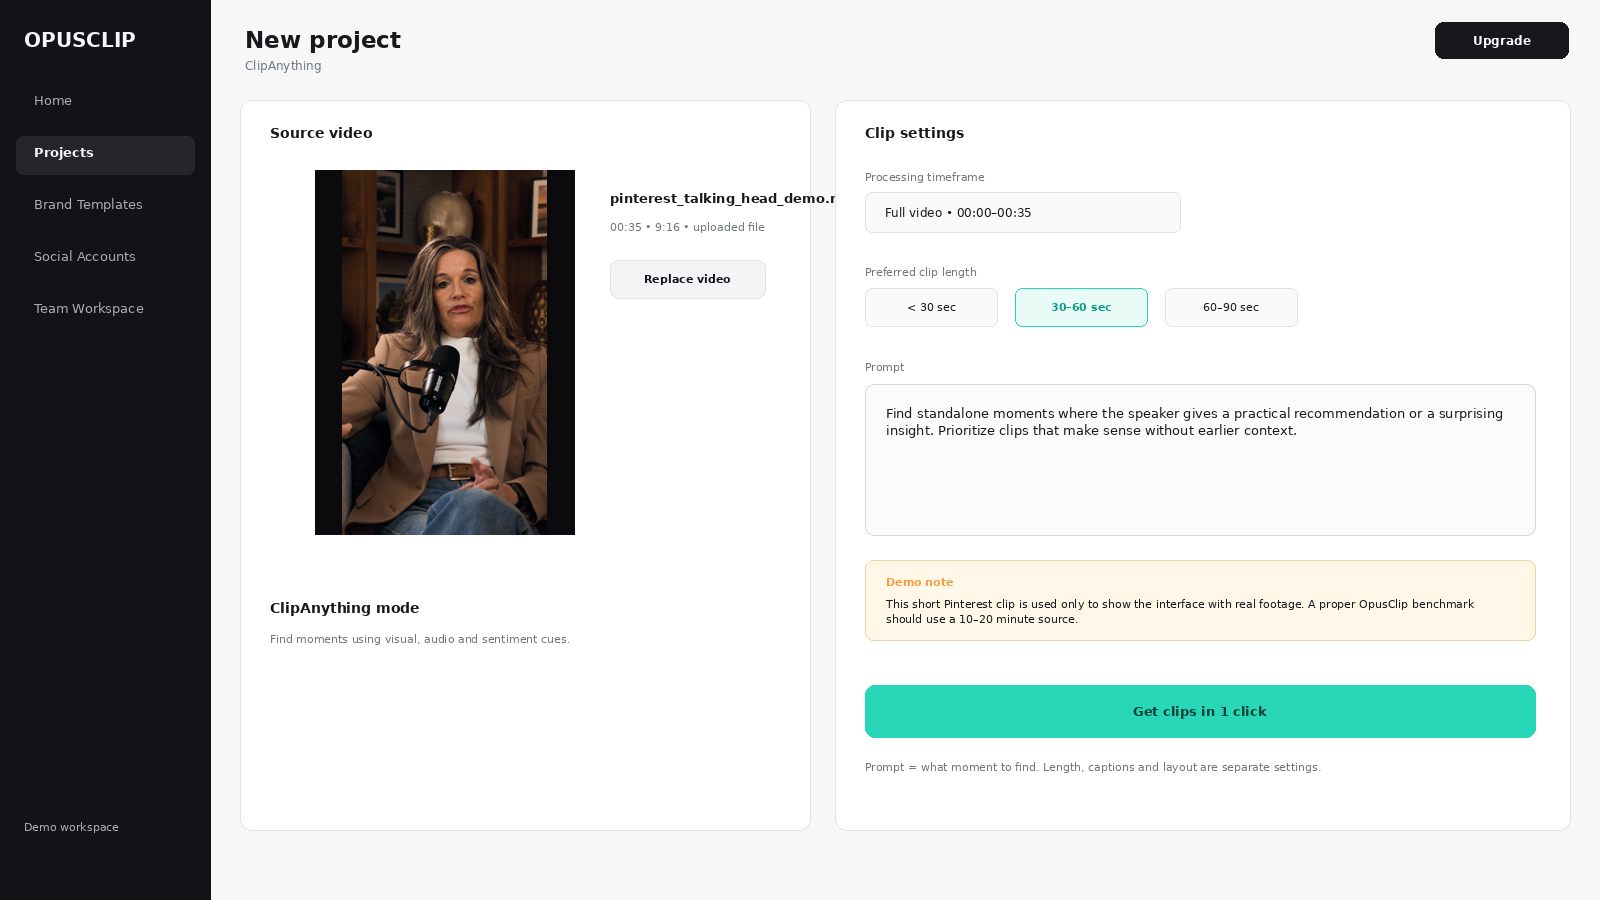
Figure 1. ClipAnything workflow recreated with the uploaded Pinterest/dummy talking-head footage. Use the prompt to describe the moment you want AI to find; set clip length and processing timeframe separately.
Which Feature Does Which Job?
Use OpusClip for the part of repurposing it is strongest at: selection first, polish second.
If you need to… | Use | Best for / Why |
Find potential Shorts inside a long video | AI Clipping | Fast first pass across podcasts, webinars and long-form video |
Find a specific topic, scene, action or reaction | ClipAnything | Natural-language search across visual, audio and sentiment cues |
Tell AI exactly what moments to look for | ClipAnything Prompts | Useful when generic “best moments” results are too broad |
Keep the subject visible in vertical crops | Reframing / Subject Tracking | Social clips, interviews and moving subjects |
Add social-ready subtitles | AI Captions | Shorts, Reels and TikTok-style publishing |
Compare generated clips quickly | Virality Score — Starter/Pro | Sort results by Hook, Flow, Value and Trend |
Trim, extend and restyle a generated clip | Built-in Editor — paid tiers | Fine-tuning after AI finds the moment |
Add AI or stock B-roll | AI / Stock B-Roll — paid | Contextual visual support after clipping |
Continue detailed post-production elsewhere | XML Export — Pro | Move selected clips into Premiere Pro or DaVinci Resolve |
FREE-PLAN REALITY: Free is enough to test the core clipping idea, but it is deliberately limited: 60 processing minutes per month, watermarked output, no Virality Score, and Free projects expire 3 days after creation. Export anything worth keeping before it disappears.
Free vs Paid: What Actually Changes?
The upgrade decision is mostly about how much footage you process, whether you need the built-in editor and whether you want publishing, scoring and professional hand-off features.
Plan | Free | Starter | Pro |
Processing allowance | 60 min/month | 150 min/month | 300 min/month or 3,600/year |
Imports | YouTube + local files | Adds Drive, Vimeo, Zoom, Rumble, StreamYard | Adds more sources incl. LinkedIn, Dropbox, Loom, Riverside, Frame.io and others |
Editing | Basic clipping workflow | Built-in editing capability | Full paid editing workflow + advanced hand-off |
Virality Score | No | Yes | Yes |
Social posting | No paid workflow | YouTube / TikTok / Instagram | Adds broader scheduling + more account connections |
XML export | No | No | Premiere Pro / DaVinci Resolve |
AI B-Roll | Not available | Limited | Higher limits / broader access |
Project retention | 3 days | 30 days | 30 days + 100GB cloud saving |
CREDIT-SAVING TRICK: OpusClip currently charges processing at roughly 1 credit per minute of source footage. If you only need one part of a long recording, narrow the Processing Timeframe before generating clips instead of paying to analyse the entire file.
The Most Important Prompt Rule: Ask for the Moment, Not the Styling
ClipAnything prompts are for finding content. Length, aspect ratio, caption style, audio cleanup and transitions belong in separate settings or the editor.
Weak / overloaded prompt | Better ClipAnything prompt |
“Find a 45-second clip, make it 9:16, clean the audio, add animated captions and include transitions.” | “Find a standalone moment where the guest explains the biggest mistake first-time founders make and gives a practical solution.” |
USE THIS FORMULA: SUBJECT / MOMENT + SELECTION CRITERION + STANDALONE CONTEXT + DIVERSITY CONSTRAINT.
Example: Find practical advice about pricing. Keep only complete explanations that make sense without the previous question, and choose different takeaways rather than several clips on the same point.
Podcast or Interview: “Find complete answers where the guest gives a surprising opinion, useful recommendation or clear takeaway. Prioritise moments that make sense without hearing the previous question.” USE: ClipAnything + a 30–60s clip-length setting WATCH FOR: A strong quote that begins halfway through an answer. Add enough context to make the clip independent. |
Long Talking-Head YouTube Video: “Find moments where the speaker explains one useful idea from beginning to end. Prioritise sections with a strong opening statement and a clear takeaway. Choose different topics rather than several versions of the same idea.” USE: ClipAnything + reprompting if results overlap WATCH FOR: Duplicate clips around the same high-density topic. |
Webinar: “Find the strongest actionable recommendations in this webinar. Exclude introductions, housekeeping, audience logistics and repeated explanations.” USE: ClipAnything + Screenshare layout when the slide itself matters WATCH FOR: Advice that depends on a slide or chart that disappears after vertical reframing. |
Tutorial or Course: “Find sections where the instructor explains one complete tip, process or technique that viewers can understand without watching the rest of the lesson.” USE: ClipAnything + manual trim/extend WATCH FOR: A clip starting after an essential setup step or ending before the result is shown. |
Vlog, Travel or Event Footage: “Find the most visually interesting moments, genuine reactions and memorable experiences. Prioritise scenes with a clear action, reaction or payoff.” USE: ClipAnything multimodal analysis WATCH FOR: Visually exciting footage that has no setup or payoff when viewed alone. |
Sports or Action Footage: “Find the biggest reactions, key actions and exciting moments. Prioritise sequences with a clear build-up and payoff.” USE: ClipAnything + visual/action prompts WATCH FOR: AI cutting only the action and missing the reaction that makes the moment worth watching. |
Practical Test You Can Reproduce: Can OpusClip Find the Clip You Would Have Chosen?
Do not test OpusClip with a 30-second source video. Its value appears when there is enough footage to search. A 10–20 minute interview, webinar or talking-head recording with several topics is a much better test.
TEST SETUP: Use a 15-minute recording. Process only the first 10 minutes for the first run, which should consume about 10 processing credits at the current 1-credit-per-minute rate. This gives you enough material to judge discovery without burning the whole Free allowance. |
Step 1 — Upload, Limit the Timeframe, Then Prompt
Select ClipAnything, set the clip-length range separately and enter one precise selection prompt:
Test prompt: “Find three standalone moments where the speaker gives a practical recommendation or surprising insight. Each clip must make sense without the full video, and each should cover a different topic.” WATCH FOR: Do not judge the captions yet. First judge whether the AI picked the right moments. |
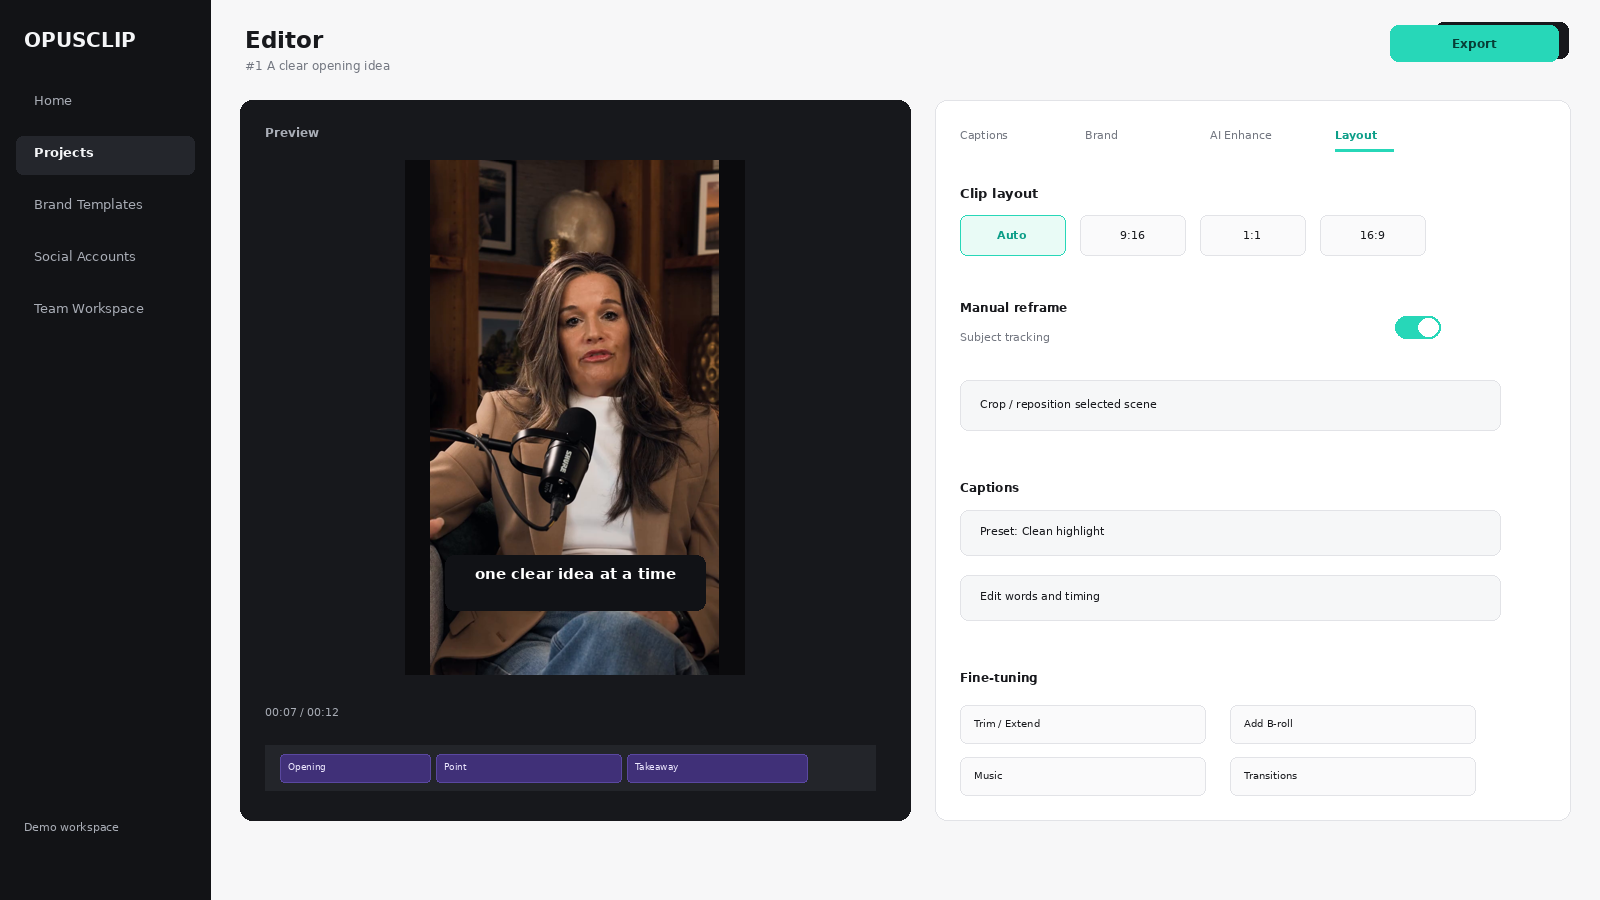 Figure 2. The same ClipAnything controls shown with our 35-second dummy clip for interface demonstration. For a meaningful benchmark, use a 10–20 minute source with several topics.
Step 2 — Review the Results Like an Editor, Not Like an Algorithm
The useful question is not “Which clip got the highest score?” It is “Did the AI save me from manually scrubbing the long video?” Review each result against the same five criteria:
Check | Pass when… | If it fails… |
Context | Does the first sentence make sense without the original video? | Extend the start or reprompt for self-contained answers. |
Complete idea | Does the clip contain one coherent point rather than a fragment? | Trim/extend or choose another result. |
Hook | Does the opening earn attention without misleading the viewer? | Try a topic or “strong statement” prompt instead of “best moments.” |
Conclusion | Does it actually finish the thought or stop mid-answer? | Extend the ending until the takeaway lands. |
Uniqueness | Is this clip meaningfully different from the other generated clips? | Reprompt: “Choose different topics; avoid duplicate ideas.” |
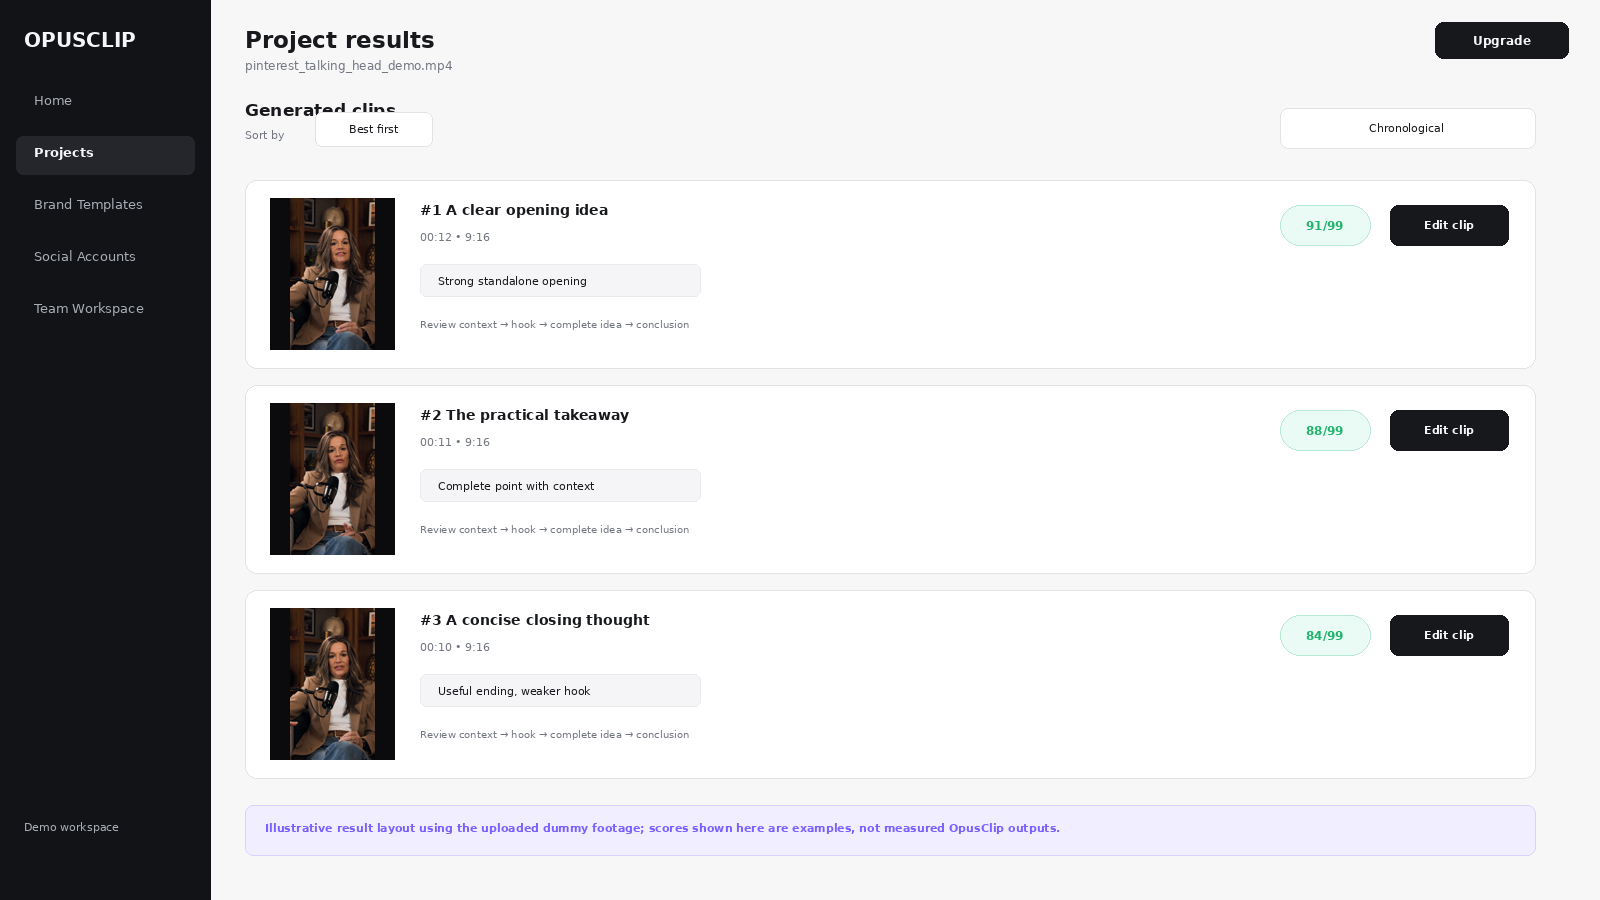 Figure 3. Results-page recreation using frames from the uploaded dummy clip. Review context, hook and conclusion before styling or scores; the sample scores shown are illustrative.
REPROMPTING TRICK: If several generated clips cover the same idea, do not start over from scratch. OpusClip allows reprompting from the results page. Try: “Find three new clips on different topics. Exclude the themes already used in clips 1–3.”
Virality Score: Useful for Sorting, Weak as a Publishing Decision
Starter and Pro users receive a 0–99 Virality Score. OpusClip says the score considers Hook, Flow, Value and Trend, and prompt relevance when ClipAnything is used. This is useful when you have a large batch of clips to review—but it is not a probability that the clip will go viral.
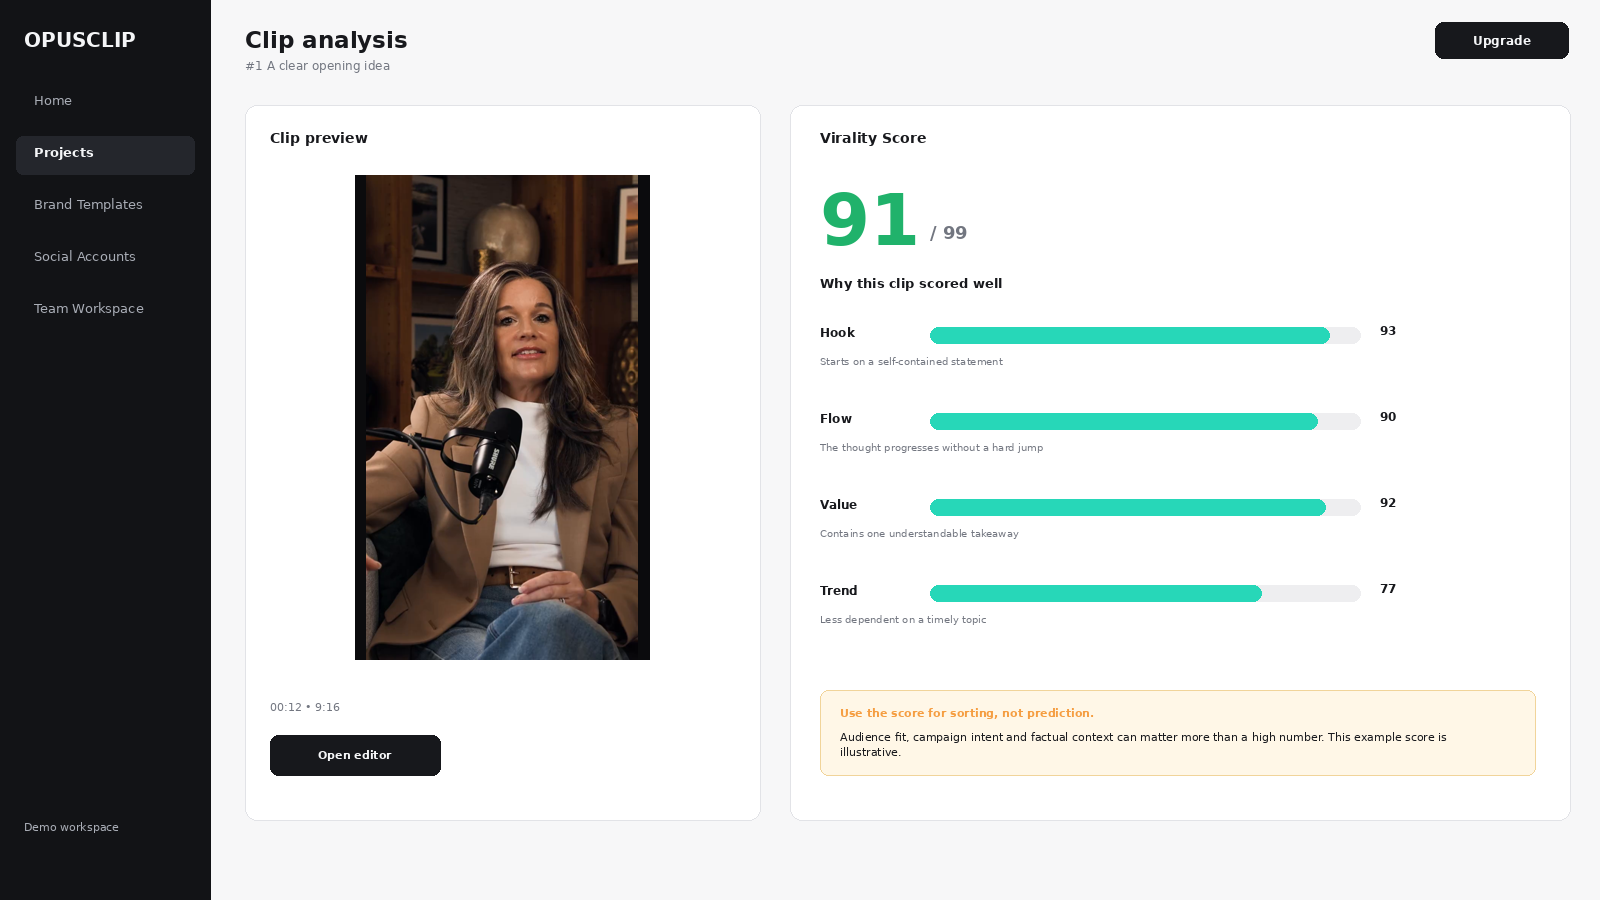 Figure 4. Virality Score recreation using the same dummy footage. Treat the number as a prioritisation signal, not a prediction; the example score is illustrative.
DO NOT CHASE THE NUMBER: A lower-scoring clip can still be the better publishing choice if it answers a high-intent question, fits the audience, preserves expert context or supports a specific campaign. Review the clip itself before trusting the ranking. |
After Clip Selection: Reframe, Captions and Fine-Tuning
Once the AI has found a worthwhile moment, the job changes from discovery to presentation. OpusClip supports layout changes, manual reframing, subject tracking, caption changes, trim/extend and other editor actions on eligible paid workflows.
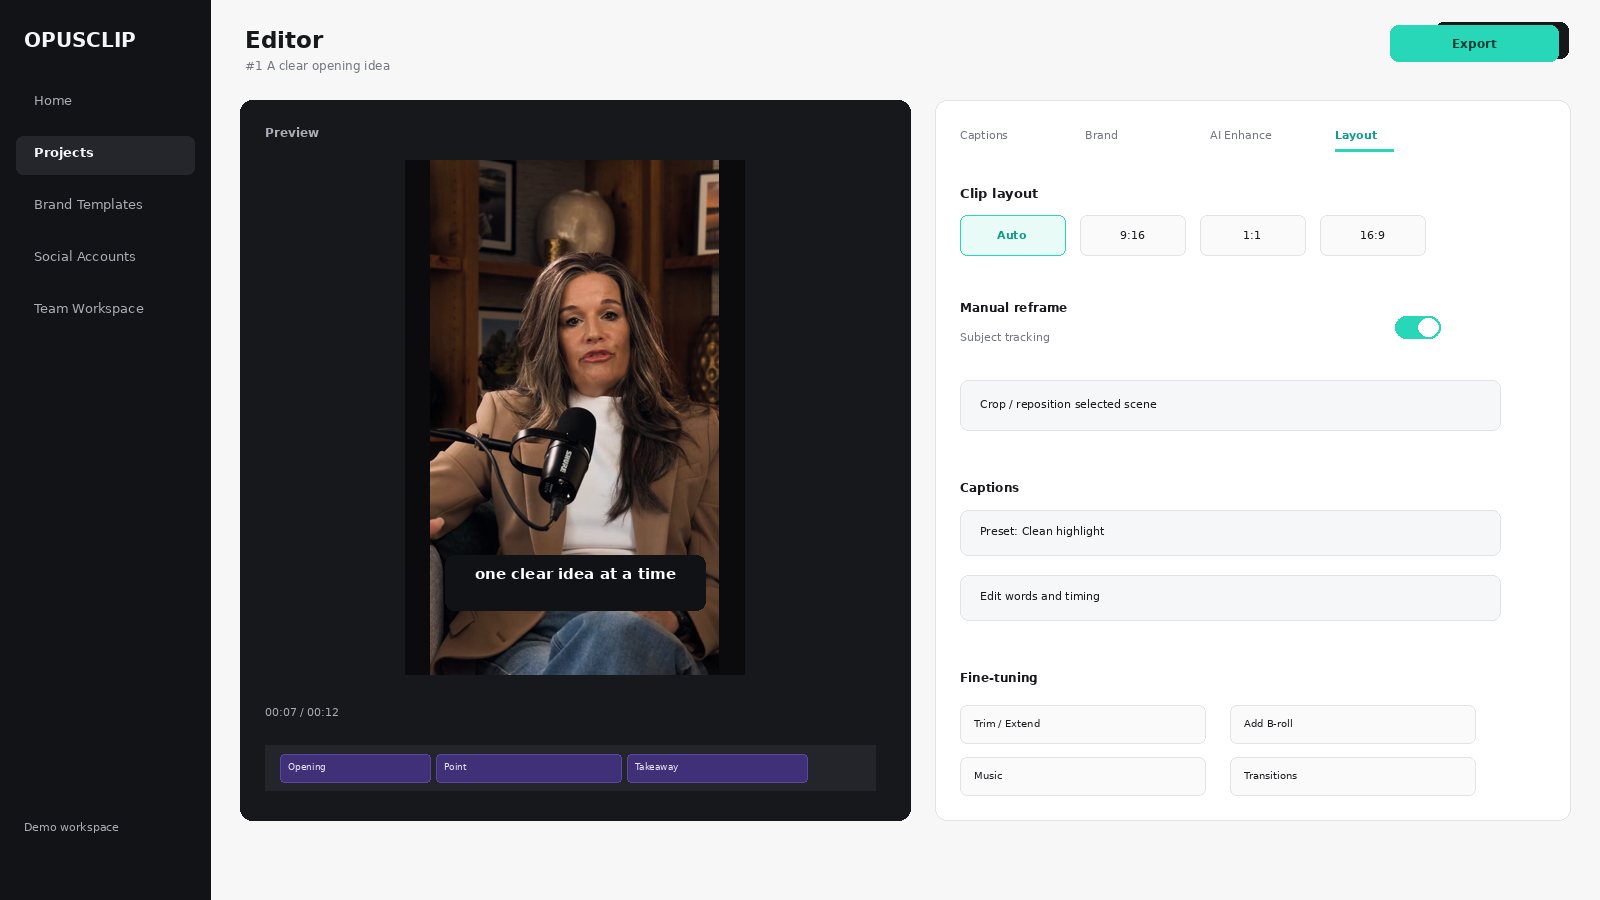 Figure 5. Post-selection editor recreation using the uploaded dummy footage: choose the layout, fix framing, check captions and trim or extend only after selecting the right moment.
| SCREENSHARE TIP: If the clip depends on slides or a software demo, use the Screenshare layout where appropriate. A perfect face crop can still destroy the meaning if the important screen content disappears. |
| MANUAL-REFRAME TIP: Auto framing is a starting point. If the subject, product or chart drifts out of view, use Manual Reframe instead of accepting a technically vertical but context-poor crop. |
| B-ROLL LICENSING: AI / Stock B-Roll is not available on the Free plan. OpusClip currently notes Pexels as a stock provider in parts of its B-Roll workflow; commercial use still follows the underlying provider’s licence, so check the source terms before publishing client work. |
A Better Long-to-Short Workflow
Do not ask OpusClip to replace every editor in your stack. It is strongest when you use it for discovery, then hand off the selected clip to the tool that is best at finishing.
1 LONG VIDEO Podcast / webinar / interview | 2 OPUSCLIP Find the moment | 3 REVIEW Context + completeness | 4 POLISH Reframe + captions | 5 HAND OFF Publish or XML to Premiere |
For Pro users, OpusClip can export selected clips as XML for Adobe Premiere Pro or DaVinci Resolve, which is a useful hybrid workflow: let OpusClip locate the moments, then use a professional NLE for detailed sound, colour, graphics and final timing.
OpusClip Tips Worth Knowing
| PROCESS ONLY WHAT YOU NEED: Use the Processing Timeframe slider when a two-hour recording contains only one relevant segment. At the current 1-credit-per-minute processing model, this is one of the easiest ways to conserve credits. |
| PROMPT FOR SELECTION, NOT STYLING: Ask for the moment, scene, action, reaction or topic. Set length, layout, captions and visual styling separately. |
| ASK FOR DIVERSITY EXPLICITLY: If a video is dense around one topic, the AI can return several near-duplicates. Add: “Choose different topics and avoid repeated ideas.” |
| CHECK THE OPENING SENTENCE FIRST: The AI may find the useful answer but start the clip one sentence too late. If context is missing, extend the beginning or reprompt for self-contained answers. |
| CHECK THE ENDING TOO: A clip that stops before the conclusion often feels worse than one with a weaker hook but a complete payoff. |
| USE CHRONOLOGICAL SORTING WHEN CONTEXT MATTERS: If you are reviewing a sequence of clips from an event or narrative video, chronological order can be more useful than ranking purely by Virality Score. |
| EXPORT FREE PROJECTS QUICKLY: Free-plan projects expire after 3 days. Save any useful clips locally before the project disappears. |
| USE OPUSCLIP AS THE FINDER, NOT NECESSARILY THE FINISHER: When the clip needs serious graphics, colour, audio or brand work, select the moment in OpusClip and finish it in a dedicated editor. |
Quick ClipAnything Prompts to Save
| Actionable advice: “Find moments where the speaker gives a specific recommendation viewers could apply immediately.” |
| Strong opinions: “Find statements where the speaker clearly challenges or disagrees with a commonly held belief.” |
| Emotional reactions: “Find moments with genuine surprise, excitement, laughter or strong emotional reactions.” |
| Useful explanations: “Find sections where one difficult idea is explained clearly from beginning to end.” |
| Hooks: “Find statements or questions that create immediate curiosity and still make sense without earlier context.” |
| Avoid duplicates: “Find five clips covering five different ideas or takeaways. Do not return multiple versions of the same discussion.” |
| Specific topic: “Find every section where the speakers discuss [TOPIC], then prioritise moments containing a complete explanation or useful conclusion.” |
BEST SINGLE FOLLOW-UP PROMPT: Find three new clips that are materially different from the current results. Exclude the topics already used, and only return moments that make sense without the full video.
5. Wondershare Filmora — Best AI Video Editor for Beginners
BEST FOR: Beginners, YouTube creators, talking-head videos, tutorials, screen recordings, product demos and everyday social content STANDOUT FEATURE: Beginner-friendly timeline editing with AI guidance built into the workflow AI ASSISTANT: AI Mate — Action, Guide, AIGC and Auto modes FREE ACCESS: Yes — full editing environment to test; standard free/trial desktop exports include a Filmora watermark SKIP IT IF: You need the advanced colour, audio, compositing or project-management depth of a professional NLE |
Filmora is particularly useful for beginners who want an AI video editor without giving up a conventional timeline. It is the easiest fit in this list for someone who wants more control than an automatic clip generator but does not want to learn a professional NLE from day one. You still work on a normal timeline, but AI tools sit around the jobs beginners usually find slow or confusing: transcribing dialogue, removing silence, cleaning audio, generating captions and finding the right command.
AI Mate is especially useful because it can work as both an assistant and an in-app tutor. In Action Mode it can execute supported commands; in Guide Mode it answers “How do I…?” questions and can direct you toward the right Filmora feature.
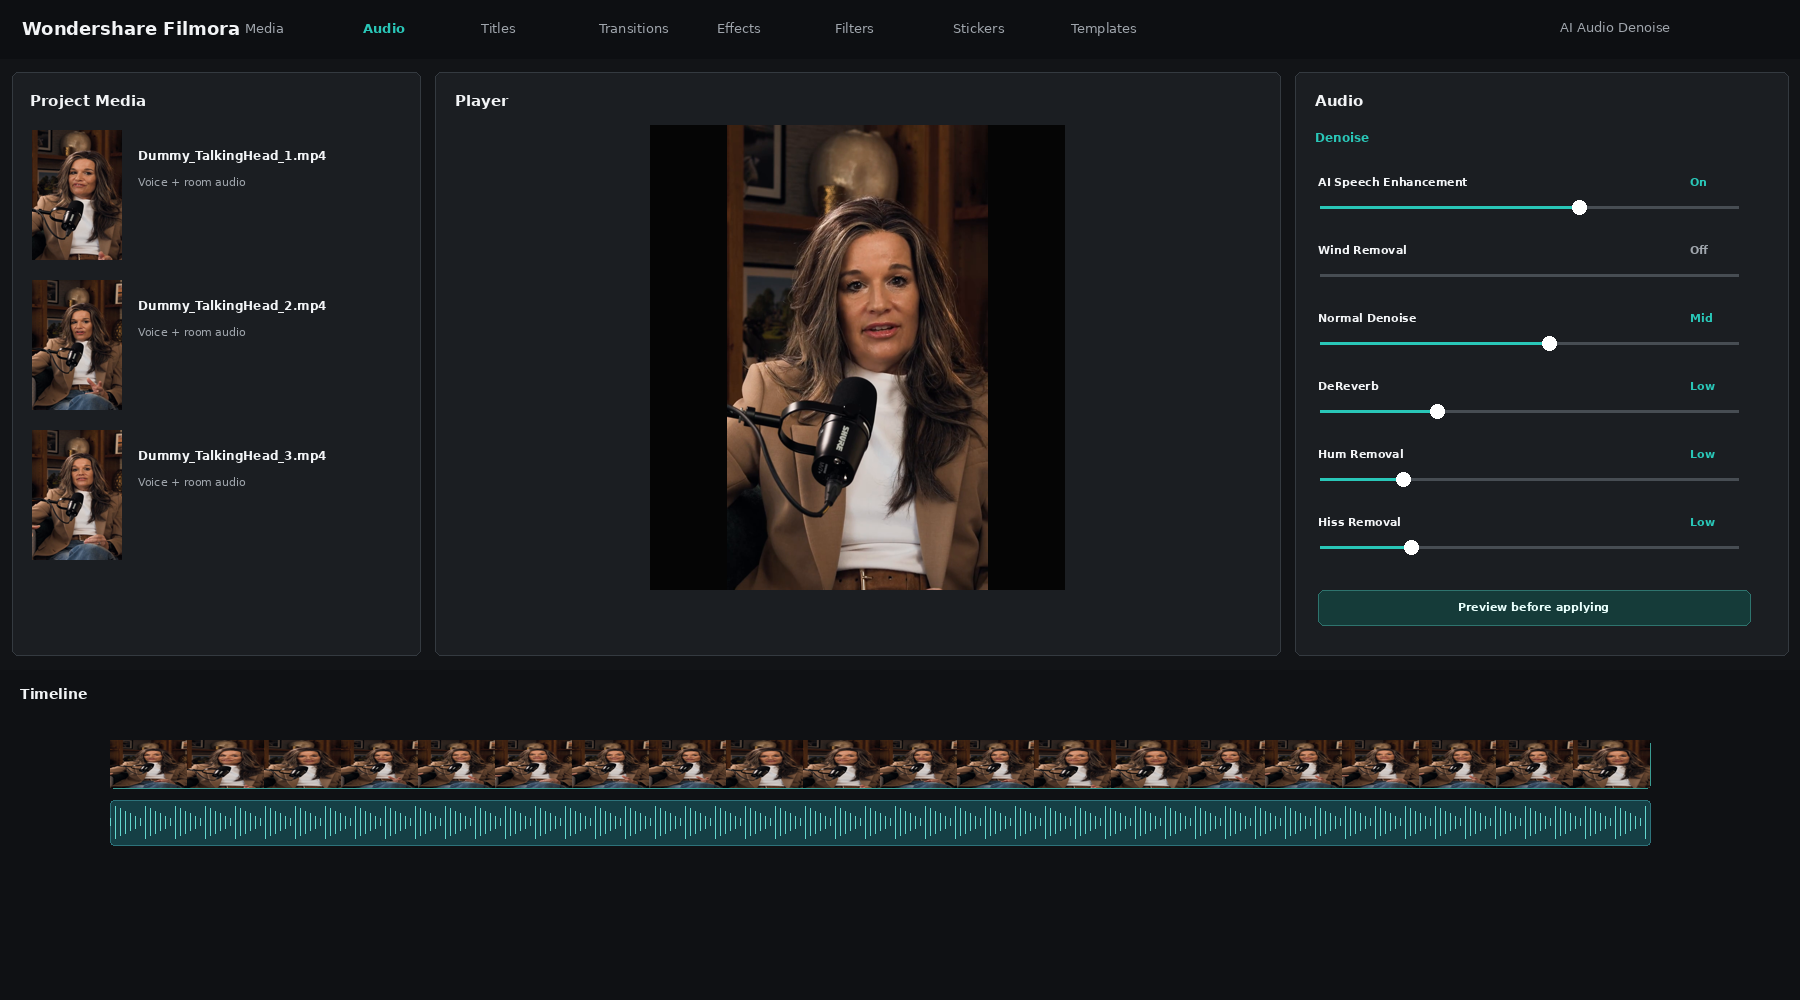 Figure 1. Filmora-style workspace recreated with the actual 35-second dummy 9:16 talking-head video used in this guide. UI is illustrative; the footage is from the test clip.
Which Feature Does Which Job?
Instead of learning every Filmora feature, start with the editing problem you actually have.
If you need to… | Use | Best use |
Ask how to perform or find an editing task | AI Mate — Guide Mode | Beginners who know the result they want but not the Filmora feature name |
Let AI execute a supported edit | AI Mate — Action Mode | Quick commands such as audio denoise, screen recording or other supported actions |
Cut spoken footage by editing words | AI Text-Based Editing | Interviews, talking heads, tutorials and presentations |
Remove dead air automatically | Silence Detection | Podcasts, interviews, vlogs and unscripted speech |
Clean weak dialogue | AI Audio Denoise | Room noise, hiss, hum, wind or reverb in spoken recordings |
Generate styled social subtitles | Dynamic Captions | Reels, Shorts, talking heads and educational video |
Record a software tutorial | Screen + Webcam Recording | Walkthroughs, training and demos |
Make final precise changes | Timeline Editor | Pacing, transitions, B-roll, audio and manual finishing |
Free vs Paid: What Actually Matters
Filmora is easy to evaluate before buying because the free/trial desktop version gives access to the editing environment and built-in effects. The practical limitation is export: standard free/trial exports carry a Filmora watermark.
What matters | Free / trial | Paid Advanced |
Editing access | Full editing environment to test | Full editing environment |
Export | Standard exports include Filmora watermark | Watermark-free export + 4K |
AI usage | Limited / trial access varies by feature | 1,000 AI credits per month + 500 AI Mate conversations on current Advanced annual plan |
WORTH KNOWING
Wondershare currently offers eligible new users a one-time watermark-free export redemption after sign-in. Treat that as a promotional benefit, not a permanent property of the free plan.
Filmora Prompts for Different Editing Jobs
AI Mate can either carry out a supported action or guide you to the right workflow. Prompts are most useful when they describe the editing problem, what should stay and what the finished video should feel like.
Podcast or Interview Use: AI Text-Based Editing + Silence Detection “Help me clean this interview. Remove long silent gaps and show me how to cut repeated or unwanted spoken sections using text-based editing. Keep complete answers and preserve natural conversational pacing.” Watch for: Removing a sentence that gives the guest’s answer its context. |
Tutorial or Course Video Use: AI Mate + Text-Based Editing + Screen Recording “Help me turn this into a clear beginner tutorial. Keep every step in the correct order, remove waiting time and failed attempts, improve the narration and leave enough time around important actions for viewers to follow them.” Watch for: Cutting loading screens, menus or mouse actions so tightly that learners cannot follow the demonstration. |
YouTube Short or Reel Use: Silence Detection + Dynamic Captions + Timeline “Help me turn this clip into a concise vertical social video. Keep one clear idea, remove unnecessary pauses and repetition, and add readable captions. Reach the main point quickly but keep the speaker natural.” Watch for: Over-styled captions competing with the person speaking. |
Product Demo Use: AI Mate + Timeline + Captions “Help me create a concise product demonstration. Keep the shots that clearly show what the product does, remove unnecessary setup and repeated footage, and leave enough time for viewers to understand each important action.” Watch for: Removing slower demonstration shots just because they look less dynamic. |
For beginners, the most valuable AI feature may be Guide Mode. You do not need to remember the name “Silence Detection” before you can solve a pause problem. Ask the question in plain language and Filmora can tell you what feature to use and where to find it.
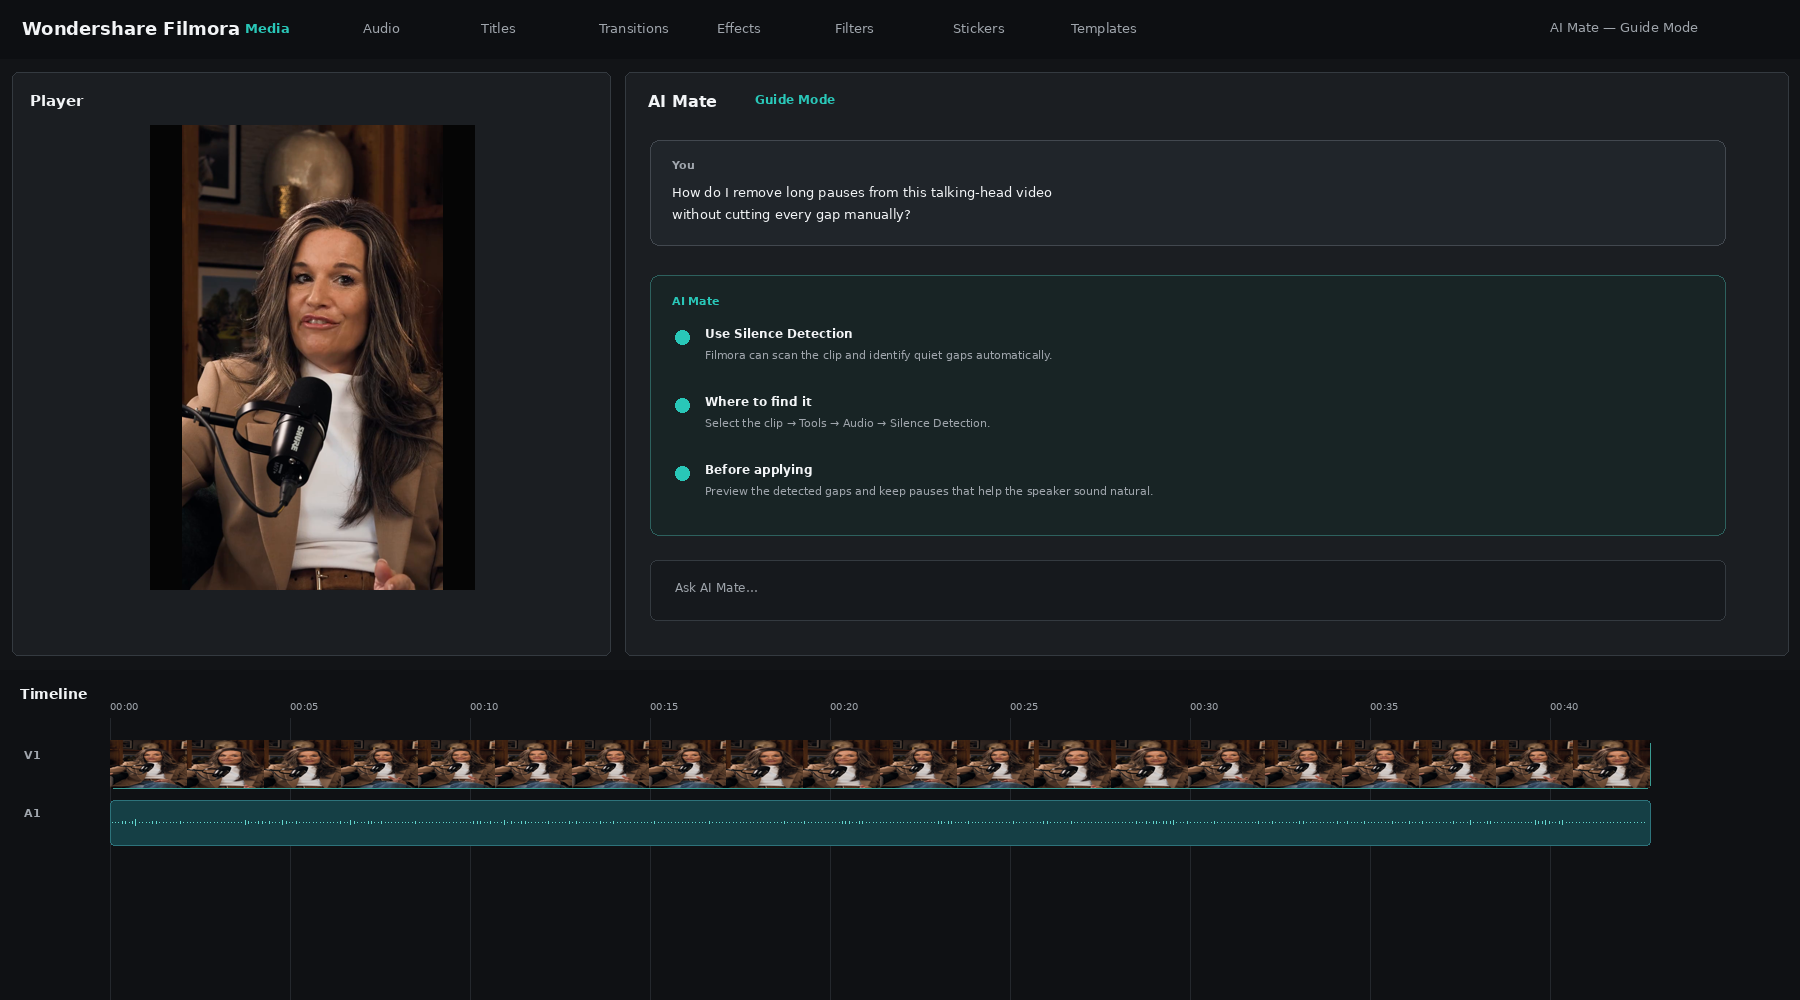 Figure 2. AI Mate Guide Mode recreated with the actual dummy footage. The example asks how to remove long pauses without manually cutting every gap.
GOOD QUESTIONS FOR GUIDE MODE Try: “How do I remove long pauses?” • “Where can I clean background noise?” • “How do I generate animated captions?” • “How can I remove a sentence by editing the transcript?” |
BEGINNER TIP If AI Mate can perform the action directly, let it. If it only gives navigation steps, use that guidance to learn the underlying Filmora tool instead of repeatedly asking AI to do everything for you. |
AI Text-Based Editing: Cut the Video by Editing Words
Filmora’s AI Text-Based Editing transcribes spoken footage, lets you search the transcript, delete unwanted text and even use a “Delete all silent clips” option before sending the result back to the main timeline.
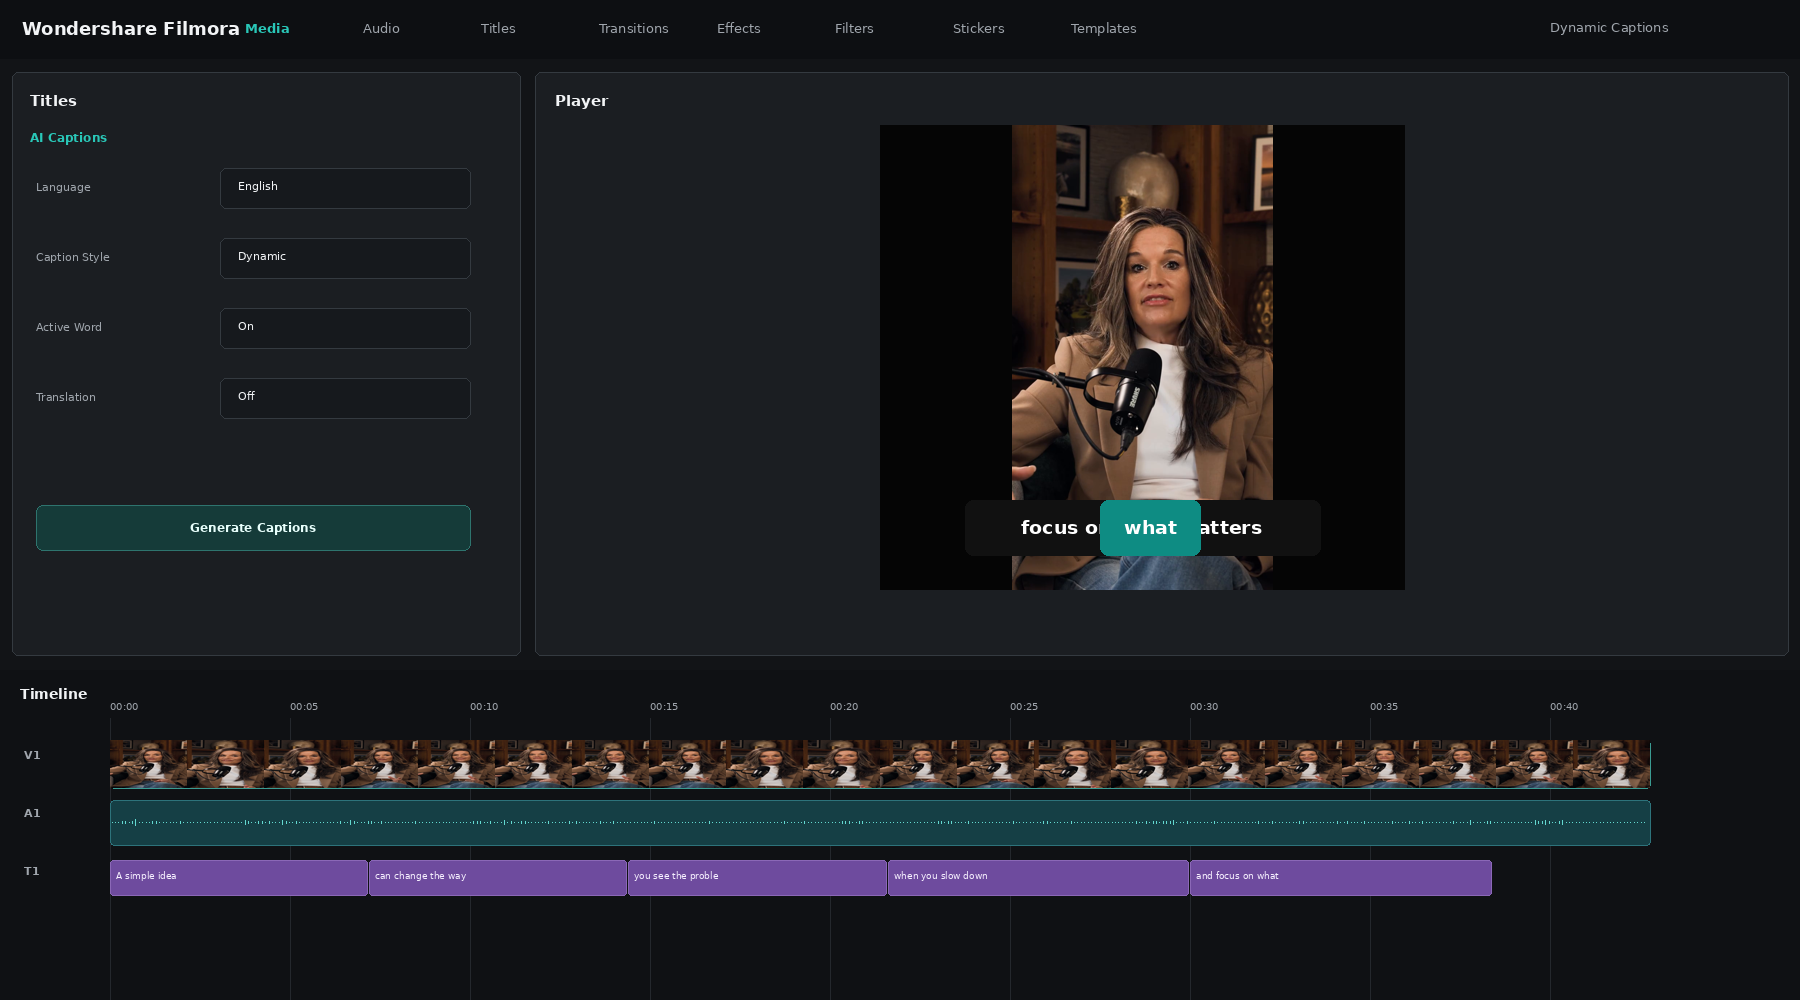 Figure 3. Illustrative AI Text-Based Editing view using the real dummy talking-head video. The transcript text shown is illustrative because this guide does not claim a verbatim transcript of the source clip.
BEST USE Use text-based editing for structural dialogue cleanup first. Then move to the timeline for visual timing, B-roll, transitions and the small cuts that need frame-level judgment. |
BEFORE YOU CUT Correct names, places, product terms and technical words first. If the transcript is wrong, your edit decision can be wrong too. |
Silence Detection: Remove Dead Air, Not Natural Speech
Silence Detection scans a video or audio clip for quiet sections. Filmora’s current Windows guide lets you adjust Volume Threshold and Minimum Duration before analysing the clip, then preview the result before replacing the original timeline clip.
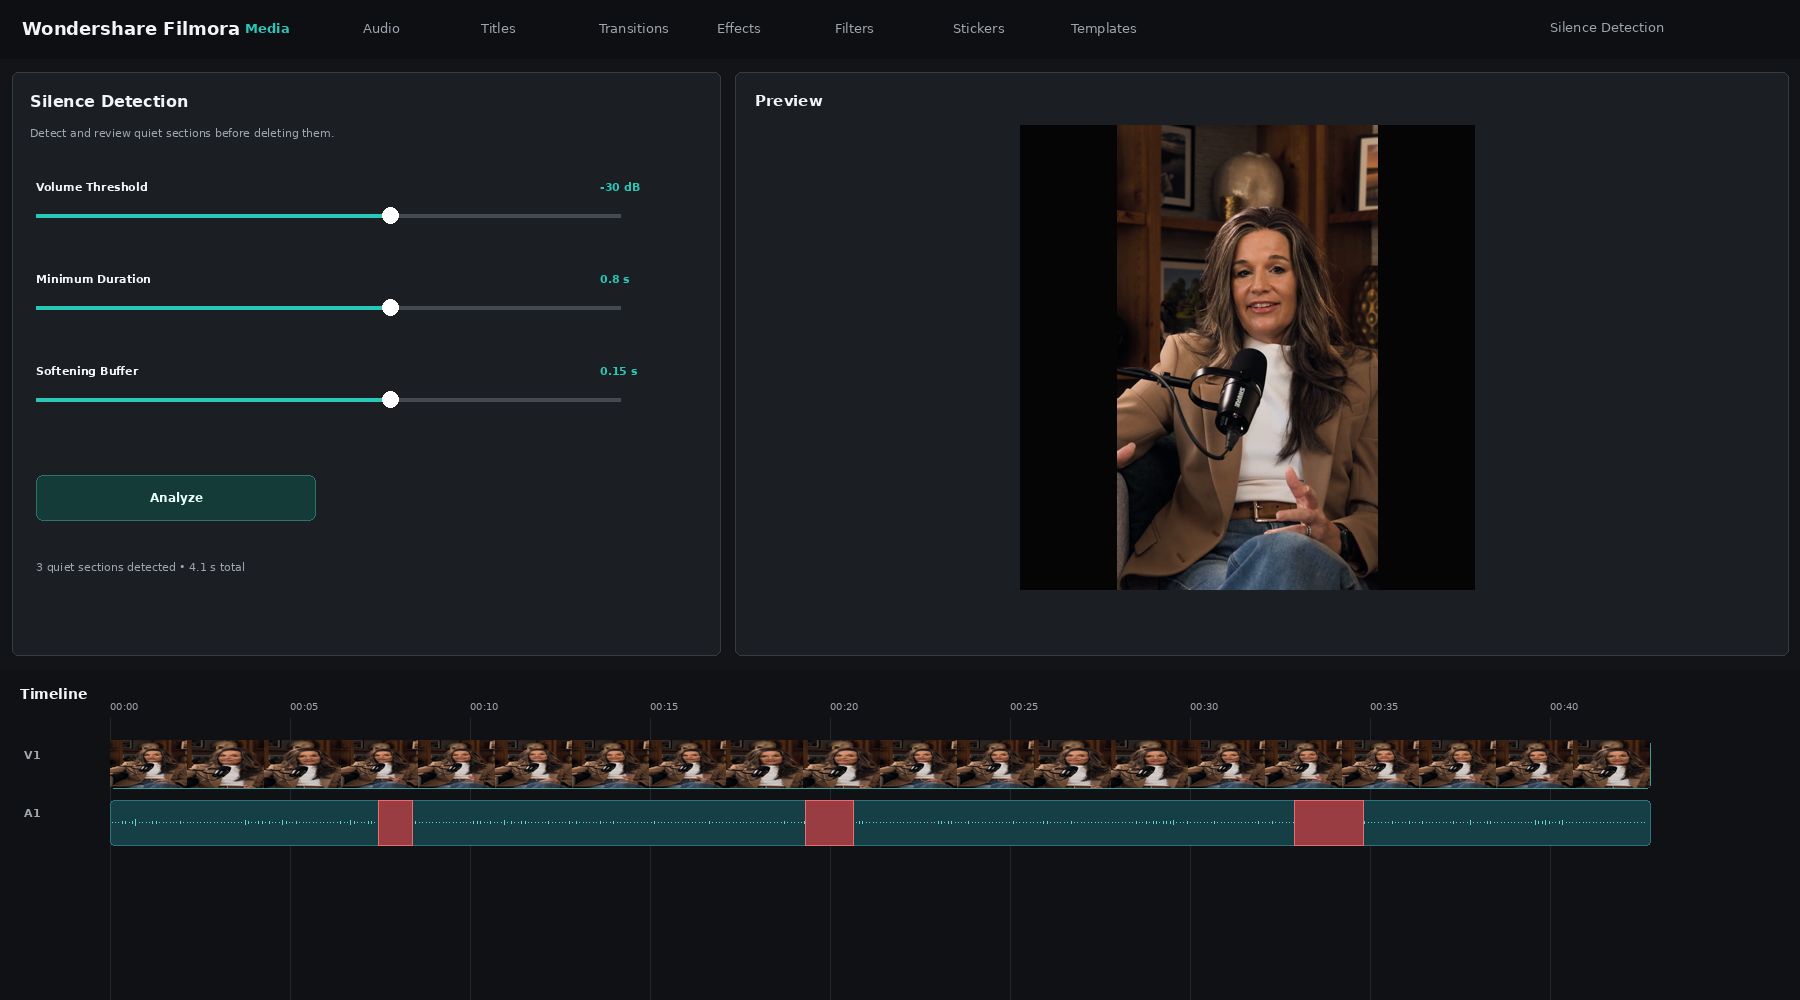 Figure 4. Silence Detection recreated with the dummy clip, showing detected quiet sections on the actual timeline waveform.
Setting | What it changes |
Volume Threshold | How quiet audio must be before Filmora treats it as silence |
Minimum Duration | How long the quiet section must last before it is flagged |
Preview before replace | Lets you check whether natural pauses were incorrectly marked for removal |
PRACTICAL RULE: Remove pauses that make the viewer wait. Keep pauses that separate ideas, add emphasis or help the speaker sound human.
Dynamic Captions: Generate First, Style Second
Filmora’s Dynamic Captions can automatically detect spoken words, create animated captions and highlight the active or emphasized word. The current Windows workflow starts from Titles → AI Captions → Dynamic Captions, where you choose the subtitle language and optional translation before generating.
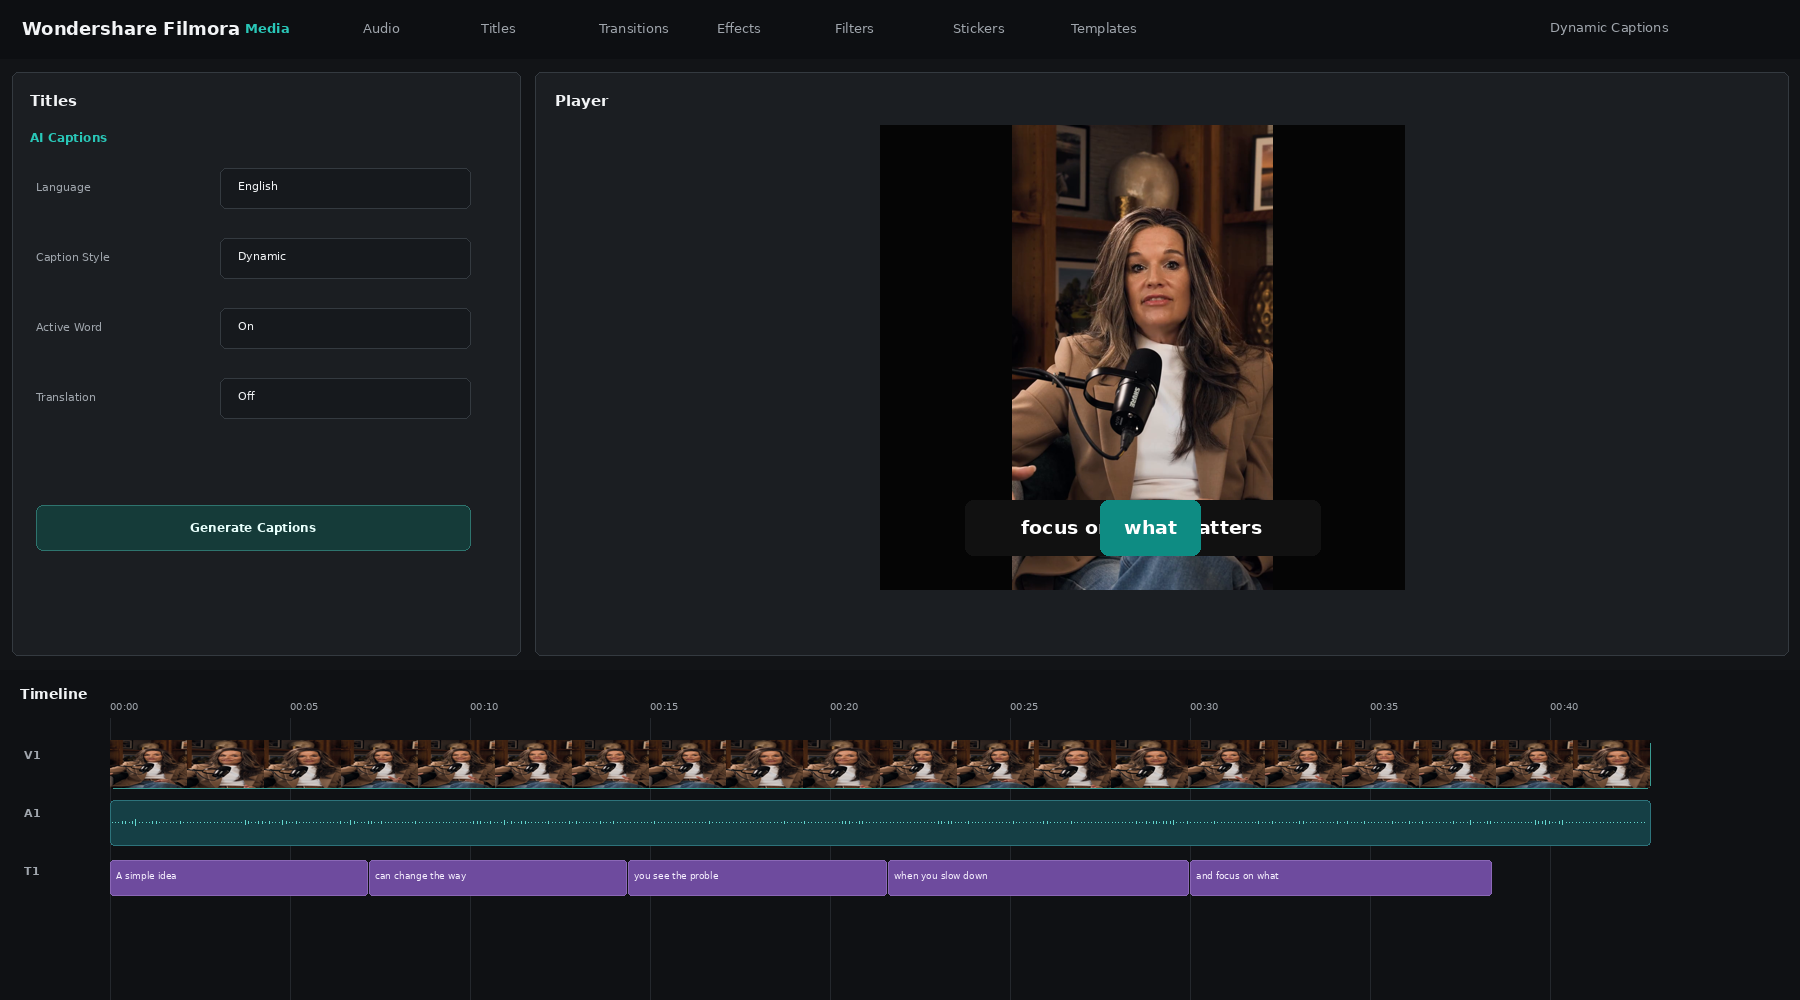 Figure 5. Dynamic Captions recreated on the actual dummy 9:16 video, showing a mobile-friendly active-word caption style.
Before styling, check names, unusual words, numbers, punctuation and caption breaks. Also check that the text does not cover the speaker or important visual information.
CAPTION TIP: Fix the wording first. Animation around an incorrect subtitle only makes the error more noticeable.
AI Audio Denoise: Match the Cleanup to the Noise
Filmora’s Windows AI Audio Denoise panel separates different audio problems instead of treating every recording the same. Current controls include AI Speech Enhancement, Wind Removal, Normal Denoise, DeReverb, Hum Removal and Hiss Removal.
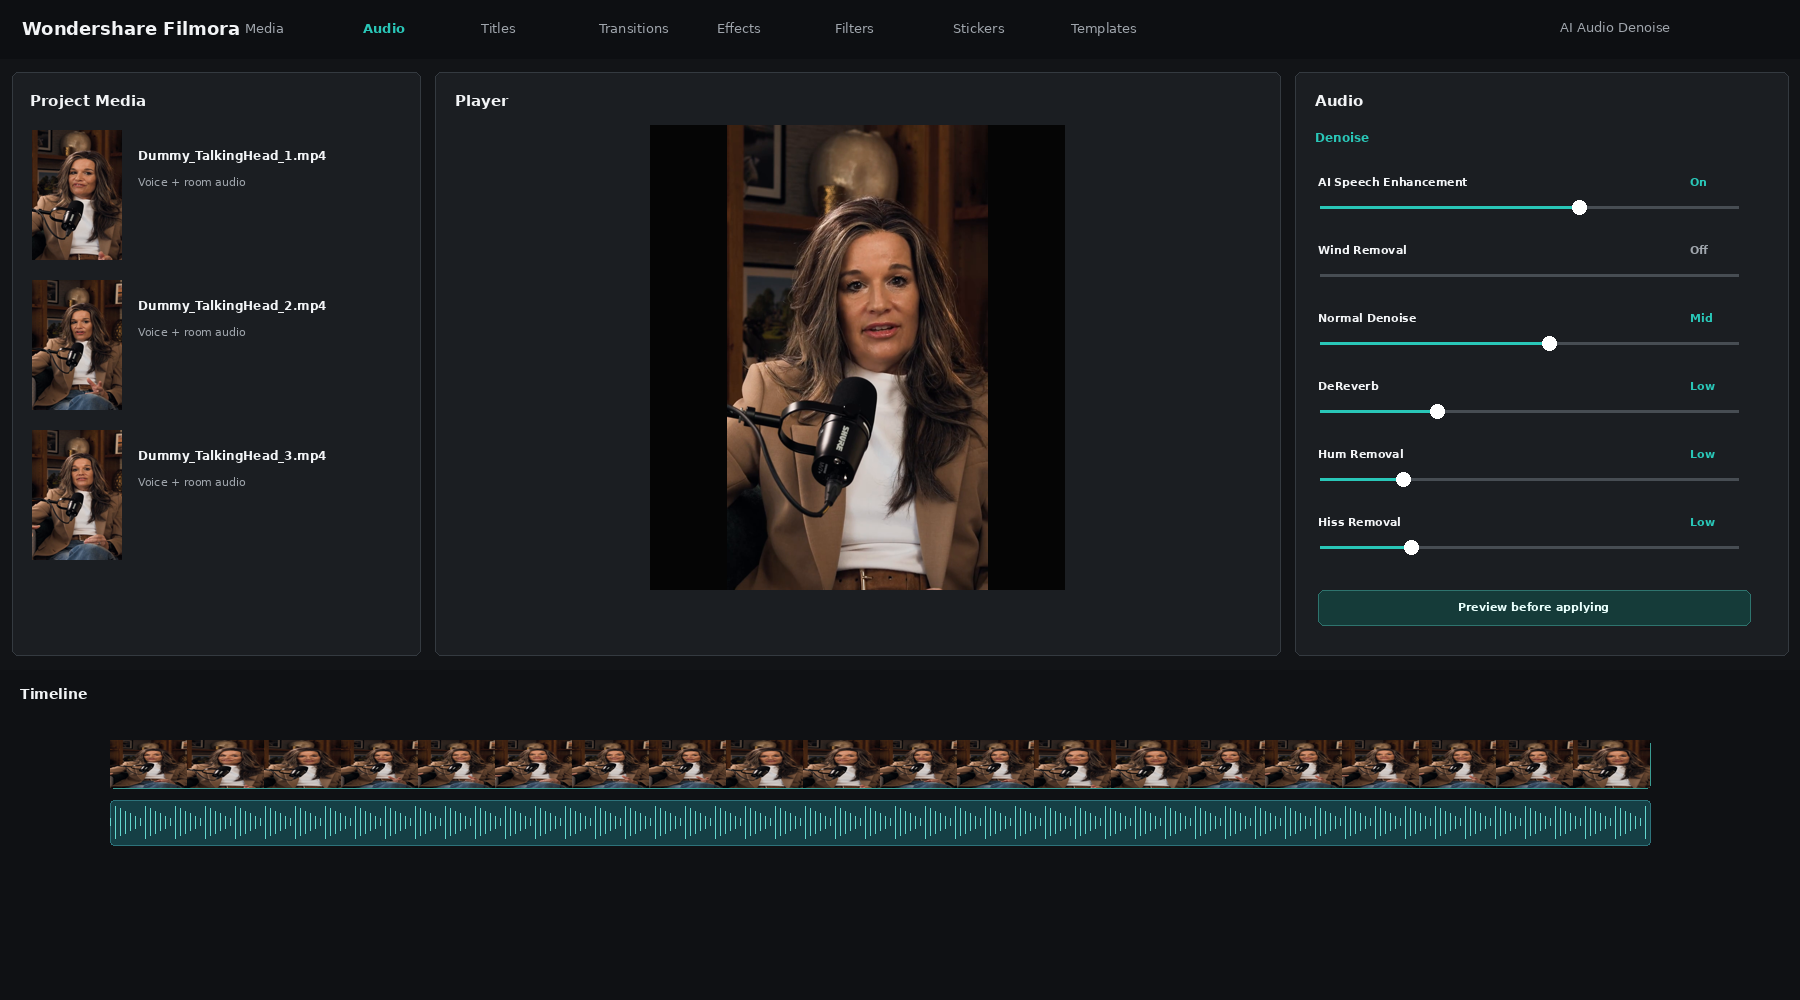 Figure 6. AI Audio Denoise recreated with the dummy video, showing the separate cleanup controls available for common dialogue problems.
DO NOT MAX EVERYTHING OUT: If the recording already sounds acceptable, preview the cleaned version against the original. Heavy denoise or speech enhancement can make a natural voice sound processed.
Practical Test: Can Filmora Make a Simple Talking-Head Edit Easier?
For the hands-on test, we use the 35-second vertical dummy talking-head clip you uploaded. That keeps the experiment neutral and gives us enough speech, pauses and mobile framing to test the beginner workflow.
TEST WORKFLOW
Import → AI Text-Based Editing → Silence Detection only if needed → AI Audio Denoise only if needed → Dynamic Captions → Manual review.
- Import and transcribe: Open AI Text-Based Editing, let Filmora generate the transcript and correct any obvious recognition errors before cutting.
- Remove only what the footage actually needs: If there is dead air, test Silence Detection. If the recording is noisy, test AI Audio Denoise. If neither problem exists, skip those tools instead of forcing an AI effect.
- Generate captions and review once from start to finish: Check whether the edit sounds natural, the captions are correct and the AI actually removed manual work rather than creating new cleanup.
How to Judge the Result
Check | Good result |
Transcript | Important words are recognised correctly |
Silence cleanup | Dead air is reduced without rushing the speaker |
Audio | Voice is clearer without sounding artificial |
Captions | Readable, accurate and not covering the speaker |
Time saved | The AI step was faster than doing the same job manually |
Filmora Tips Worth Knowing
- Ask AI Mate when you do not know the feature name. Guide Mode can turn a plain-language problem into a step-by-step path to the right Filmora tool.
- Use text editing before fine timeline trimming. Remove obvious spoken mistakes from the transcript first; keep the timeline for precise visual timing.
- Do not remove every detected silence. Natural speech still needs breathing room.
- Use only the cleanup tool that matches the problem. Do not apply denoise, silence removal and speech enhancement to every recording simply because the buttons exist.
- Correct captions before styling them. Fix words and segmentation first, then animation and emphasis.
- Use AI credits deliberately. Different advanced AI features consume different amounts of credits; Filmora lets you see your balance and usage history in the Account Center.
- Treat the free version as an evaluation environment. It is useful for judging the workflow, but standard desktop exports carry a watermark.
Quick Filmora Prompts Worth Saving
Remove slow sections “Help me identify unnecessary silent gaps and repeated spoken sections. Keep short pauses that make the delivery sound natural.” |
Improve a talking-head clip “Help me tighten this talking-head video without making the speaker sound rushed. Remove obvious dead space, clean distracting background noise and keep one clear message.” |
Clean a tutorial “Keep every required instructional step, but remove waiting time, failed attempts and repeated explanation. Leave enough time for viewers to see important on-screen actions.” |
Fix an over-edited result “Review the current cut for abrupt transitions or places where too much silence was removed. Restore natural pacing where needed.” |
Ask Filmora which tool to use “I want to remove long pauses from this talking-head video without manually cutting every gap. Which Filmora feature should I use and where can I find it?” |
BEST BEGINNER WORKFLOW: Import → Fix transcript → Make obvious text cuts → Use Silence Detection only when needed → Clean audio only when needed → Generate captions → Finish on the timeline → Export.
Conclusion:
The best AI video editors in 2026 are not replacing the entire editing process. They are removing specific parts of it that used to consume time. That distinction matters. Descript makes dialogue easier to reshape. CapCut shortens the path from raw footage to social-ready video. Adobe Premiere Pro brings AI into a deeper professional post-production workflow. OpusClip tackles the tedious job of finding worthwhile moments inside long recordings. Filmora makes conventional editing more approachable for creators who want more control without a steep learning curve.
The most useful AI editor wheather its for AI genration tool for image or videos, therefore, is not necessarily the one with the most AI features. It is the one that removes the bottleneck you encounter repeatedly. If you spend hours searching podcasts for clips, automatic clip discovery matters more than colour grading. If you edit interviews every week, transcript-based editing can save more time than dozens of generative effects. If you work with clients, the ability to override AI decisions and finish every detail manually becomes far more important.
Resources & Credits
This guide was researched and reviewed in August 2026 using official product documentation, industry research, practical workflow testing and sample media. Product features, pricing, AI credits, free-plan limits and beta availability may change, so confirm current details with the respective provider before subscribing.
- Wyzowl — Video Marketing Statistics:https://wyzowl.com/video-marketing-statistics/
- Adobe Premiere Pro — Generative Extend: https://helpx.adobe.com/premiere/desktop/edit-projects/edit-with-generative-ai/generative-extend-overview.html
- Adobe Premiere Pro — Generative Media Tool: https://helpx.adobe.com/premiere/desktop/edit-projects/edit-with-generative-ai/generative-media-tool-overview.html
- Adobe Premiere Pro Plans: https://www.adobe.com/products/premiere/plans.html
- OpusClip — Introduction: https://help.opus.pro/docs/introduction
- OpusClip — ClipAnything: https://help.opus.pro/docs/article/9947095-clip-anything
- OpusClip — ClipAnything Prompt Manual: https://help.opus.pro/docs/article/clip-anything-prompt-manual
- OpusClip — Virality Score: https://help.opus.pro/docs/article/virality-score
- OpusClip — Plans & Credits: https://help.opus.pro/docs/article/plans-and-credits
- OpusClip Pricing: https://www.opus.pro/pricing
- Wondershare Filmora — AI Mate: https://filmora.wondershare.com/ai-copilot-editing.html
- Filmora — AI Text-Based Editing: https://filmora.wondershare.com/guide/ai-text-based-editing.html
- Filmora — Silence Detection: https://filmora.wondershare.com/guide/silence-detection.html
- Filmora — Dynamic Captions: https://filmora.wondershare.com/auto-caption.html
- Filmora — AI Audio Denoise: https://filmora.wondershare.com/ai-audio-denoise.html
- Filmora — Screen Recorder: https://filmora.wondershare.com/screen-recorder.html
- Filmora — Desktop Download & Free Access: https://filmora.wondershare.com/video-editor/video-editor-download.html
- Filmora Pricing: https://filmora.wondershare.com/shop/buy/buy-video-editor.html
- Video Reference — Pinterest Pin 717198309452647202: https://www.pinterest.com/pin/717198309452647202/
- Video Reference — Pinterest Pin 55802482886820298:https://in.pinterest.com/pin/55802482886820298/
Testing and visual disclosure: Practical prompts, workflow observations, comparison scores and editing recommendations were created for CrowJack.
Media credit: Copyright in third-party footage remains with the original creator or rights holder. Pinterest links indicate where the referenced footage was located and do not imply that Pinterest owns the original material.
Trademark notice: Descript, CapCut, Adobe Premiere Pro, OpusClip, Wondershare Filmora and other product names, logos and trademarks belong to their respective owners. Their inclusion is for editorial, educational and comparative purposes only.