AI tools for coding now cover far more than autocomplete. Turning an idea into working software has traditionally required coding skills, development time, or access to someone who has both. Today, a non-coder can describe an app in plain English, while a developer can ask an agent to inspect a repository, edit several files, run tests and review a pull request.
The shift is no longer limited to autocomplete. AI is becoming part of how software is designed, built, debugged and maintained.
The challenge is that “AI coding tool” now describes very different products. Replit and v0 can help someone start from an idea. GitHub Copilot and Cursor work much closer to an existing development workflow. Claude Code and Codex move further toward agentic, repository-level engineering.
So instead of asking only which AI writes the best code, this guide asks a more practical question: which tool fits the way you actually want to build? We compare Replit Agent, v0, GitHub Copilot, Cursor, Claude Code and OpenAI Codex across the workflows they are designed to handle, while keeping the same SpendSmart benchmark project as our common reference point.
Reality check: AI adoption is high, but trust is not automatic. Stack Overflow found the most common frustration is AI output that is “almost right,” which is exactly why this guide looks at control, debugging and verification—not just code generation.
Choosing among the best ai tools for coding depends less on finding a universal winner and more on matching a tool to your development needs. Different ai tools for coding suit different users, projects, and levels of technical experience. Beginners may prefer tools that simplify setup and provide guided assistance, while experienced developers may value deeper code control, debugging, and workflow integration. Designers and product teams might prioritize tools that turn ideas into functional interfaces quickly. Your choice should also consider how much of the development process you want AI to manage, from generating individual code snippets to building larger features. The best ai tools for coding ultimately vary by your goals, workflow, and preferred level of AI involvement. Evaluate ai tools for coding based on these factors.
You are... | What you actually need | Tools worth considering |
Non-coder / founder / marketer | Turn an idea into a working product with minimal technical setup | Replit Agent, Lovable, Bolt.new, v0 |
Beginner learning to code | Build faster while still understanding the code, errors and changes | GitHub Copilot, Replit, Cursor |
Designer / product manager | Turn a wireframe, screenshot or product idea into an interactive application | v0, Lovable, Bolt.new, Replit |
Working developer | Understand repositories, implement features, debug, test and reduce repetitive coding work | Cursor, GitHub Copilot, Devin Desktop, Claude Code |
Experienced developer / engineering team | Delegate meaningful repository-level work with more autonomy and control | Claude Code, OpenAI Codex, Cursor, Devin, Augment Code |
The term “AI coding tool” now covers a wide range of capabilities, from generating code and debugging errors to building complete applications. That makes it important to understand what different tools actually do before comparing the best ai tools for coding. Some ai tools for coding work as coding assistants, helping developers write, explain, and improve code, while others can generate entire features or applications from natural-language instructions. Understanding these differences makes it easier to see where each tool fits into a developer’s workflow. In this guide, we break down the main capabilities of best ai tools for coding and explore how different ai tools for coding support various development needs.
Type of AI coding tool | What it mainly does | Best for | Examples |
|---|---|---|---|
AI coding editors & assistants | Explain, write, edit and debug code inside an existing development workflow | Beginners, developers and teams that want AI close to their IDE/editor | Cursor, GitHub Copilot, Devin Desktop, Zed |
AI coding agents | Explore repositories, edit multiple files, run commands/tests and return changes for review | Experienced developers and teams delegating complex coding work | Claude Code, OpenAI Codex, Devin, OpenHands |
Prompt-to-app builders | Turn natural-language requirements into working applications with much of the setup handled by the platform | Non-coders, founders, marketers and first-time builders | Replit Agent, Lovable, Bolt.new, v0 |
AI UI & prototyping tools | Turn ideas, screenshots or wireframes into working interfaces and prototypes | Designers, product managers and frontend-focused builders | v0, Lovable, Bolt.new |
AI code review & security tools | Analyze code or pull requests for bugs, quality issues and security risks | Developers and teams that want a validation layer before merge | CodeRabbit, Snyk, SonarQube |
These categories overlap. Cursor is an AI editor with agent capabilities; GitHub Copilot now goes beyond suggestions into multi-step tasks; Replit and v0 both move from prompt to working application. We therefore judge each product primarily on the work it is designed to do best.
The six tools below represent different approaches to AI-assisted development, from prompt-first app building to repository-level agentic engineering.
Tool | Best for | Main experience | Learning curve | Why it stands out |
|---|---|---|---|---|
Non-coders and first-time app builders | Prompt → working app | Low | Build, data and publishing in one browser workspace | |
Designers and product prototyping | Visual / full-stack building | Low–Medium | Strong product and interface iteration | |
Existing IDE and GitHub workflows | Assistant + agent + PR workflow | Medium | Fits established developer workflows | |
AI-first development | AI-native editor | Medium | Deep repo-aware Agent workflow | |
Complex repositories | Terminal / repo agent | High | Strong repository reasoning and execution | |
Delegated and parallel engineering | Coding agent | Medium–High | Parallel and longer-running task delegation |
Prices and included usage change quickly. The figures below were rechecked against official vendor pricing on September 4, 2026; usage-based credits, model choice and overages can materially change the effective cost.
Tool | Free entry point | Paid starting point (Sep 2026) |
|---|---|---|
Replit Agent | Starter: free daily Agent usage | Core: $17/mo billed annually ($20 monthly) |
v0 | Free: $5 monthly credits + daily message limit | Plus: $30/user/mo for new paid team accounts |
GitHub Copilot | Free plan available | Pro: $10/mo |
Cursor | Hobby free | Pro: $20/mo; India Start: ₹649/mo |
Claude Code | No separate unlimited free coding plan | Claude Pro: $20/mo; API pay-as-you-go also available |
OpenAI Codex | Promotional/plan-limited free access may vary | Included with ChatGPT Plus: $20/mo |
Comparing these products only by feature count would be misleading because they are built for different jobs. We used common evaluation criteria where the workflows overlap, then added job-specific criteria for app builders and developer-focused agents.
What we looked at | What we wanted to find out |
Ease of use | How quickly can the intended user get started? |
User expertise required | How much coding or technical knowledge does the intended user need to build, troubleshoot, verify and maintain a usable result? |
Instruction following | Does the tool understand the request without repeated correction? |
Output quality | Is the generated application or code genuinely usable? |
Code / project understanding | Can it understand existing files, dependencies and project structure? |
Debugging & error recovery | Can it find the cause of problems and recover without creating new ones? |
Control & transparency | Can users inspect, reject, undo or review AI changes? |
Automation & autonomy | How much work can it complete on its own? |
Testing | Can it create, run and respond to tests effectively? |
Pricing & limits | What does meaningful usage cost in practice? |
Privacy & security | What controls exist around code, data and agent permissions? |
User-expertise lens: We also considered whether a tool meaningfully lowers the expertise barrier. One real-world example shared with us involved a non-developer who used AI to create an entire app that is now being used. That matters in this comparison because an AI coding tool can create value not only by accelerating developers, but also by enabling capable non-developers to turn an idea into working software. Verification, security and maintainability are still evaluated separately.
Testing principle: Completing a task is not enough. We also look at unnecessary changes, correction loops and how much human intervention is still required.
Testing transparency: We directly tested the workflows and account limits where we had live access. Where a full paid workflow was not available, we used current official documentation and clearly labelled illustrative reconstructions instead of presenting them as measured benchmark results. The scores in this guide are editorial fit scores, not vendor benchmark claims.
To keep the guide grounded in something more realistic than a one-line coding prompt, we use the same small project throughout: SpendSmart, a personal expense tracker.
For Replit Agent and v0, the test begins with only the product idea. For GitHub Copilot, Cursor, Claude Code and Codex, we use an existing SpendSmart codebase and focus on understanding, feature work, debugging, refactoring, testing and review.
Why SpendSmart? It is more realistic than a basic to-do app, but still small enough that differences in setup, reasoning, code quality and developer control are easy to see.
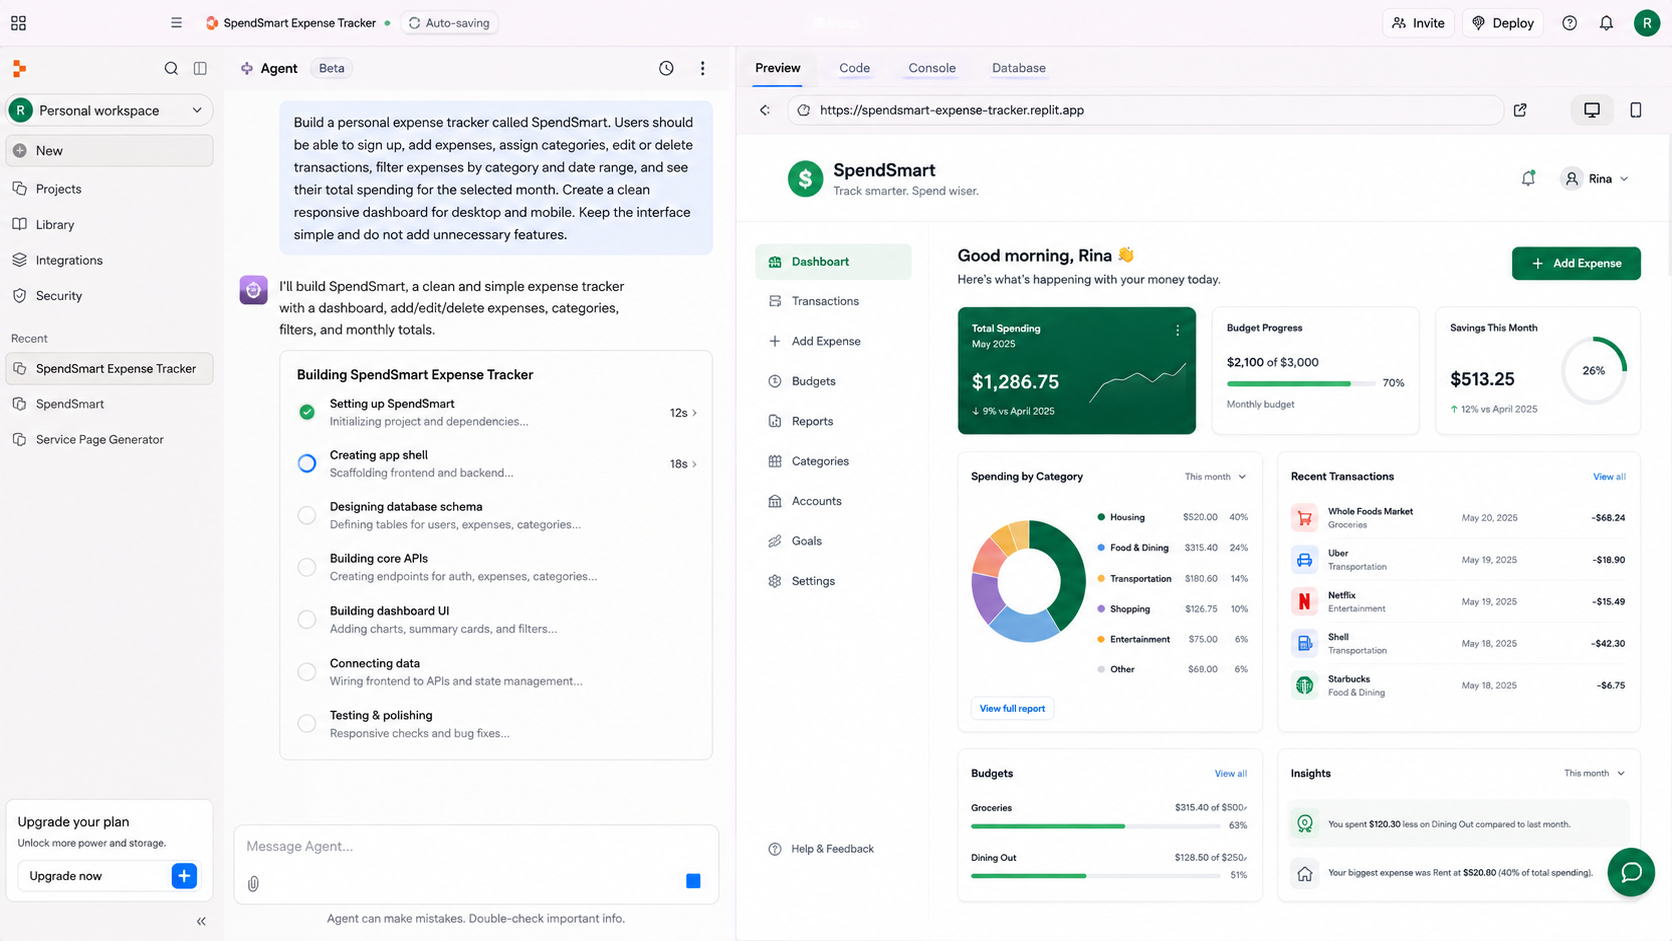
Used primarily for Replit Agent and v0. We start with the same SpendSmart product requirement and look at setup, first-result quality, UI, backend/data handling, authentication, conversational iteration, error recovery, deployment and code access.
Used for GitHub Copilot, Cursor, Claude Code and Codex. Each tool is evaluated around repository understanding, feature implementation, debugging, refactoring, tests, command execution and final diff/code review.
Fair comparison: When products perform the same job, we use the same prompts and project context. When their intended workflows differ, we judge them on the work they are actually built to handle.
Below are the six tools we compare in depth using the SpendSmart scenario and the job-specific criteria above.
Replit Agent is built around a simple idea: describe what you want to build, and let AI handle much of the technical setup required to turn that idea into a working application. Unlike a traditional coding assistant that expects you to already have an IDE, repository and development environment ready, Replit combines Agent, code editing, preview, database tools and publishing inside one browser-based workspace. Replit itself says users can describe what they want in plain language while Agent handles the technical details. Among the best ai tools for coding, Replit stands out for bringing these capabilities together in a single environment. Its approach also shows how ai tools for coding are expanding beyond code generation to handle setup, development and deployment. This makes Replit particularly relevant for non-coders, founders, marketers, students and beginners who want to build something before learning how to assemble a complete development stack.
Best for | Non-coders, founders, beginners and first-time app builders |
Main experience | Prompt → build → preview → refine → publish |
Where it works | Browser-based Replit workspace |
Free option | Yes — Starter includes daily Agent credits and limited Agent functionality |
Paid starting point | Core from $20/month when billed annually |
Included Core credits | $20/month |
Database | Built-in database support |
Authentication | Replit Auth and Clerk Auth can be provisioned through Agent |
Deployment | Built-in publishing to a live URL |
Main strength | Removes much of the setup between an idea and a working application |
Main limitation | More capable Agent workflows and heavier usage require paid plans and usage credits |
Replit’s current Starter plan includes free daily Agent credits, a built-in database and one published project. Core adds Full Build, Plan Mode, connectors, unlimited workspaces and autonomous long builds.
Replit deserves a place in this comparison because it tackles a very different problem from Cursor, GitHub Copilot or Claude Code: Can someone go from an idea to usable software without first becoming comfortable with a traditional development environment? What makes Replit relevant for this test:
That is exactly what we want to examine with SpendSmart.
For Replit Agent, we use our Build From an Idea testing track. Instead of giving it an existing SpendSmart repository, we start with only the product requirement:
We deliberately avoid specifying the framework, database structure or file architecture. Part of the test is seeing how much sensible technical decision-making Replit handles for a user who may not know what to choose.

Before judging the generated application, we check whether Agent:
When Plan Mode is available on the account being tested, we review the generated plan before approving the build. Plan Mode currently requires Core or above rather than being part of the permanent Starter experience.
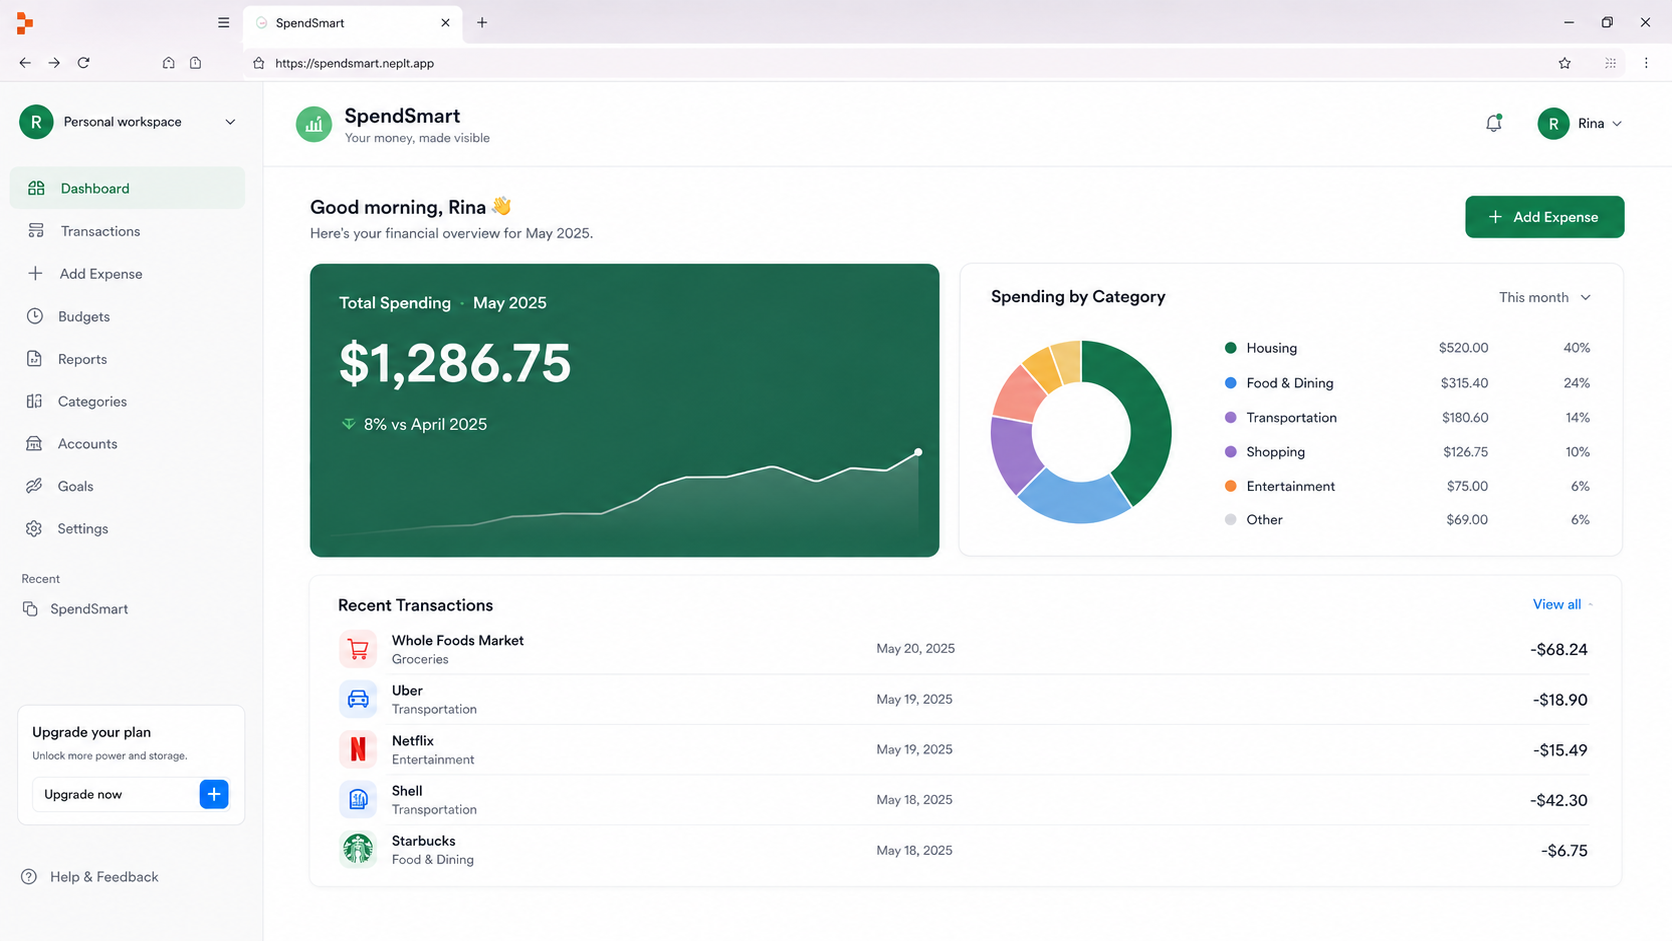
Once the direction is set, let Replit build the first version without immediately correcting every design preference or minor imperfection. The objective is to judge how much of the original requirement survives the jump from prompt to working application.
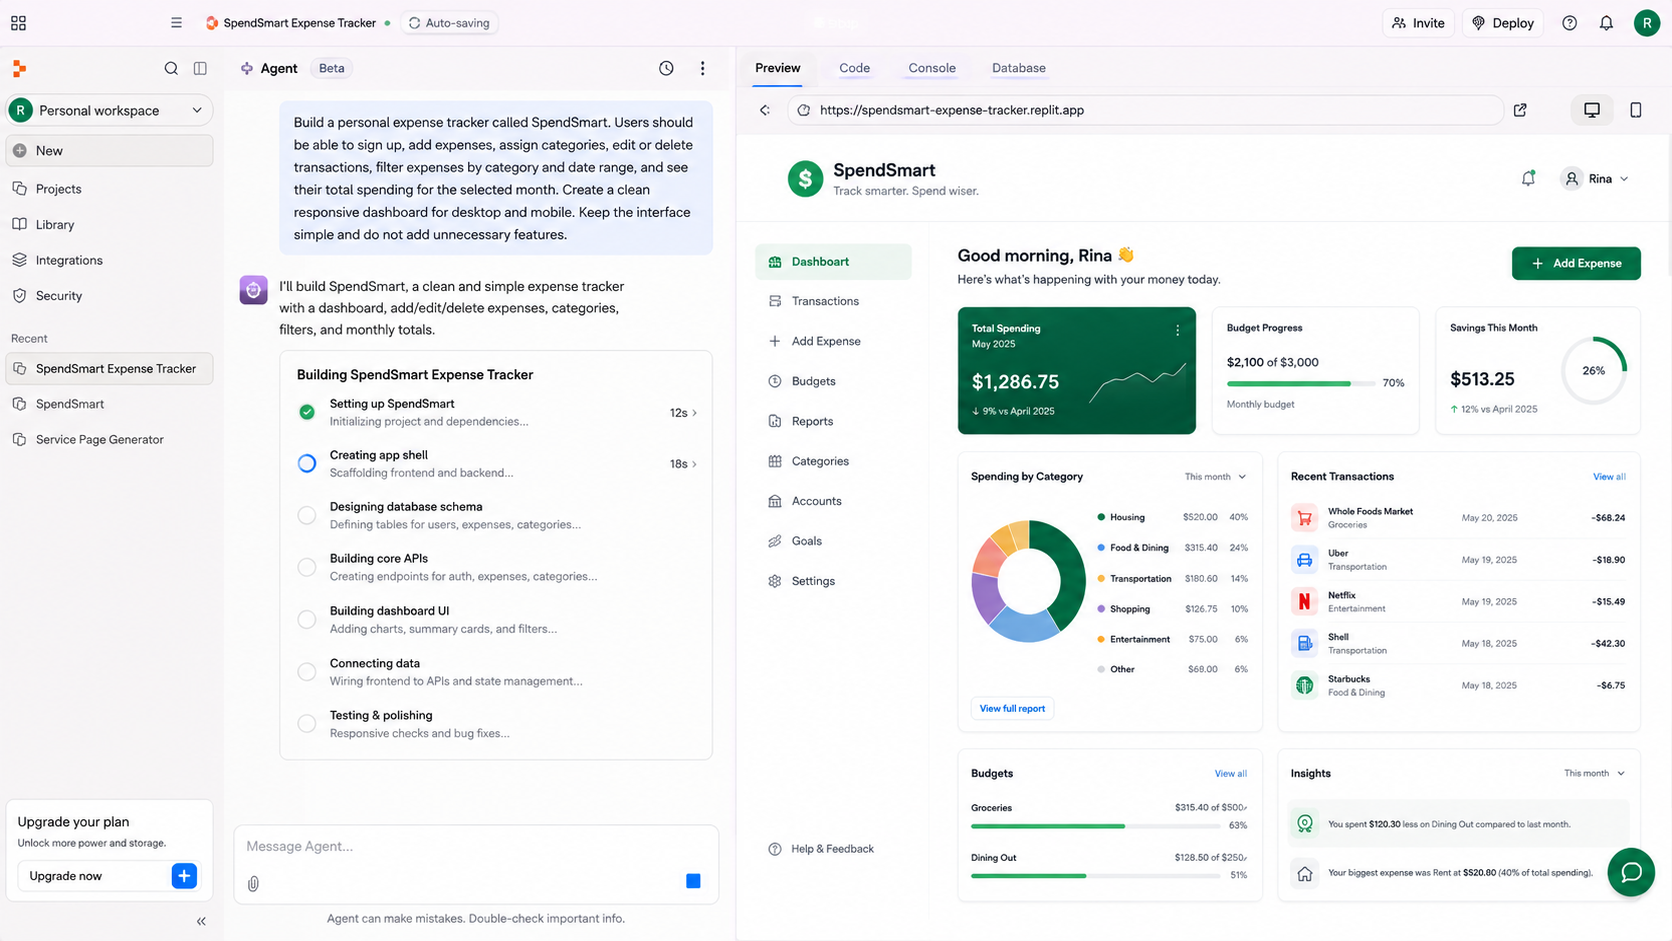
The first usable version is checked before major refinement for:
The first-build test shows how much of the original requirement Replit can translate into working software before the user starts correcting or refining the result.
Record:
Result | Finding |
Requested features completed | Partially verified before the free-plan Agent allowance was exhausted |
Partially working | Initial SpendSmart interface/build generated; a published app URL was later available |
Missing | Full CRUD, authentication and filter behavior were not independently verified |
Unrequested features added | Not fully assessed before the session limit was reached |
Generation time | First styled preview ~4m45s; daily credits exhausted at ~6m15s |
Human intervention | No manual coding during the initial build |
Why this matters: A tool that eventually produces a good application after ten repair prompts is not equivalent to one that gets most of the product right on its first serious attempt.
A polished dashboard does not automatically mean we have a working application. SpendSmart needs persistent expenses and user accounts, so the next step is to inspect what Replit created behind the interface. Replit provides managed database workflows for keeping data persistent rather than storing it only in the browser. For authentication, Replit currently offers two Agent-provisioned options:
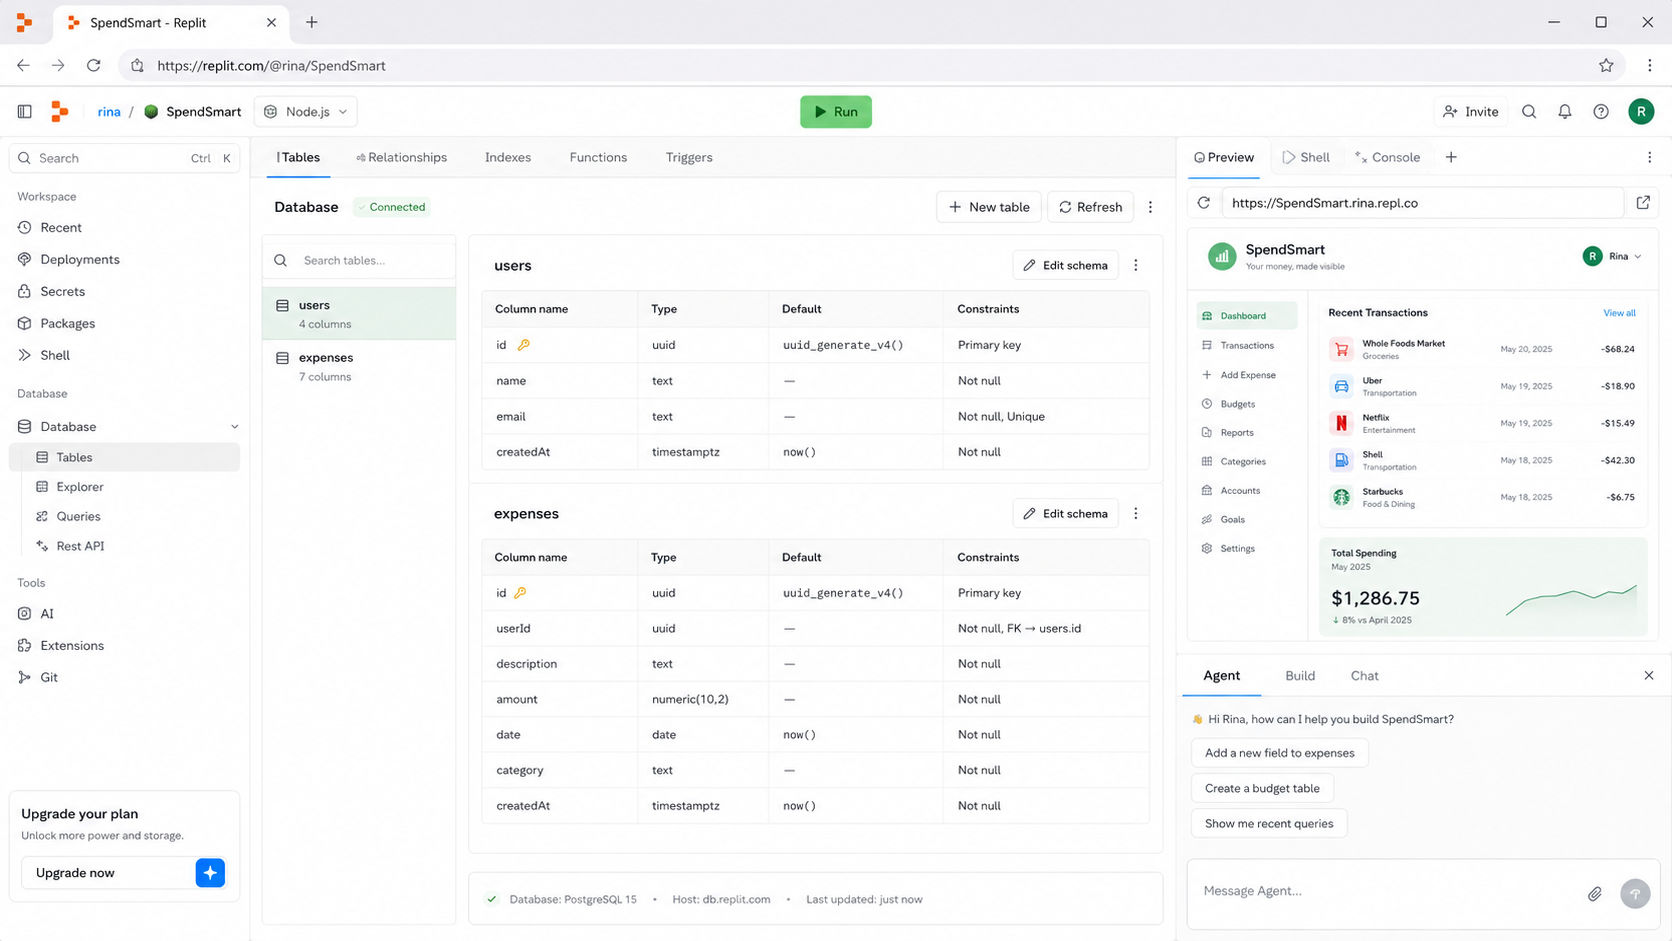

Test:
This is one of the most important tests for Replit’s intended audience. A non-developer is unlikely to open several files and manually redesign the dashboard. Instead, they are more likely to describe what they dislike. We use:
Then we check whether Agent can improve the product without breaking something that already worked.

Next, we ask Replit to extend an existing application rather than just modify its appearance.
This is a useful test because the feature touches both the interface and application logic.
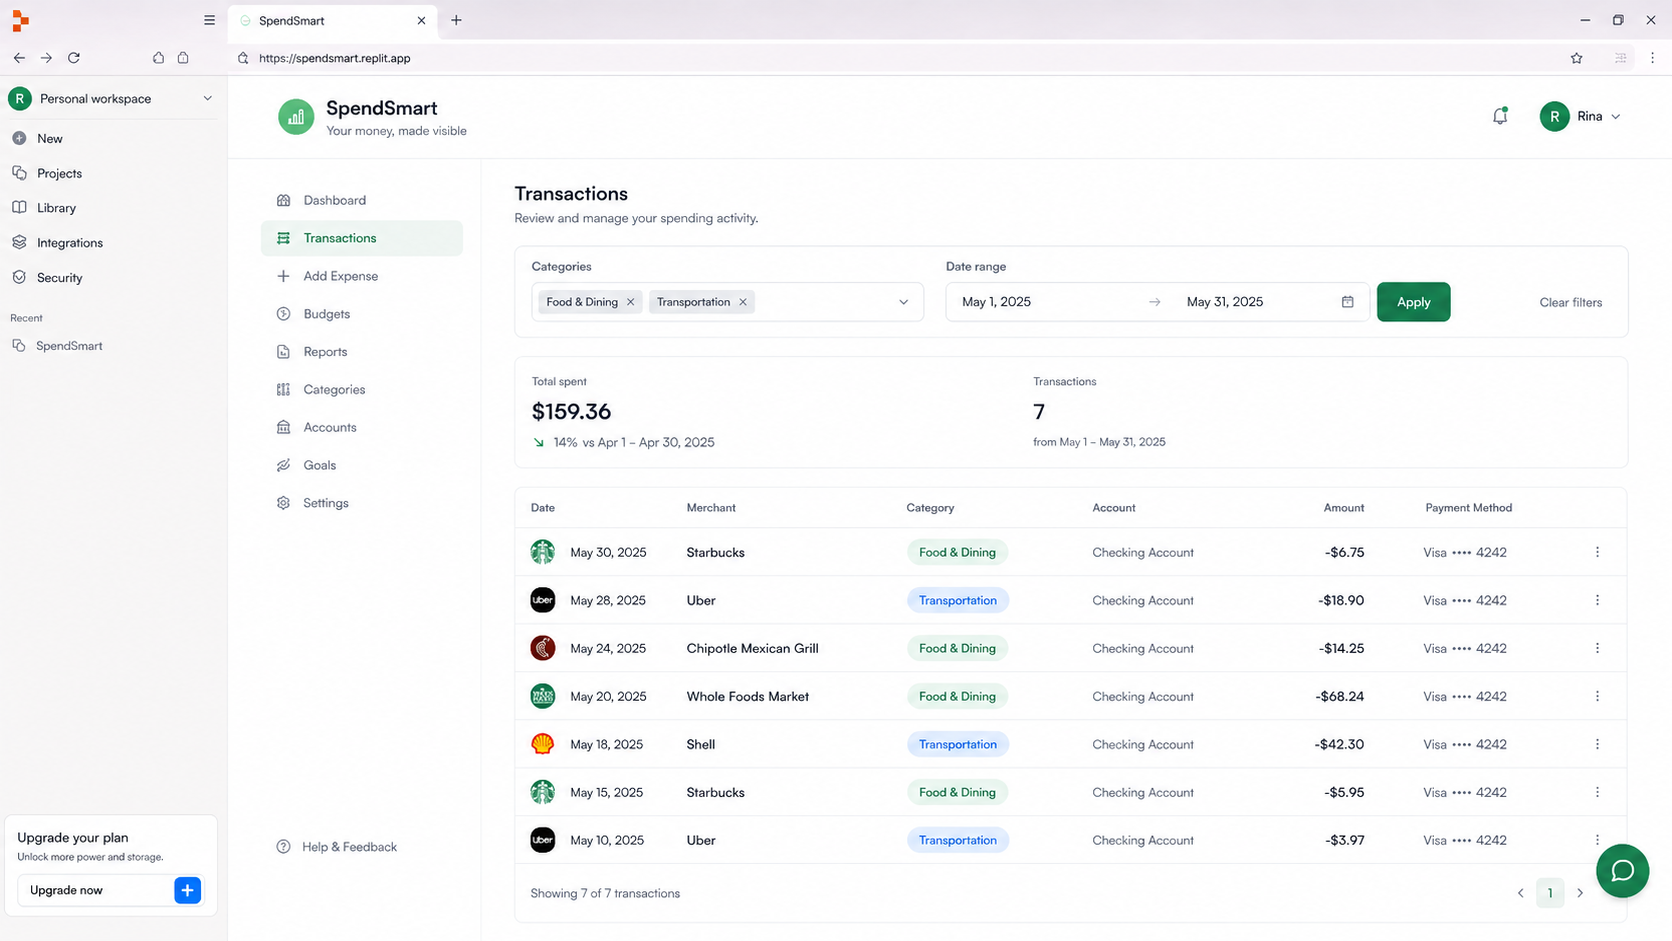
AI-generated applications will eventually break. So instead of judging only successful generations, we also want to know whether Agent can diagnose a problem when the user does not know where the relevant code lives. Use:
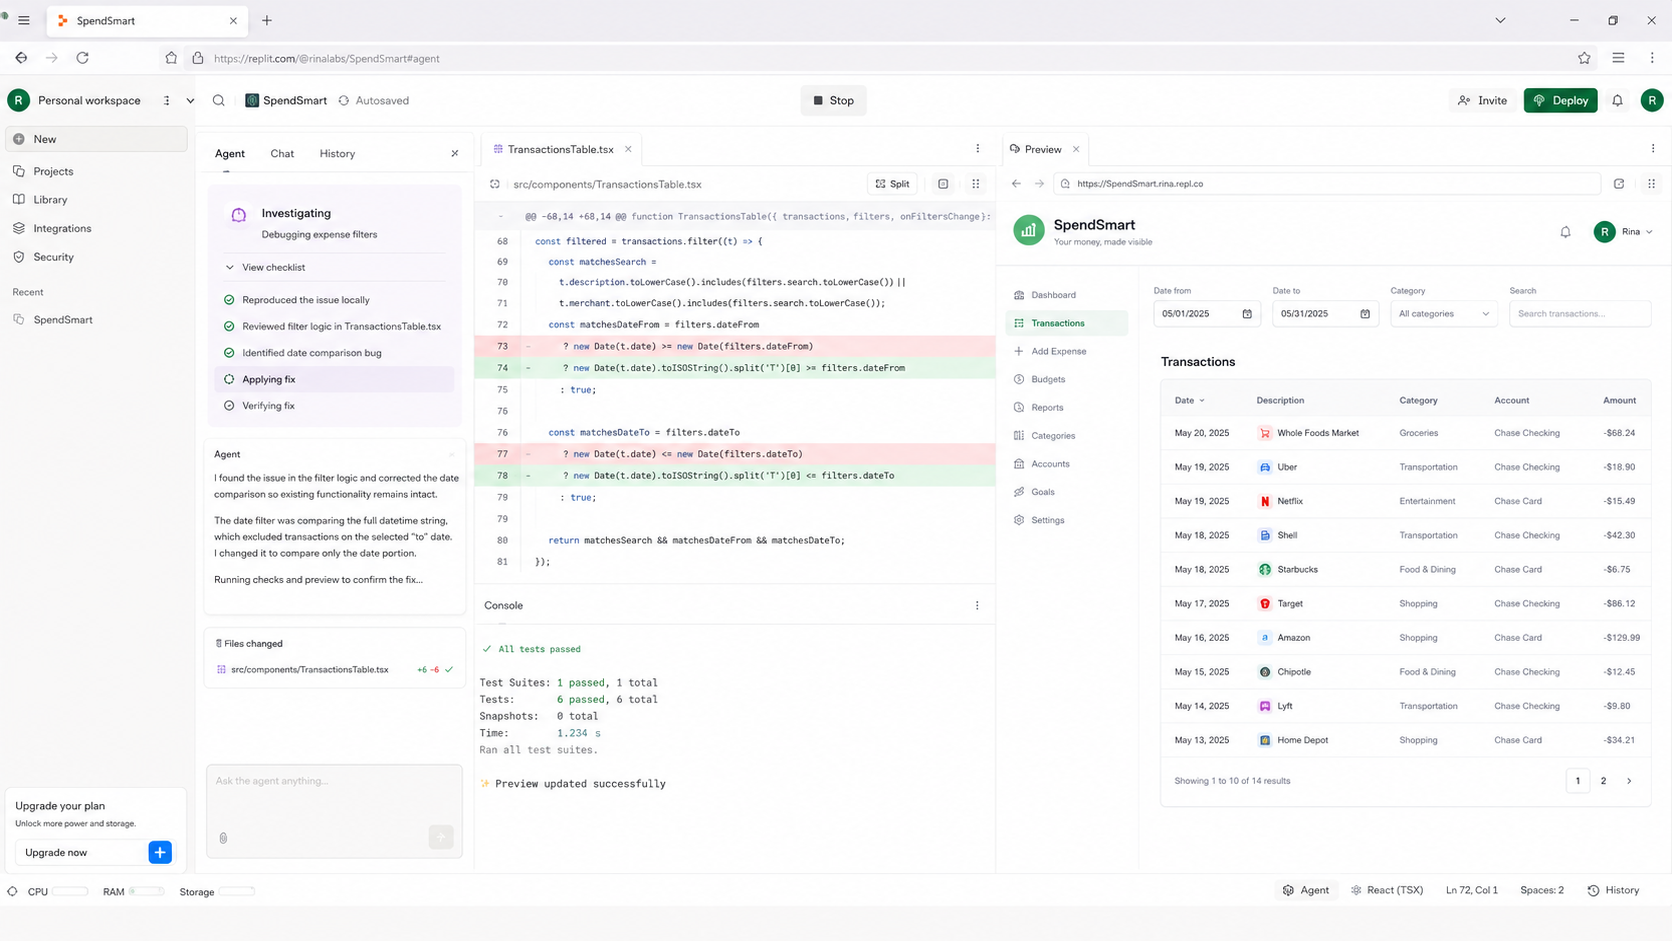
Error recovery matters particularly for non-coders because they may be able to describe what is broken without being able to locate or repair the underlying code themselves. In a live benchmark, we would record root-cause accuracy, whether the first fix worked, the number of repair attempts, unrelated changes and whether manual coding was required. Our free-plan session did not reach this debugging stage, so this diagram is illustrative rather than a measured Replit result.
Replit keeps development and publishing relatively close together. Its official workflow allows an application that works in Preview to be published from Agent or the Publishing panel to a shareable URL. Replit’s publishing system creates a separate cloud-hosted version of the project and supports different deployment types depending on the application.
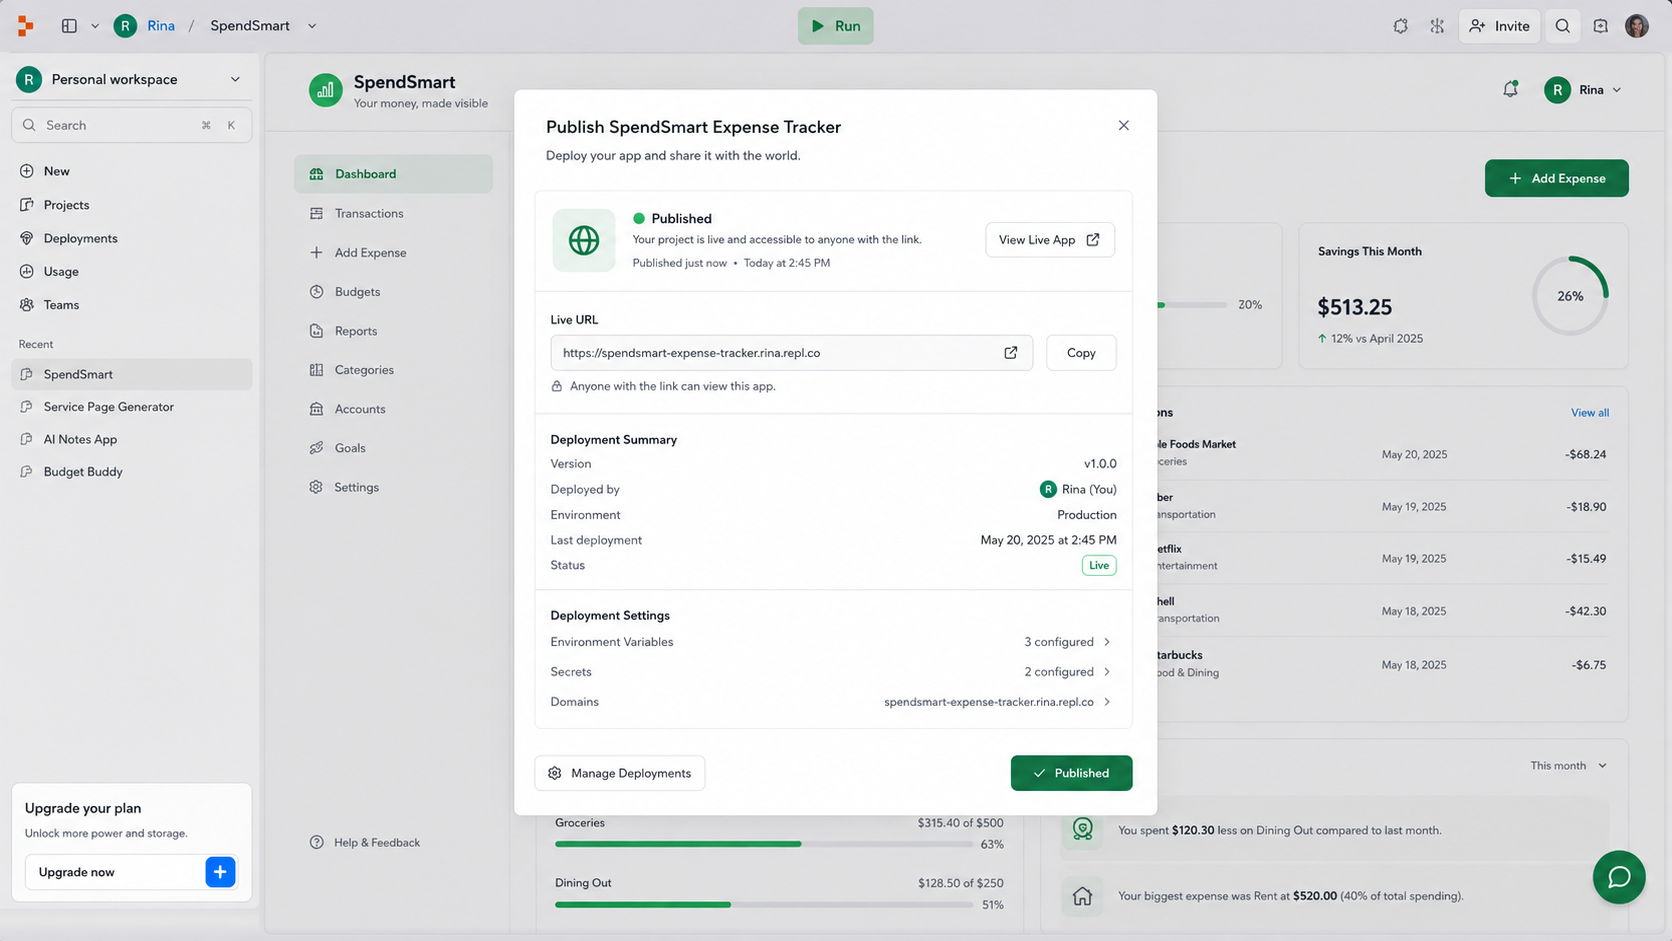
Replit’s own troubleshooting guidance recommends testing in Preview first because production problems can come from app code, deployment settings, secrets, ports or other configuration.
Replit removes a lot of development setup, but it does not remove the risks associated with shipping software. Before treating an AI-built app as production-ready, check:
Replit itself notes that Agent is powered by probabilistic models and may occasionally make mistakes.
Replit pricing needs more explanation than a simple monthly subscription because AI usage and cloud services consume credits.
Plan | Current entry point | What you get | Review angle |
Starter | Free | Daily Agent credits, Lite Build, built-in database, one published project | Useful for exploring Replit, but not the full autonomous Agent experience |
Core | From $20/month billed annually | $25 monthly credits, Full Build, Plan Mode, unlimited workspaces, up to 2 parallel agents, publishing in multiple regions | The more realistic tier for someone regularly building apps with Agent |
Pro | From $95/month billed annually | $100 monthly credits, up to 10 parallel agents, more powerful models, larger collaboration limits and premium support | Aimed more at commercial and heavier professional usage |
Enterprise | Custom | Enterprise controls, SSO/SAML, advanced privacy options and infrastructure controls | Outside the natural starting point for most individual builders |
Current plan limits and annual entry pricing come from Replit’s 2026 pricing and plan documentation.
The Starter plan is useful for understanding how Agent works, but it should not be treated as unrestricted free AI development. Starter currently provides daily Agent credits, a built-in database and one published project. Core adds more agent usage, Plan Mode and $20 toward Replit’s most powerful models. This pricing structure is an important consideration when comparing the best ai tools for coding, particularly for users with larger or ongoing projects. Replit also uses usage-based billing for AI and cloud services, meaning ai tools for coding can involve different practical costs depending on build size, agent effort, hosting and database usage. As a result, two people on the same subscription can incur very different costs based on how extensively they use the platform.
Tell Agent:
A more precise first prompt can reduce unnecessary rebuilding later.
If your plan includes Plan Mode, use it for larger features before allowing Agent to modify the project. Reviewing a proposed approach is usually easier than undoing a large incorrect implementation.
Do not make five major conversational edits and then test the application at the end. Change → test → checkpoint → continue.
Agent usage is not necessarily a fixed unlimited allowance. Keep an eye on billing/usage while experimenting with repeated builds and larger projects.
If a working feature is important, preserve a stable version before asking Agent for a large refactor or redesign.
For apps containing private user data, create two test accounts and actively try to access data across them.
v0 sits between visual product building and full-stack development. For our SpendSmart benchmark, the most interesting question was not whether it could make a polished dashboard, but how far the same workflow could go into data, authentication, debugging and deployment.
Category | Current position |
Best for | Designers, product managers, founders and UI-focused builders |
Main experience | Prompt / mockup → interface → visual refinement → application logic → deploy |
Where it works | Browser-based v0 workspace |
Free option | $0; $5 included monthly credits and a 7-message/day limit |
Paid starting point | Plus — $30/user/month |
Database options | Integrations such as Supabase, Neon and Upstash |
GitHub | Repository sync and project connection supported |
Deployment | One-click publishing to Vercel |
Main strength | Strong bridge between product/design ideation and editable full-stack code |
Main limitation | Credit-based usage can stop larger app-generation sessions before completion |
Current pricing and workflow details were checked against v0’s official pricing and documentation in August 2026.
For SpendSmart, this makes v0 a useful test of whether strong visual generation can translate into a usable product workflow rather than just a good-looking prototype.
Like Replit, v0 belongs primarily in our Build From an Idea track. We deliberately used the same benchmark requirement rather than giving it an existing repository.
Benchmark prompt: Build a personal expense tracker called SpendSmart. Users should be able to sign up, add expenses, assign categories, edit or delete transactions, filter expenses by category and date range, and see their total spending for the selected month. Create a clean responsive dashboard for desktop and mobile. Keep the interface simple and do not add unnecessary features.
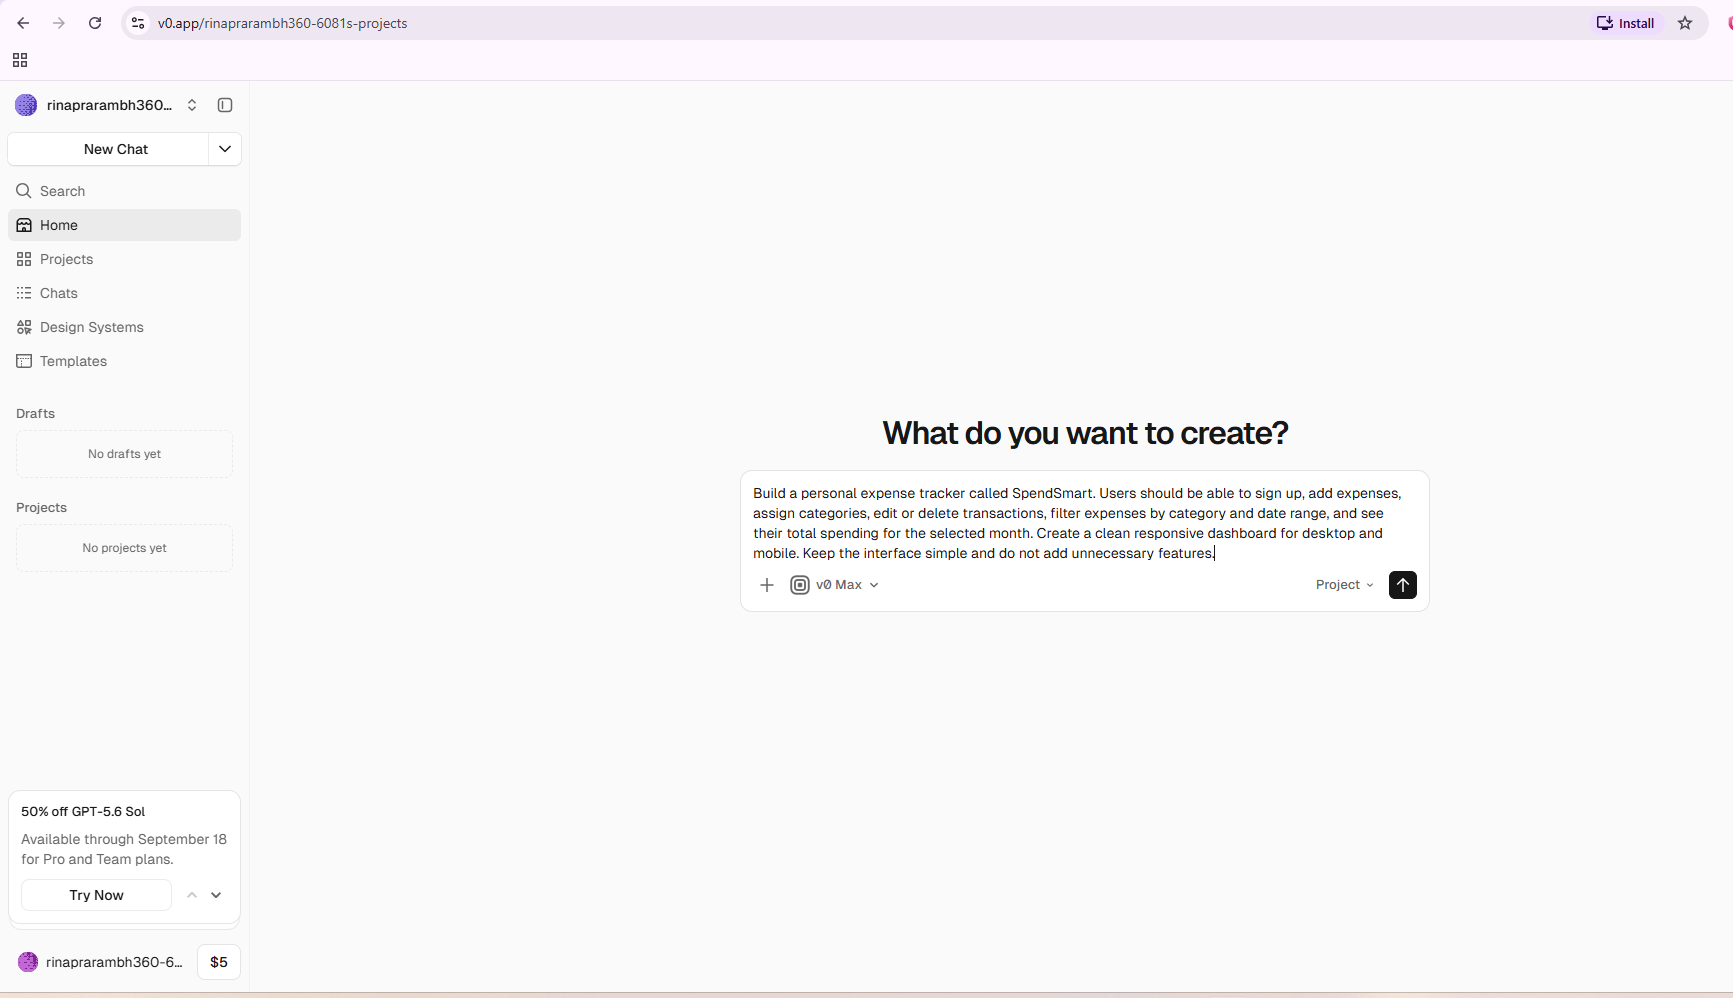
We gave v0 the same SpendSmart brief used for Replit without specifying the visual layout, database or project architecture.
Before generation, we looked for whether v0 understood that SpendSmart needed a dashboard, transaction entry, categories, monthly totals, filters, authentication, persistent data and responsive behavior.
The build did start. v0 inspected available components, began writing the expense dialog and filter bar, and progressed through a multi-task build. However, our available credits ran out before the entire SpendSmart application could be completed.
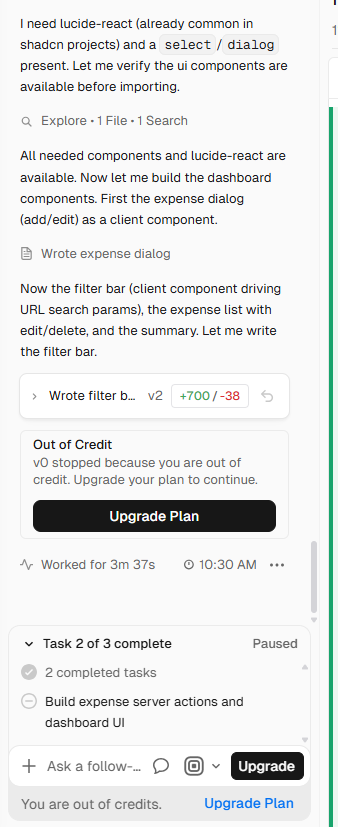
Our live SpendSmart build completed two of three planned tasks before v0 stopped because the account was out of credits.
Observed in our test | Result |
Tasks completed | 2 of 3 |
Visible run time | 3 min 37 sec |
Visible code change on one step | +700 / -38 |
Build status | Paused — out of credit |
Remaining task shown | Build expense server actions and dashboard UI |
Free-plan / credit reality: The available credits were enough to begin a meaningful multi-step SpendSmart build, but not enough to finish the complete application. For larger prompt-to-app projects, credit consumption can become a practical constraint before the feature set itself does.
Testing transparency: The later v0 diagrams in this section are illustrative workflow reconstructions based on the current v0 interface, official v0 documentation and our SpendSmart setup. Our live build stopped when credits were exhausted, so these are not presented as completed results from our test account. Exact UI and output can vary by plan, model, credits, prompt quality and project complexity.
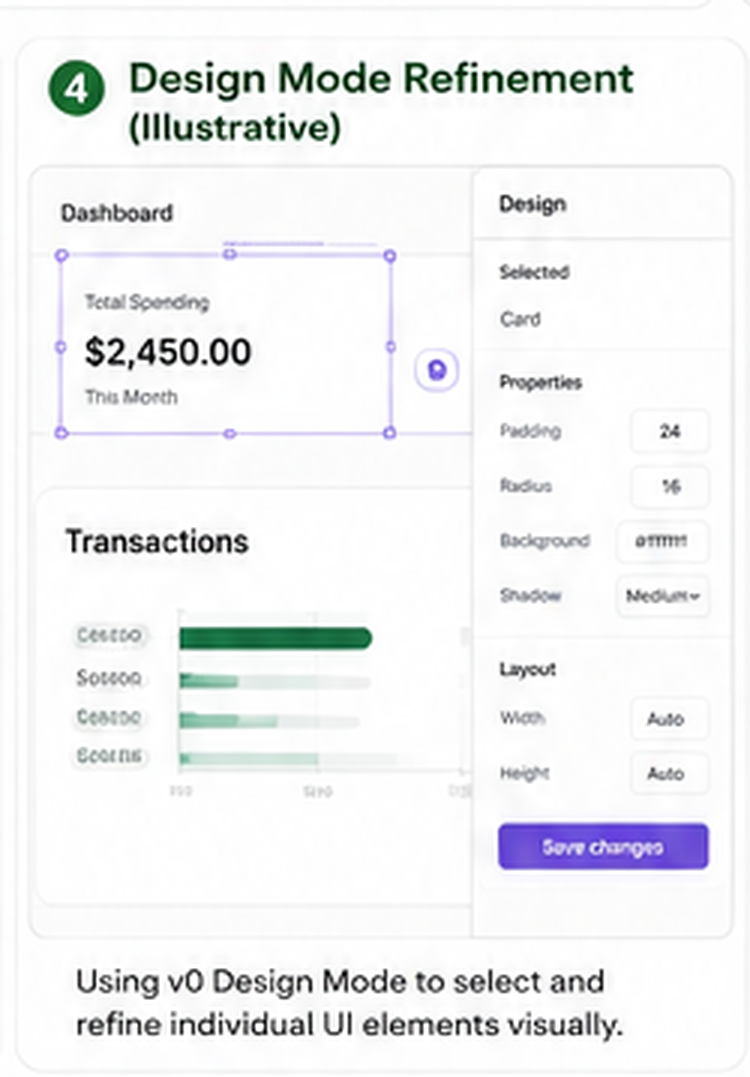
This is one of v0’s strongest differentiators. Design Mode lets users select elements in Preview and adjust styling visually or through targeted natural-language instructions. For SpendSmart, the goal would be to make monthly spending the primary metric, simplify secondary information and keep the layout easy to scan on mobile.
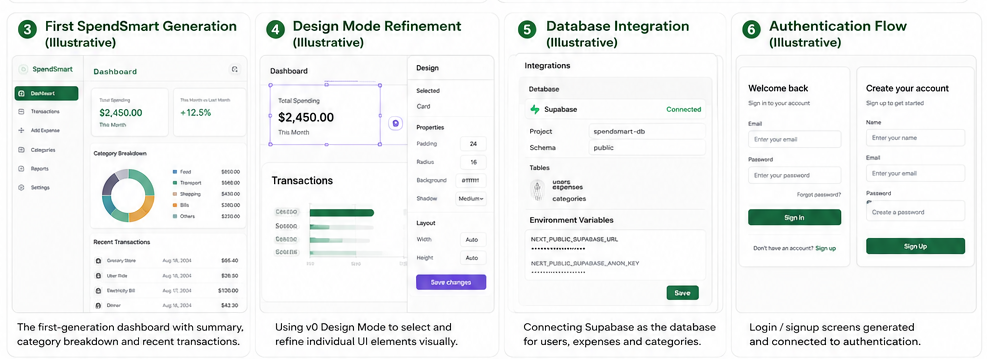
v0’s current integration flow supports databases and backend services from Project settings or directly through chat. Official documentation lists Supabase, Neon and Upstash among the available database integrations. For SpendSmart, users and expenses need persistent storage rather than demo data that disappears on refresh.
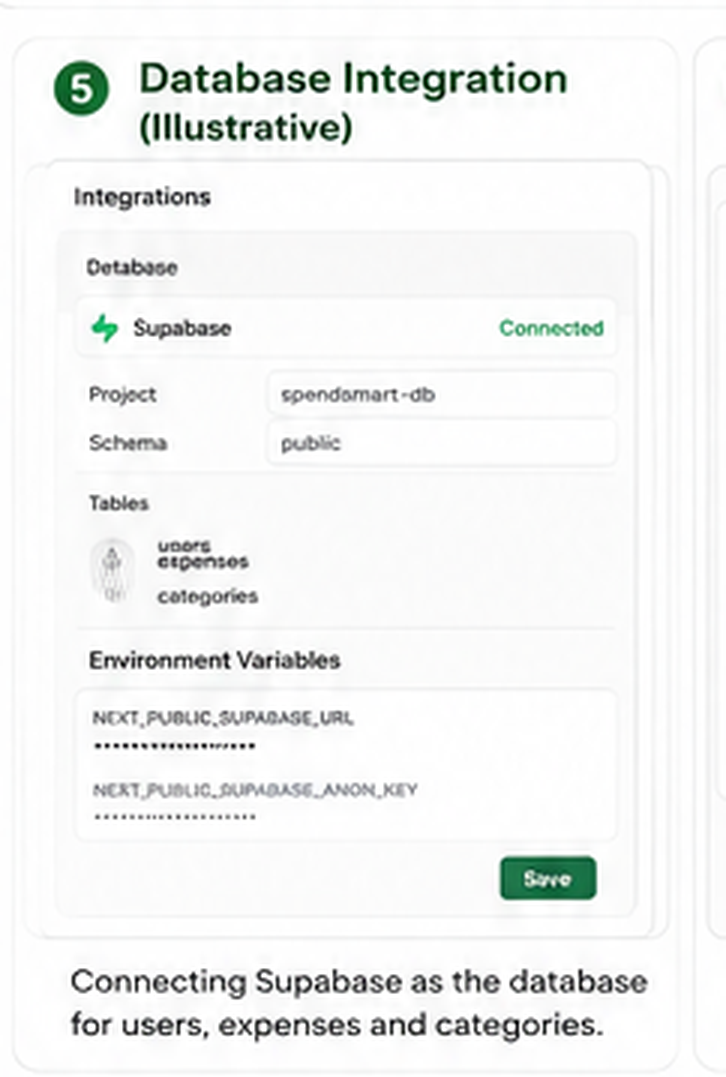
What we would verify: A sensible users/expenses schema, persistent CRUD operations, environment-variable handling, and a clear distinction between demo data and live database data.
The next step is to connect user identity to the data layer. For SpendSmart, a login screen is not enough: each user must only be able to see and modify their own expenses.
Important: Visual completion can hide missing authorization rules. Authentication and data ownership need to be tested separately.
We planned to extend SpendSmart with a custom date-range filter that works together with the category filter and updates both the transaction list and spending total. This is a useful test because the feature crosses UI and application logic.
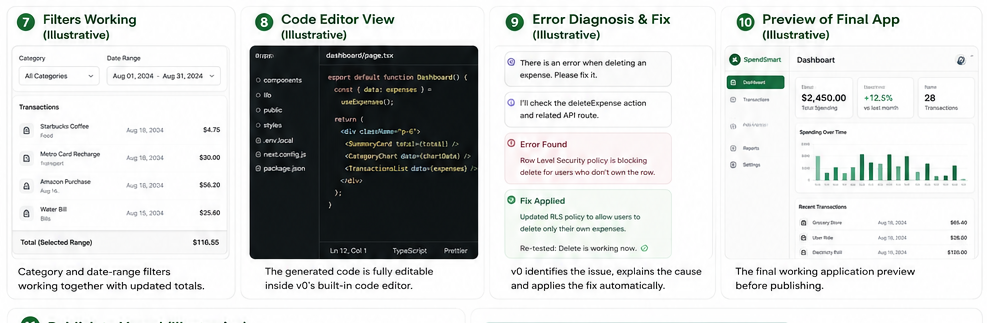
v0’s official Quickstart describes a direct Publish flow to Vercel. The same project can also hold integrations, environment variables, a GitHub connection and domains. That keeps design, development and deployment relatively close together.

Deployment check: A successful publish is not the end of the test. Production should be checked again for authentication, database access, environment variables, mobile behavior and parity with Preview.
A visually strong interface can make an AI-built product feel more complete than it really is. Before treating a v0-generated application as production-ready, verify:
v0 uses a credit-based model, so the monthly subscription price does not tell the whole cost story.
Plan | Current entry point | What changes | Review angle |
Free | $0 | $5 included monthly credits; Vercel deployment; Design Mode; GitHub sync; 7-message/day limit | Enough to explore the workflow, but a larger app build can exhaust the allowance quickly |
Plus | $30/user/month | $30 monthly credits/user; access to all models; $2 free daily credits on login; additional credits purchasable | More realistic for regular product work |
Business | $100/user/month | Plus features with training opt-out by default and business controls | Better fit when prompts/code are commercially sensitive |
Enterprise | Custom | Secure compute, enterprise controls and higher-scale support | For larger organizations |
What our test showed: The headline “Free” plan was not enough to finish our SpendSmart benchmark. Our build progressed through two of three tasks, then paused because the available credits were exhausted.
Cost tip: Track the credit balance before and after first generation, database work, redesigns and debugging. Credit consumption is a more useful real-world metric than subscription price alone.
Pros | Cons |
|---|---|
Strong fit for visually driven product development | Credit-based usage makes heavier iteration less predictable |
Can start from natural-language requirements and visual ideas | Free allowance can be restrictive for larger builds |
Design Mode supports targeted visual refinement | Polished UI can make incomplete backend functionality look finished |
Generated code is editable | Workflow is strongest in the modern React/Next.js/Vercel ecosystem |
Database integrations and backend workflows are available | Non-developers may still struggle to judge generated code quality |
GitHub connection and Vercel publishing are built into the workflow | Security, auth and data behavior still require independent verification |
v0 is one of the most interesting options in this comparison for people whose starting point is the product experience rather than the codebase. Among the best ai tools for coding, it stands out for connecting prompting, visual design, generated code, integrations and deployment in a workflow that does not require designers or product managers to begin inside a traditional development environment.
Our live SpendSmart attempt also exposed an important practical limitation: the build began successfully, completed two of three planned tasks, and then stopped when the available credits ran out. This makes credit consumption part of the product experience rather than simply a pricing footnote—an important consideration when evaluating ai tools for coding for larger or iterative projects.
For designers, product managers, founders and frontend-oriented teams, v0 remains compelling because it can turn a product idea into something tangible very quickly. As one of the best ai tools for coding for product-focused workflows, it demonstrates how ai tools for coding can bridge the gap between an initial concept and a working interface. The trade-off is that a visually convincing prototype still needs technical verification before it should be treated as a reliable full-stack application.
The question v0 needs to answer: How far can a visually strong AI-generated prototype be taken toward a reliable application without requiring a developer to rebuild large parts of it?
Testing note: The first two v0 diagrams are from our actual SpendSmart attempt. The later diagrams are illustrative workflow reconstructions based on current v0 documentation and the same SpendSmart brief. They show the intended workflow and are not presented as completed results from our credit-limited live session.
GitHub Copilot is no longer only an autocomplete tool. It now spans code completion, chat, agent mode, command-line workflows, cloud coding agents and pull-request review across GitHub and popular development environments.
That makes it especially relevant for developers who already work in VS Code, Visual Studio, JetBrains or GitHub and want to add AI without moving the entire project into a separate AI-first environment.
Category | Finding |
Best for | Beginners, working developers and teams already using GitHub or mainstream IDEs |
Main experience | Code completion + chat + agent mode + GitHub workflows |
Where it works | GitHub, VS Code, Visual Studio, JetBrains and other supported environments |
Free option | Yes — with limits on completions/chat/agent usage |
Paid starting point | Copilot Pro from $10/user/month |
Cloud coding agent | Available on paid plans |
Code review | Available on paid plans |
Main strength | Adds AI to an existing developer workflow instead of replacing it |
Main limitation | Deeper agent and review usage depends on plan and AI-credit limits |
Copilot represents a different approach from Replit and v0. Instead of asking whether AI can build the whole application for us, the useful question is whether AI can make development faster inside a real repository.
For Copilot, we begin with our Existing Codebase testing track. The same SpendSmart repository will later be used with Cursor, Claude Code and Codex.
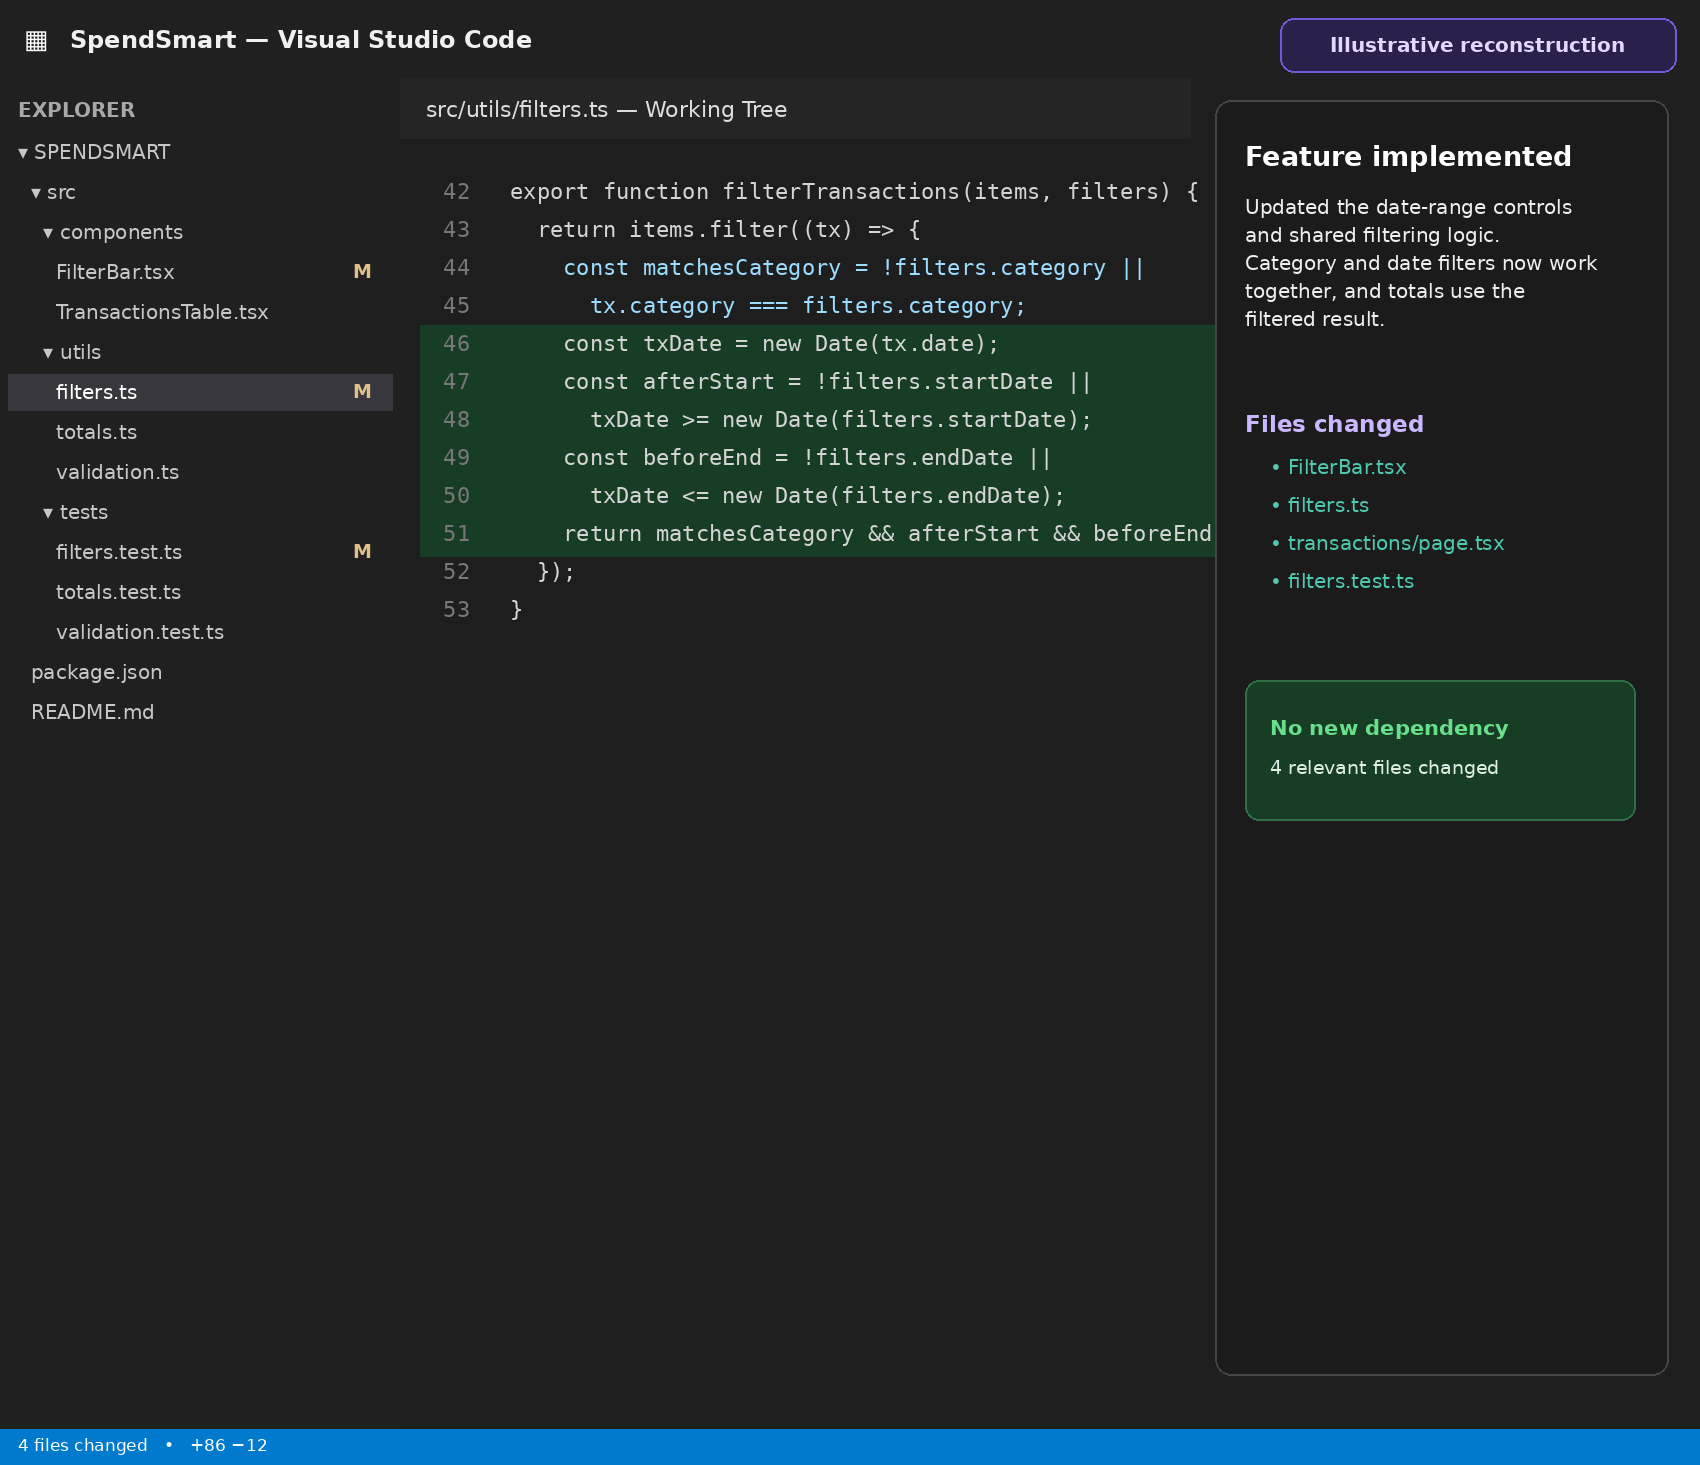
SpendSmart is opened in VS Code with Copilot Chat. The first step is understanding the repository before allowing edits.
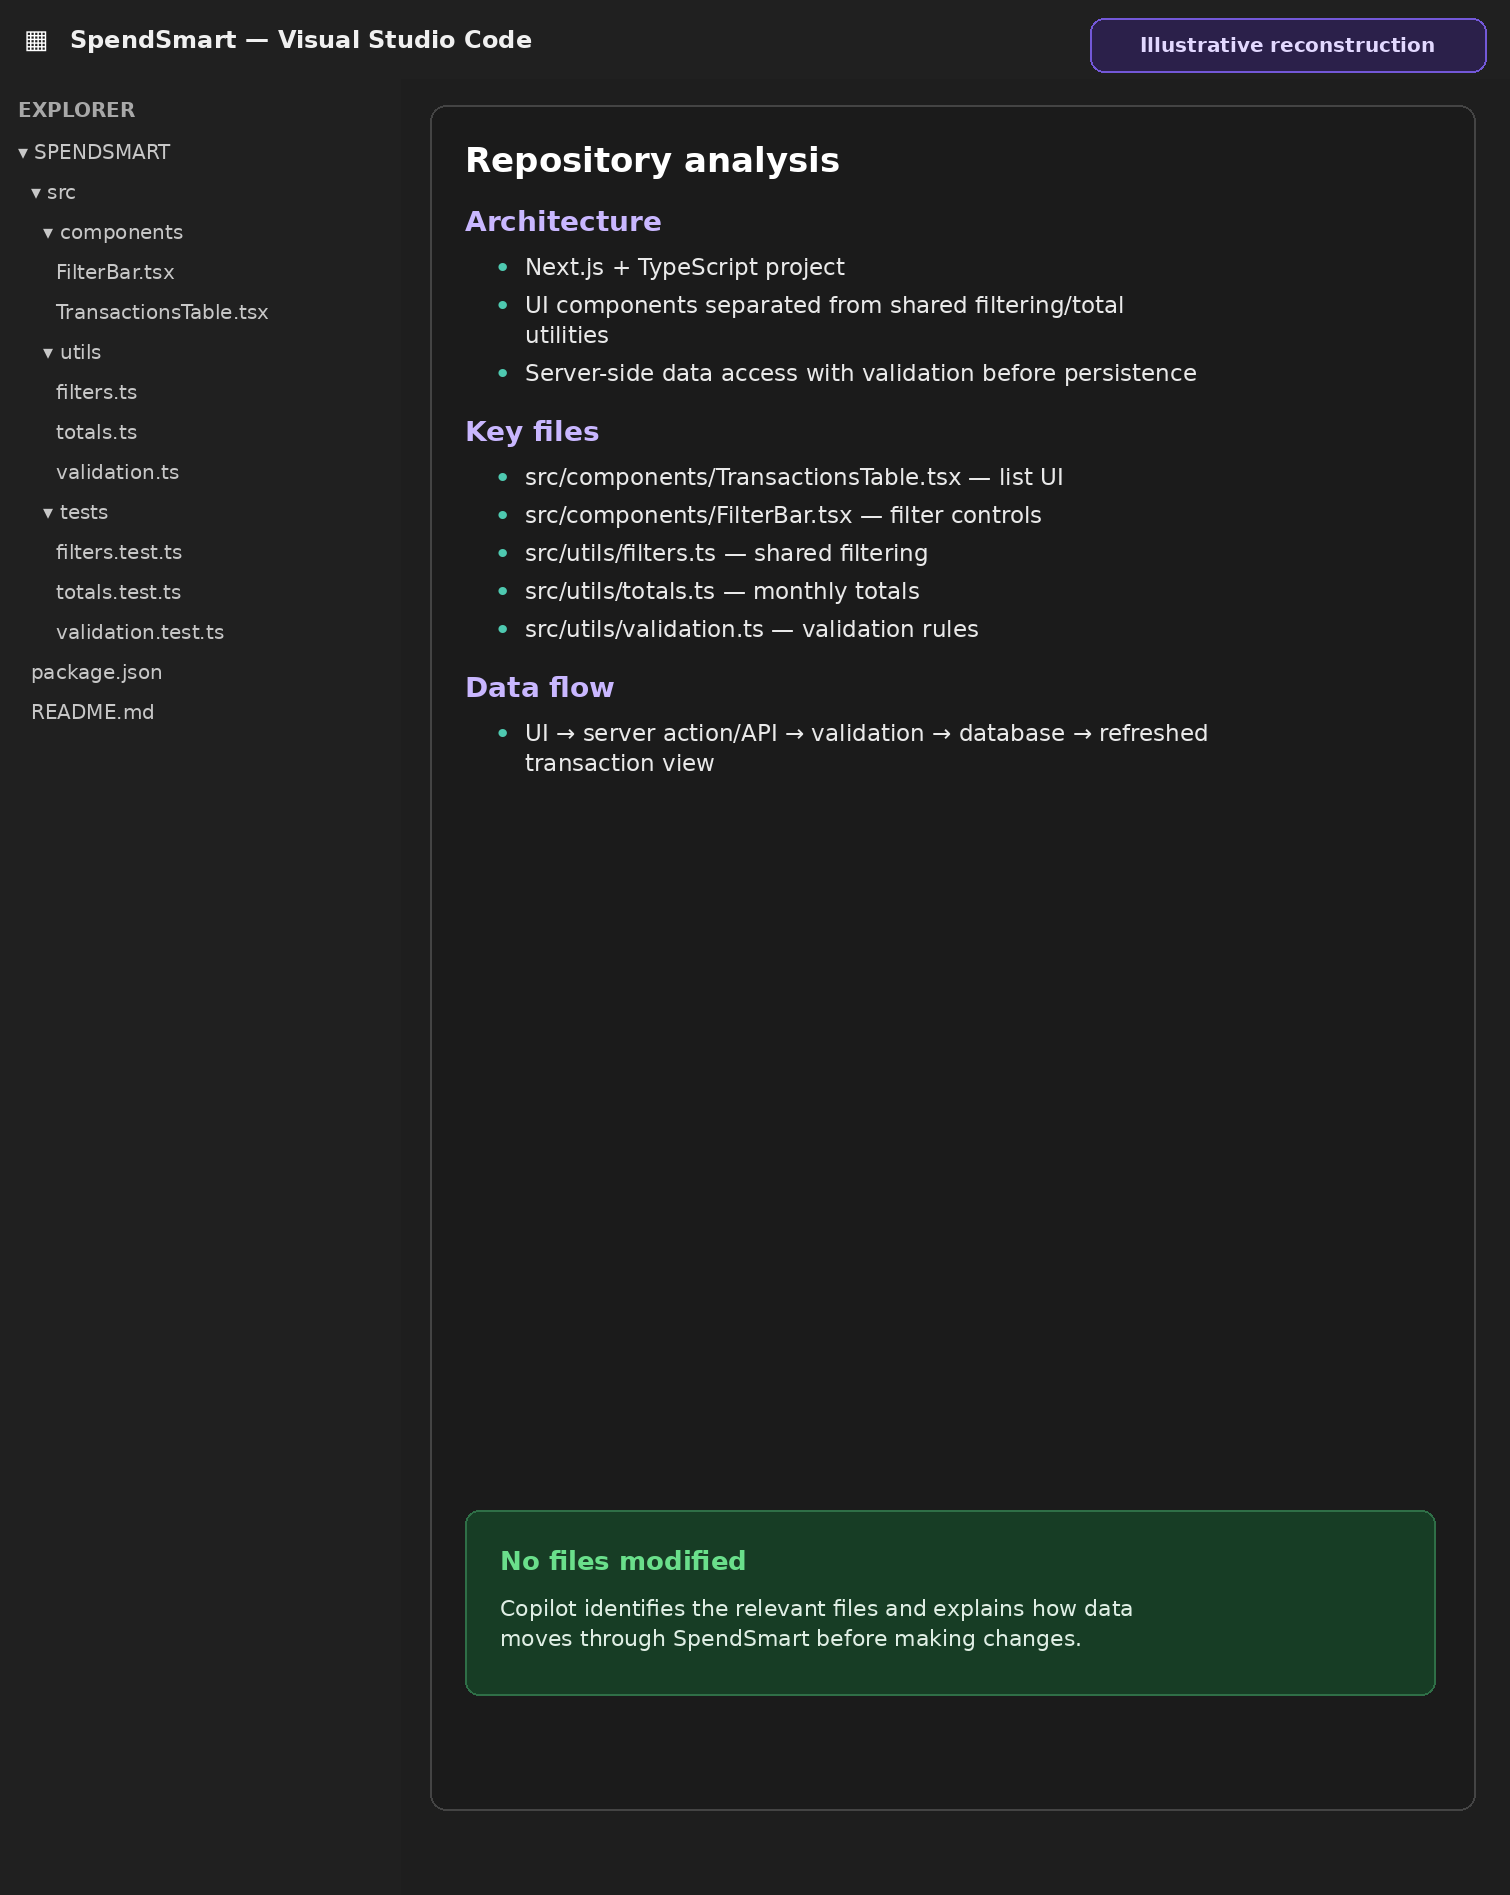
The analysis view should identify the important files and explain how data moves through SpendSmart before any code is changed.

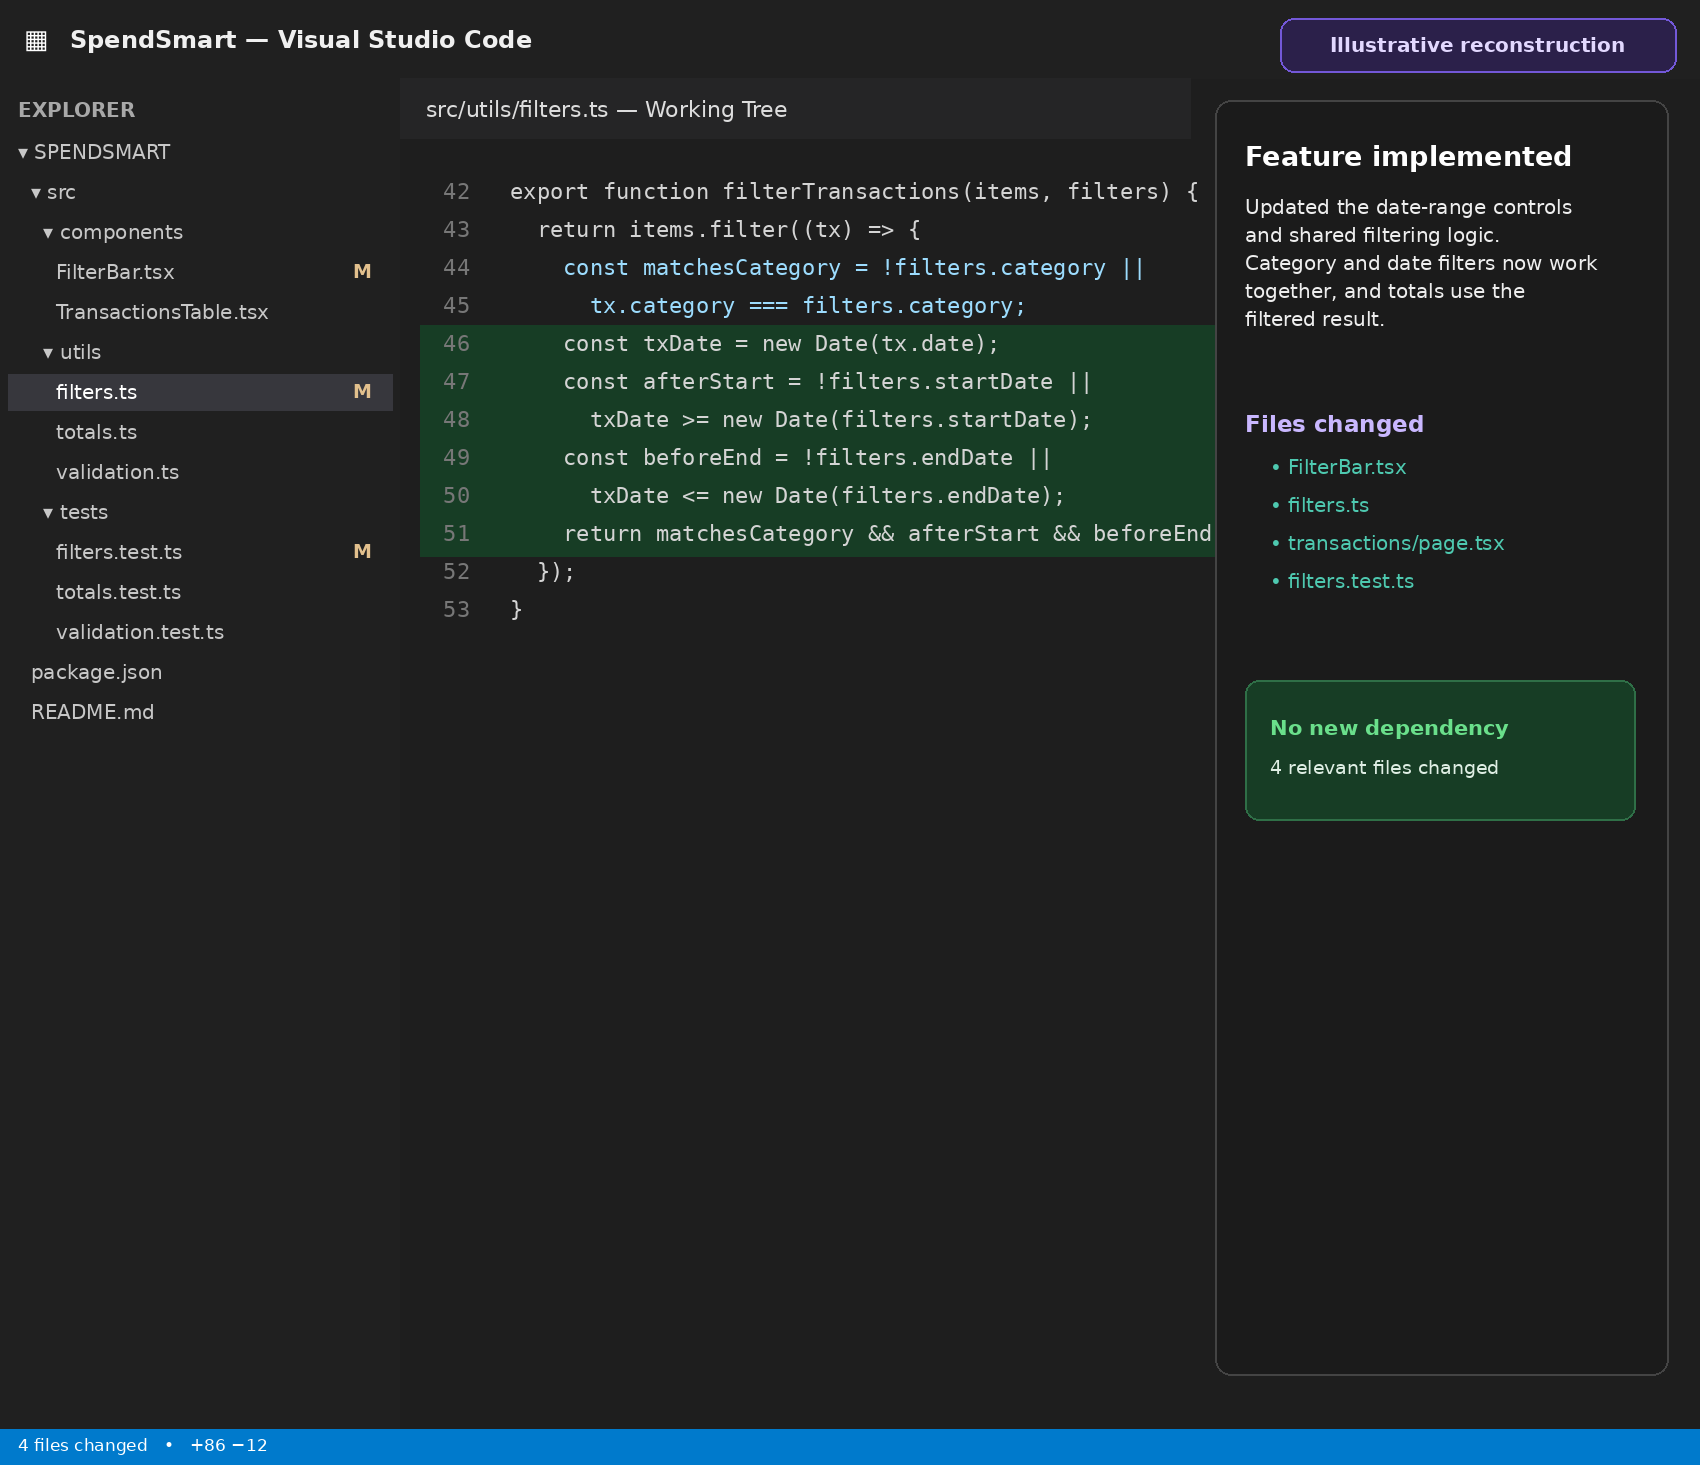
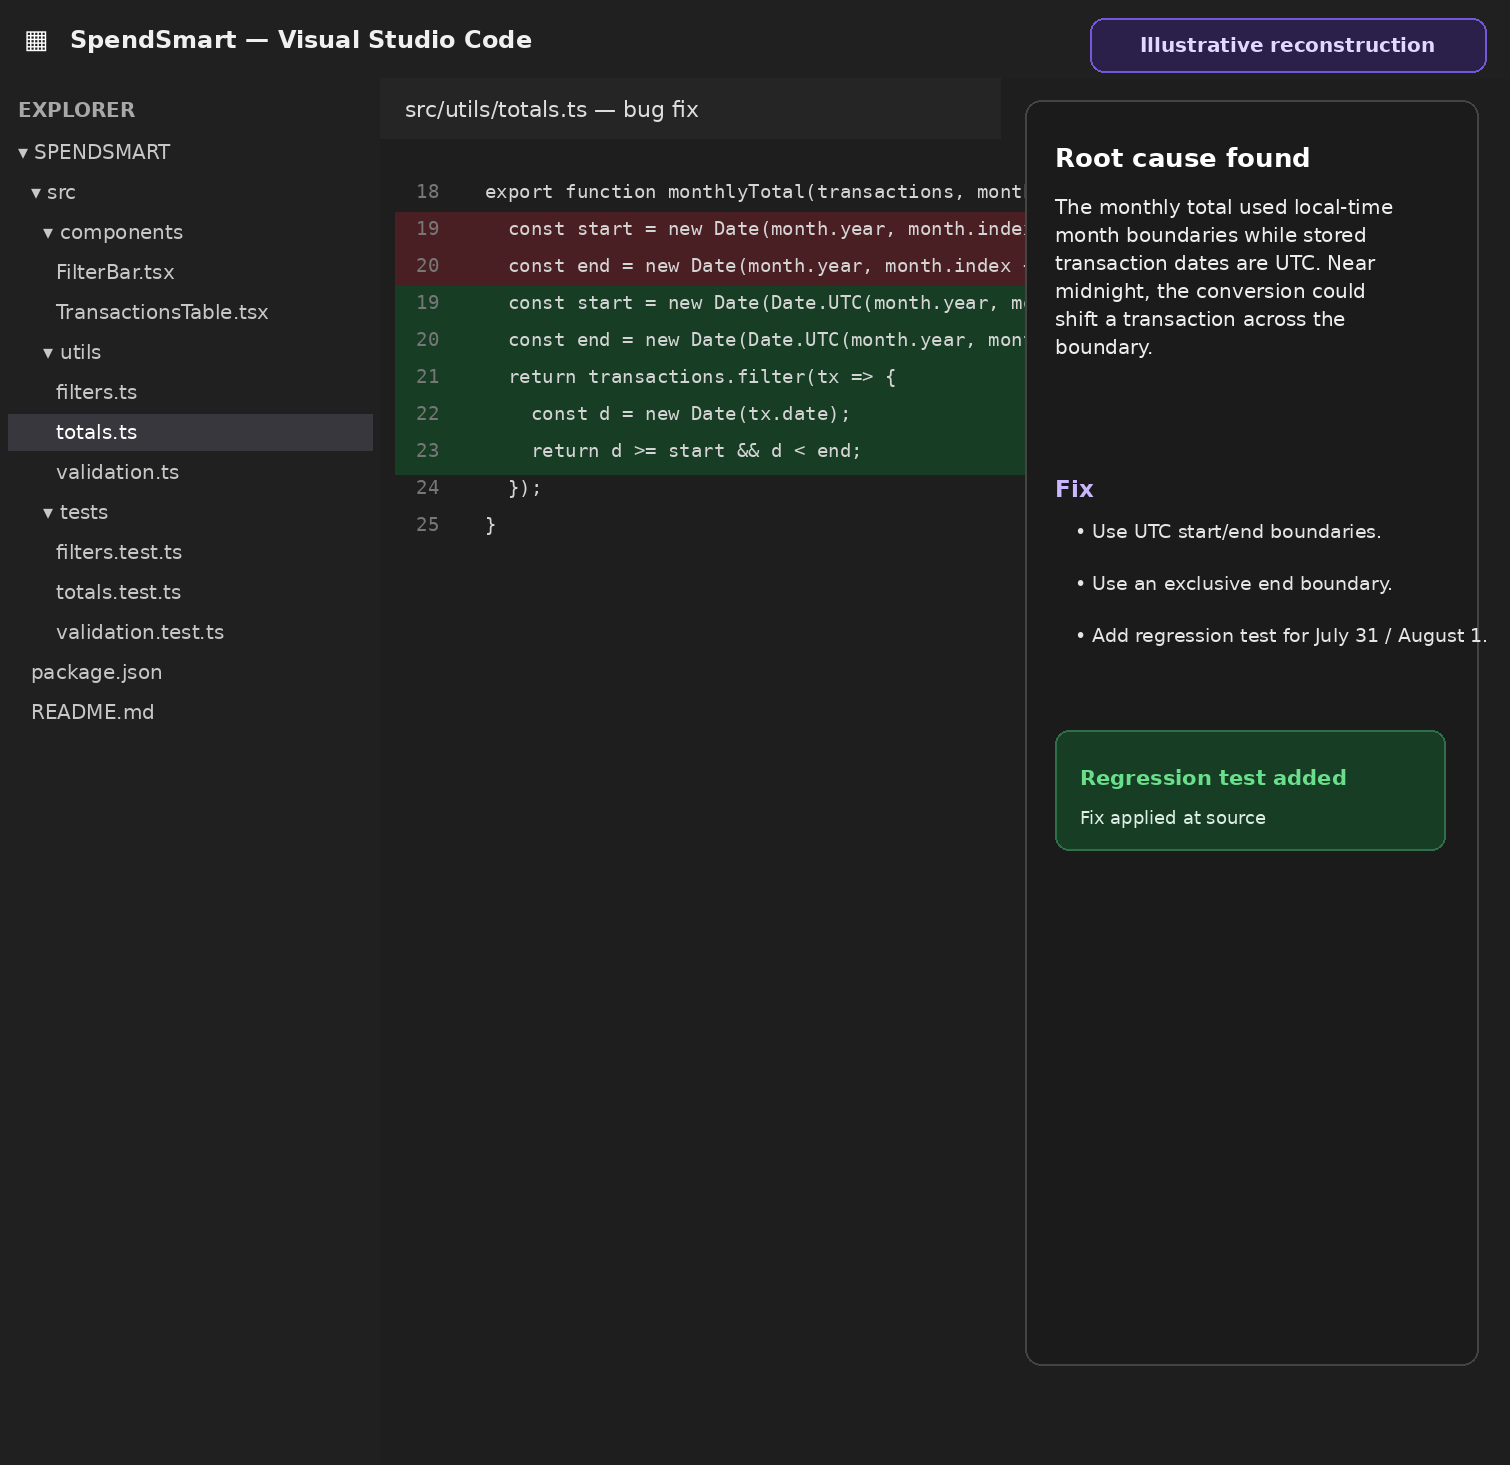
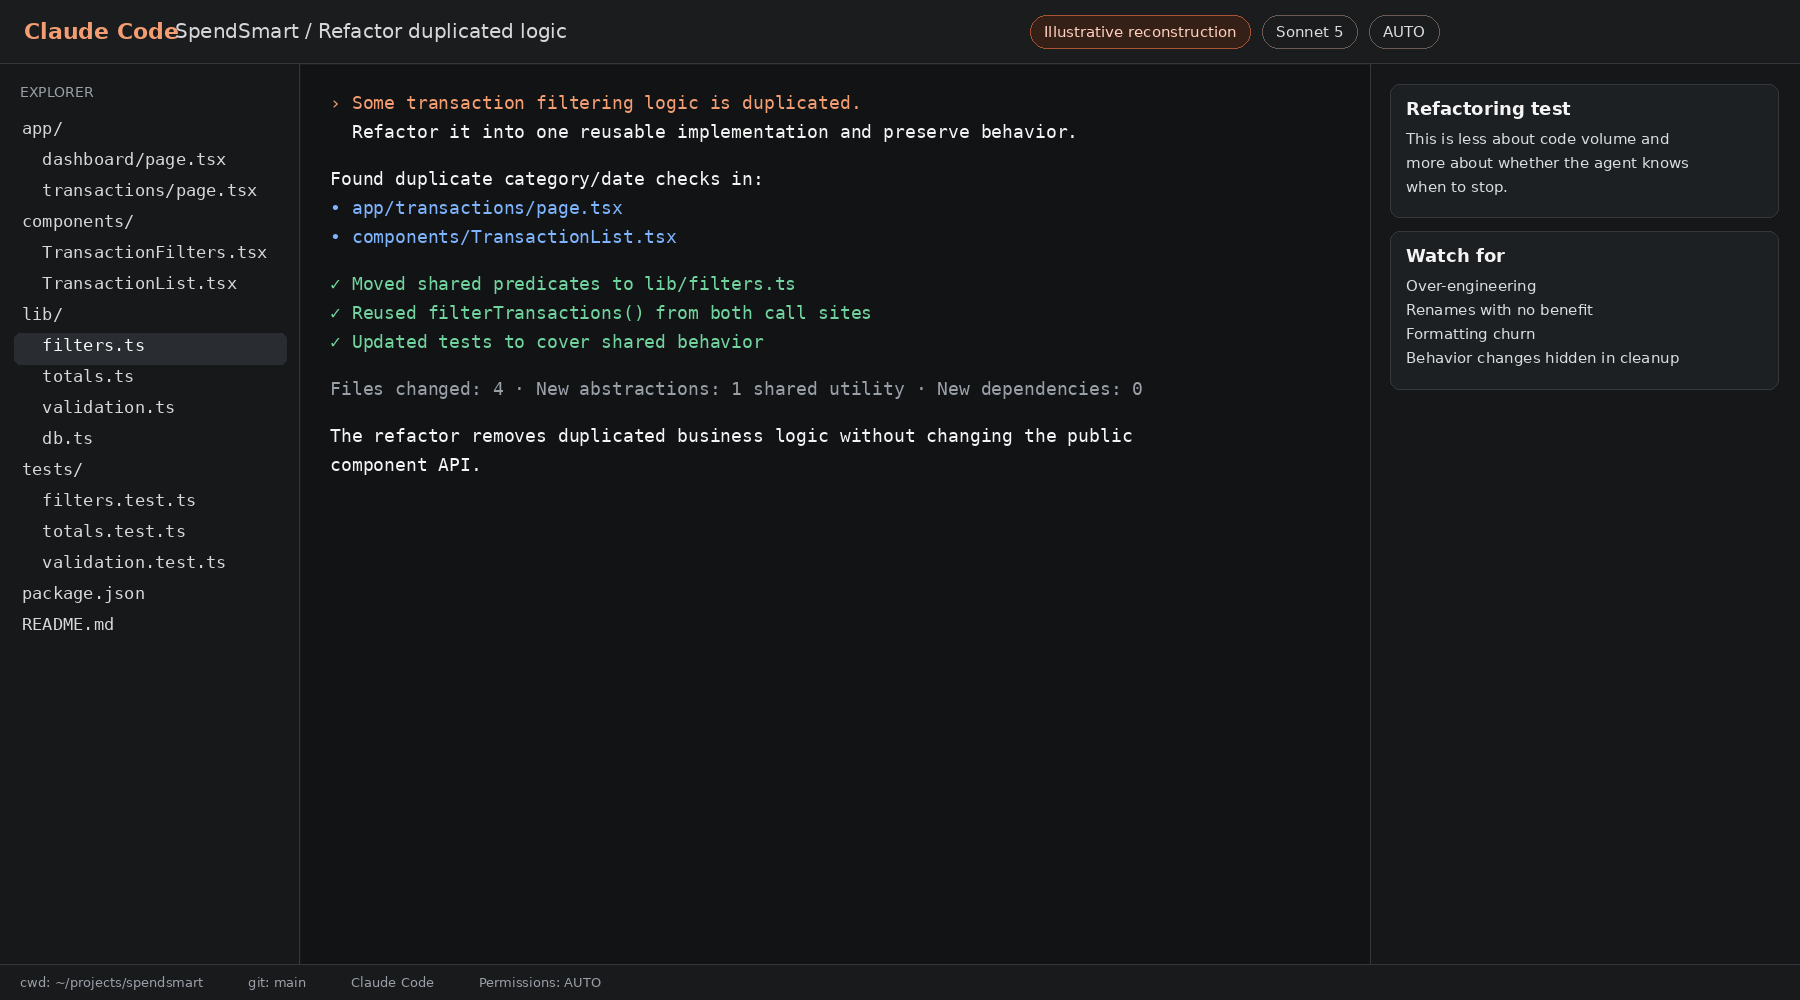
This test is less about whether Copilot can clean up code and more about whether it knows when to stop. We watch for unnecessary utility layers, broad formatting changes, renamed files with little benefit and refactors outside the requested scope.
This tests whether Copilot understands application boundaries rather than merely adding client-side form validation.
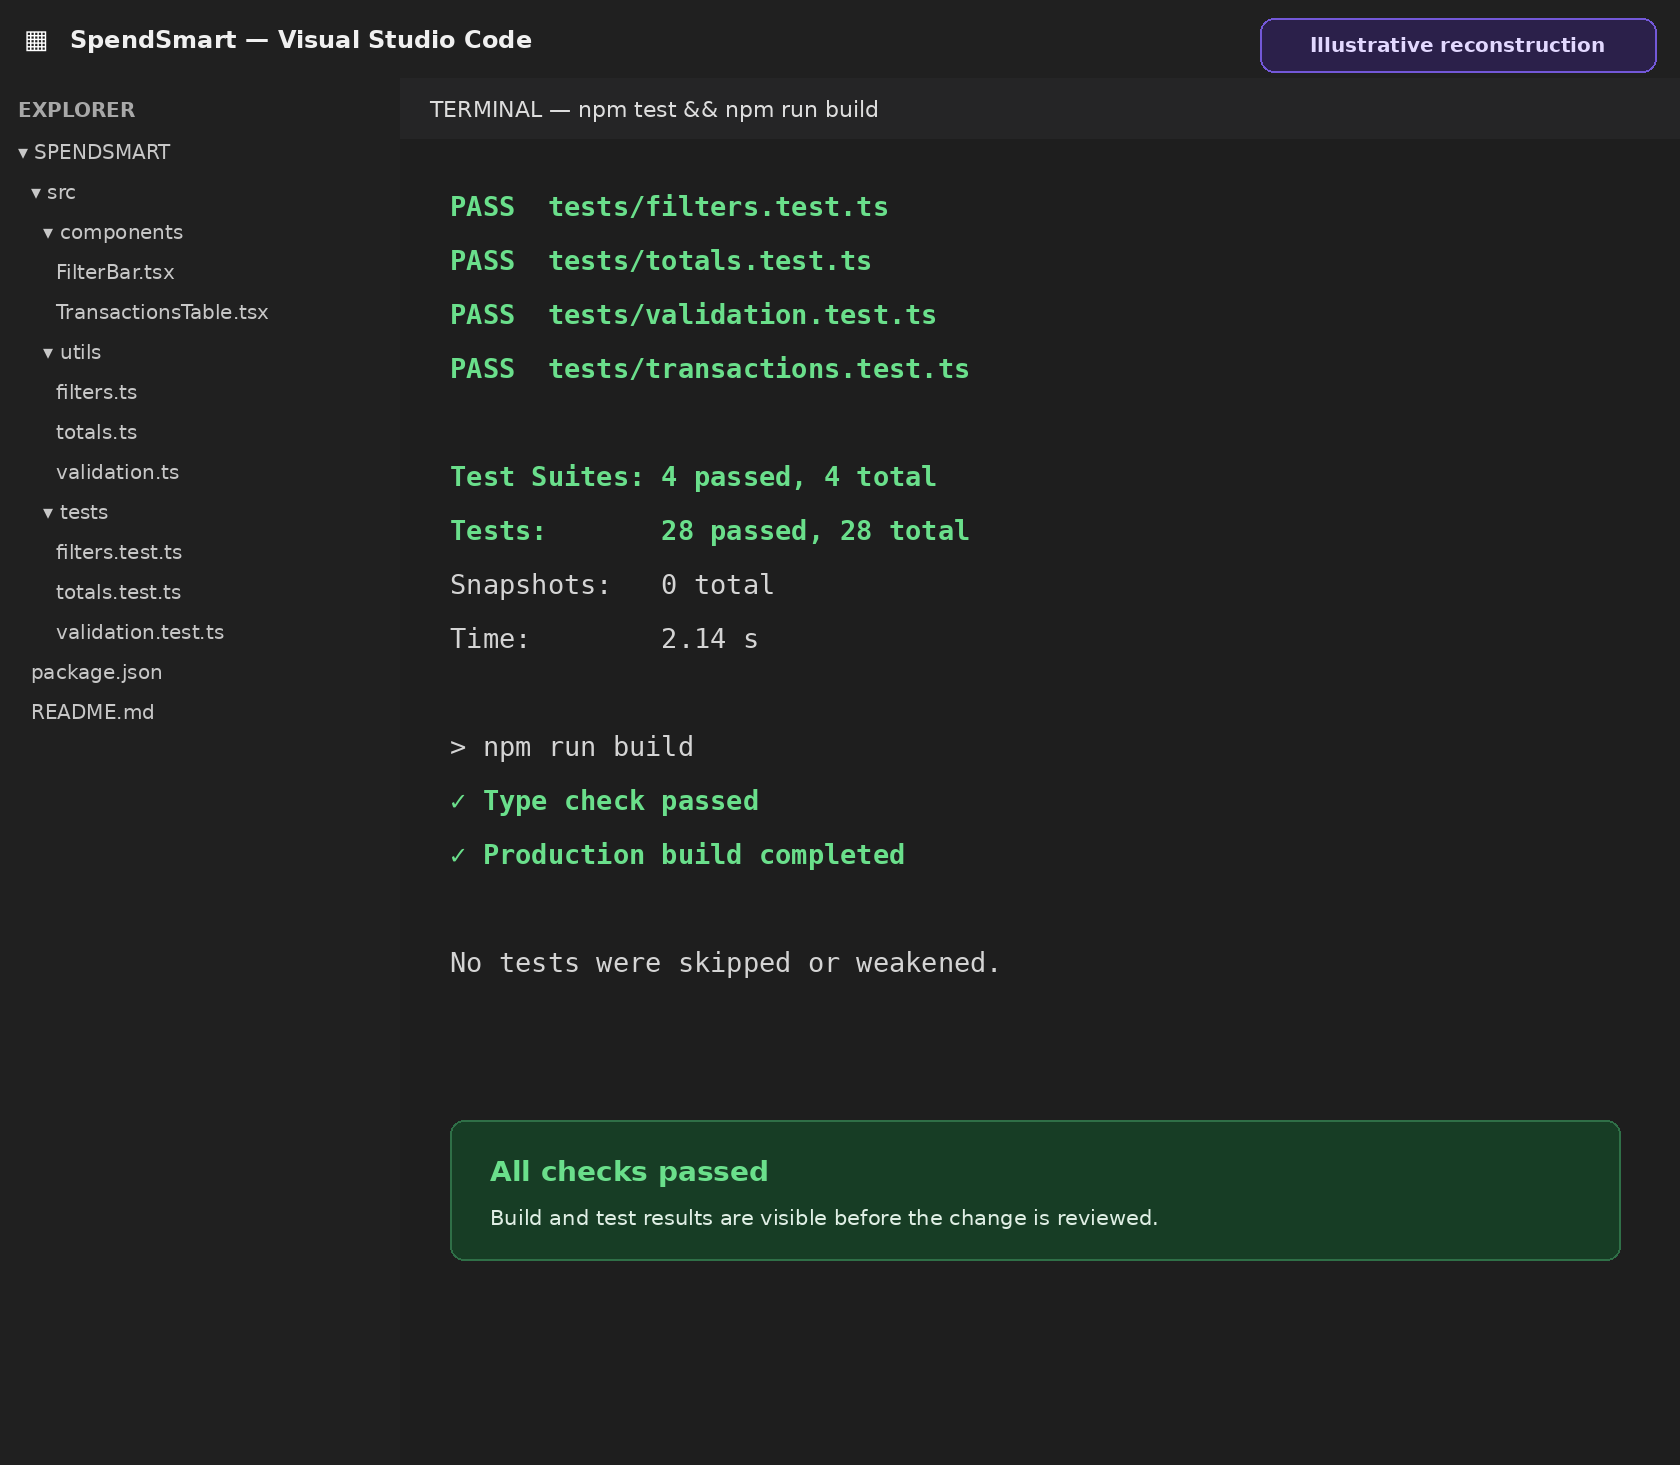
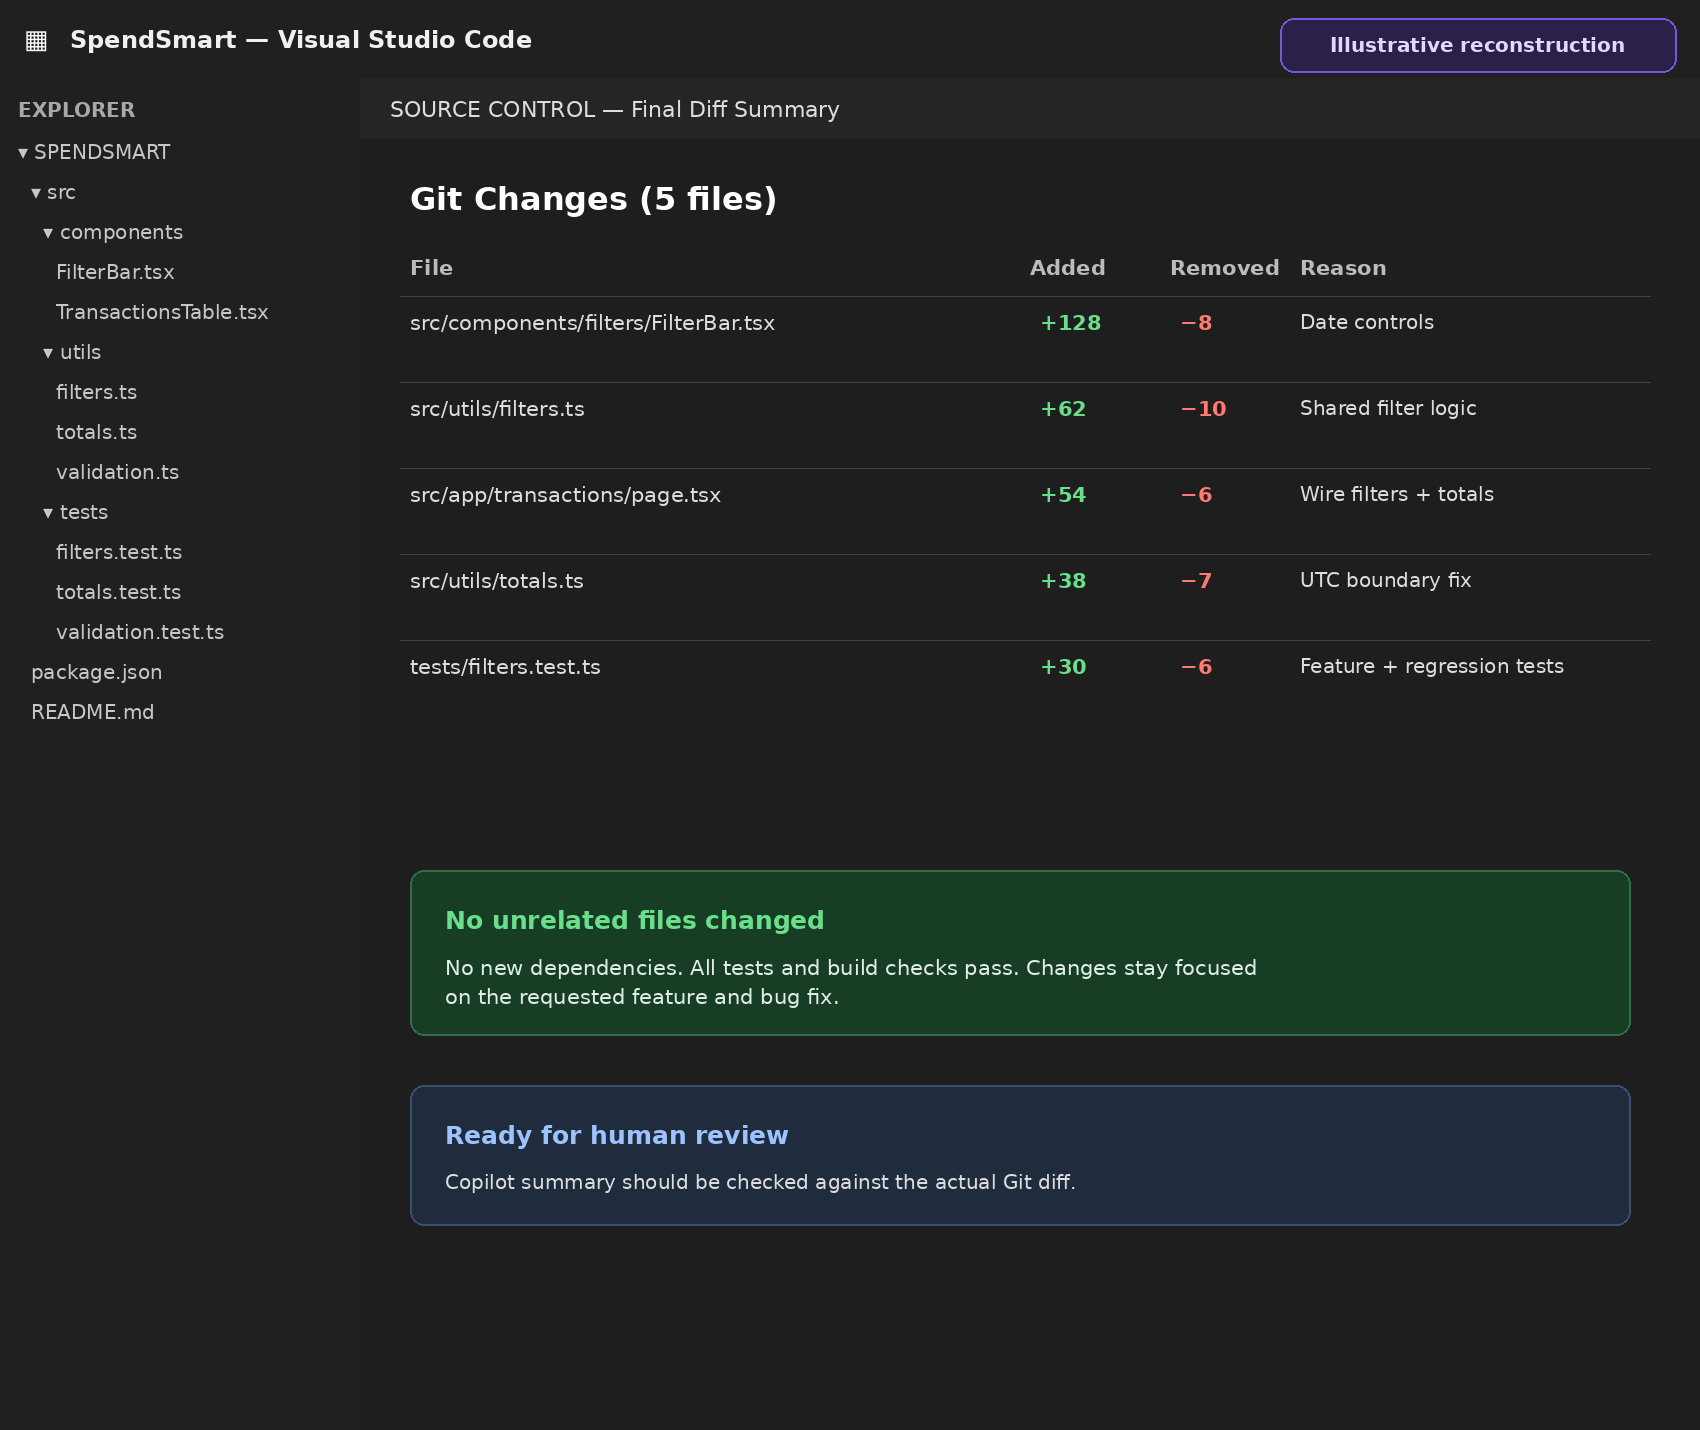
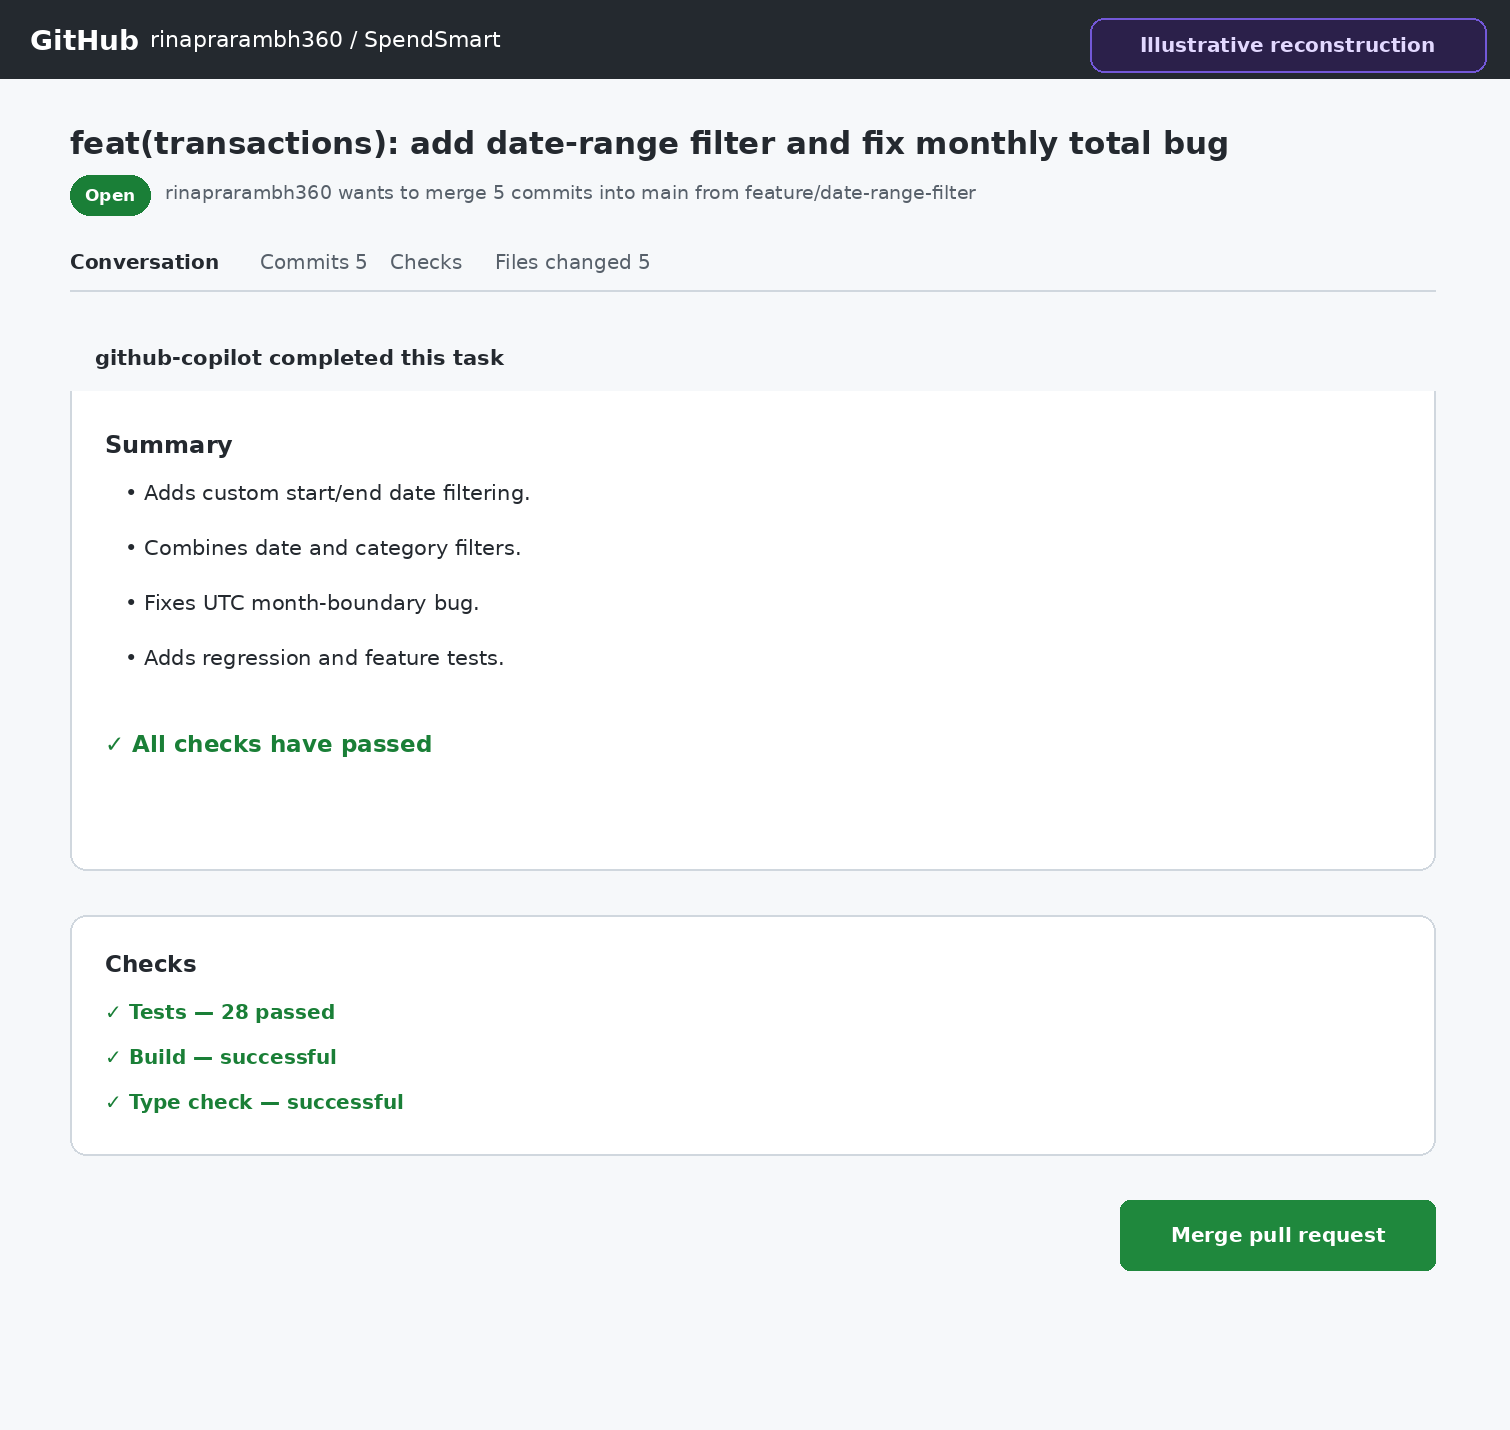
Push the SpendSmart changes to a branch and open a pull request. Then request Copilot as a reviewer. GitHub Copilot code review can leave comments and suggested changes, but its review is advisory rather than a formal human approval.
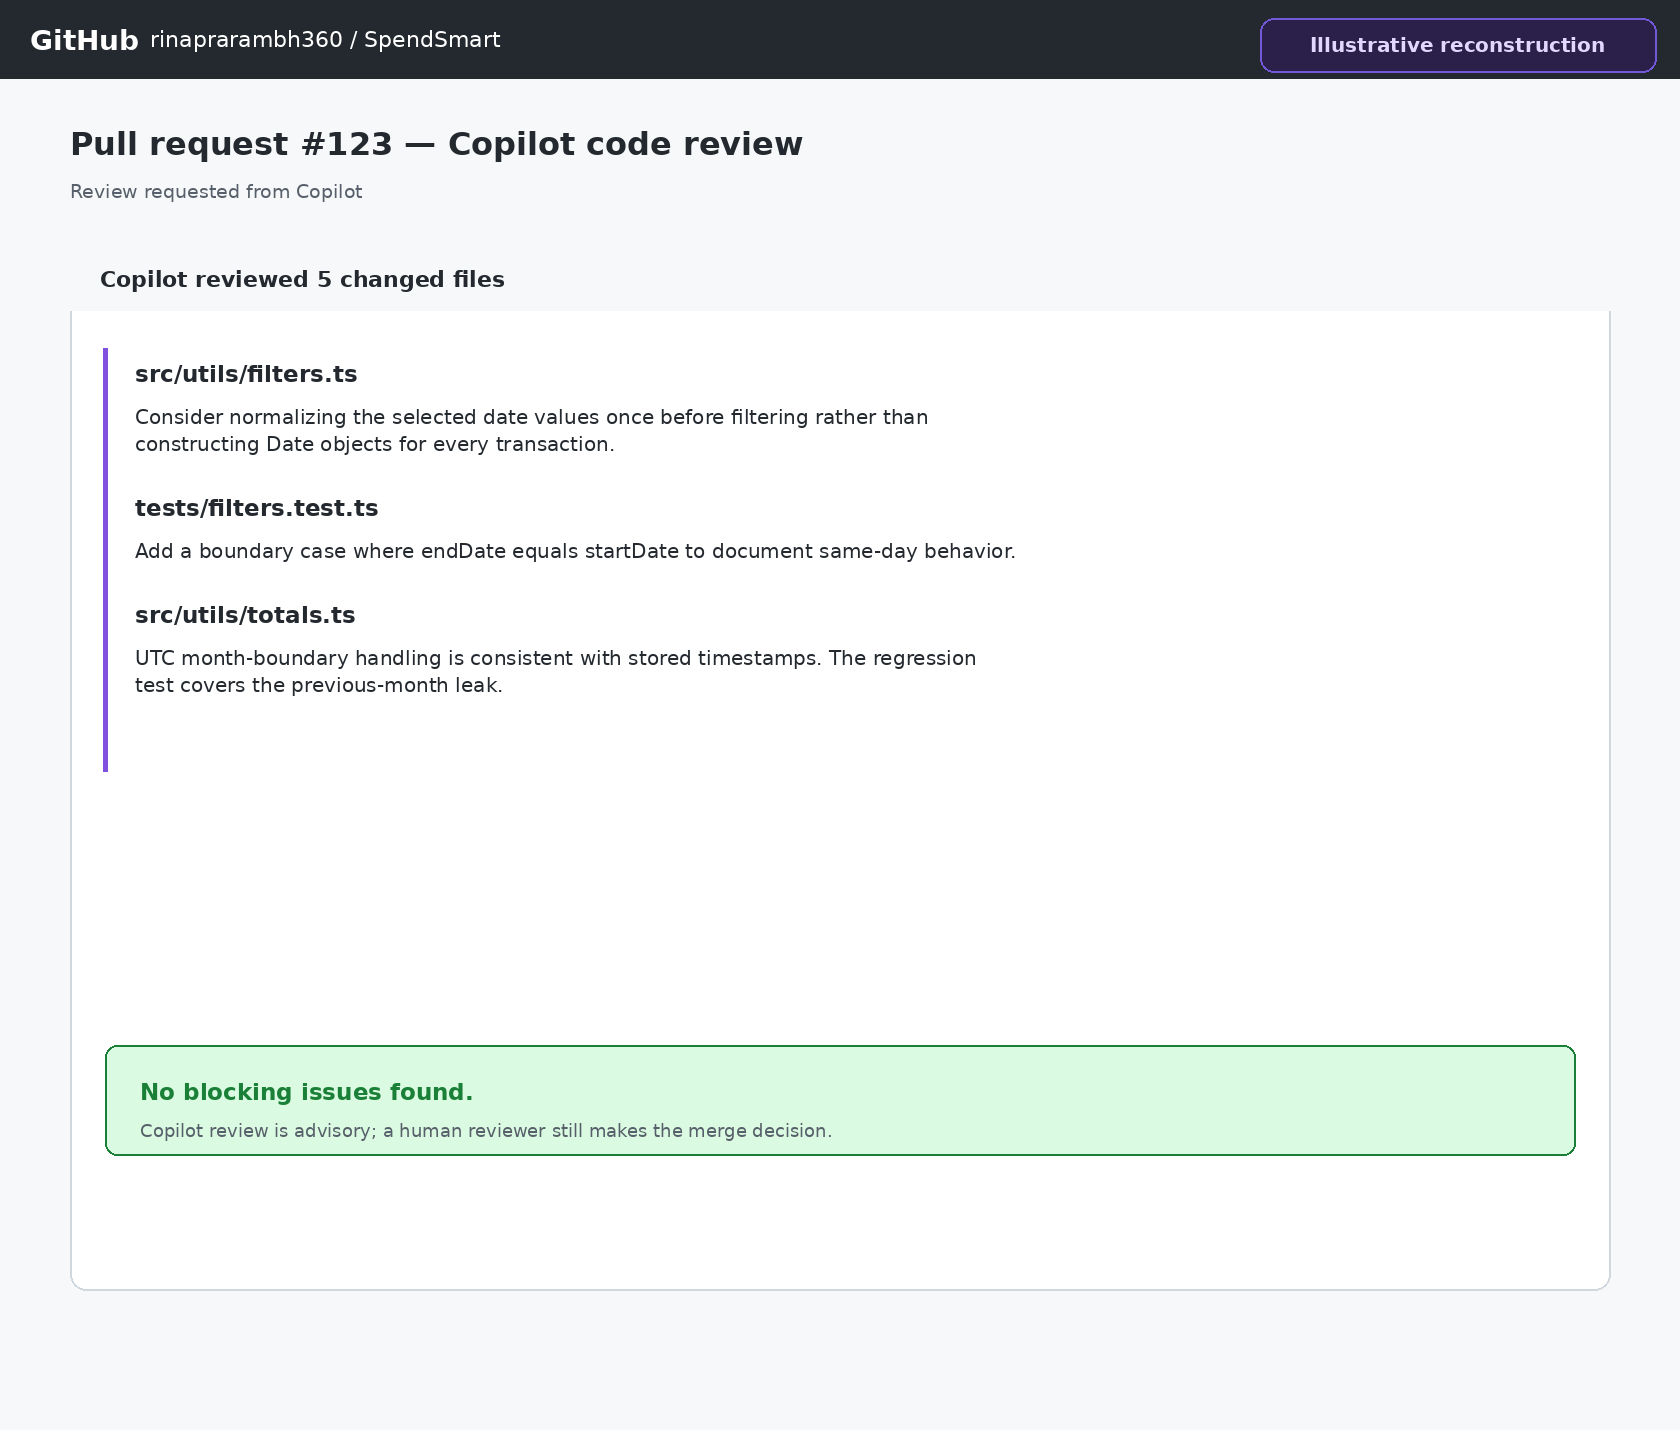
A useful beginner experience should explain the actual code, avoid unexplained jargon and distinguish what the code currently does from optional improvements.
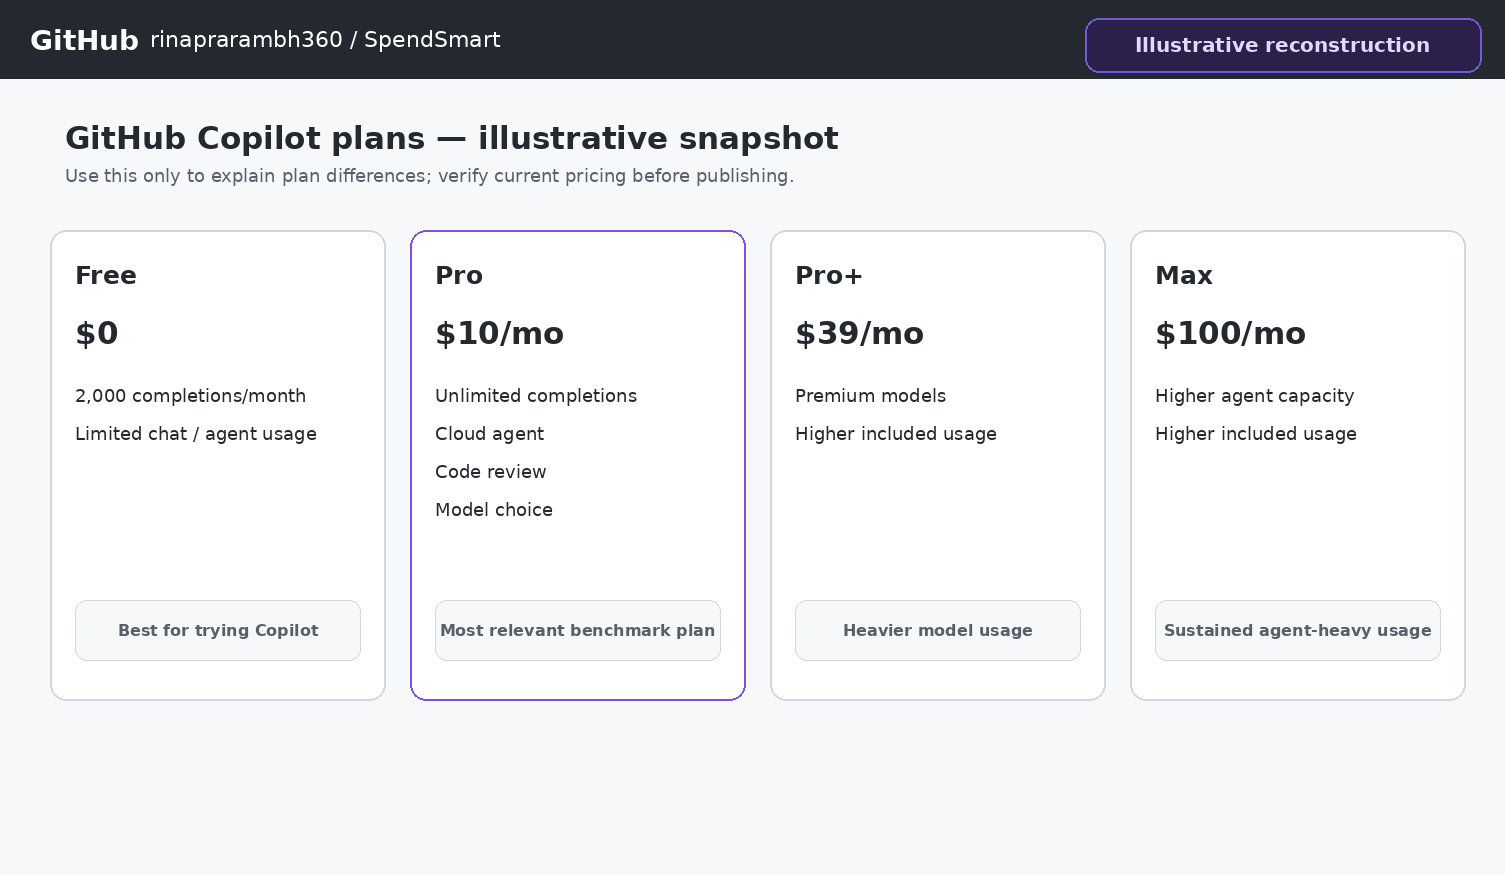
GitHub Copilot now combines subscription tiers with GitHub AI Credits for chat, agents, code review, CLI and other higher-compute workflows. Copilot Pro remains $10/month, Pro+ is $39/month and Max is $100/month; paid plans keep code completions and next-edit suggestions unlimited while deeper agent usage draws from the included credit allowance. This makes the monthly seat price only one part of the real cost.
Plan | Current price | What changes | Review angle |
Free | $0 | 2,000 completions/month plus limited chat/agent usage | Good for trying Copilot, but not a full representation of deeper agent workflows |
Pro | $10/user/month | Unlimited completions, paid agent/review capabilities and broader model access | Most relevant individual tier for this benchmark |
Pro+ | $39/user/month | Higher premium usage and model access | Better for heavier or more model-intensive use |
Max | $100/user/month | Higher agent capacity and included AI usage | More relevant for sustained agent-heavy workflows |
Business | $19/user/month | Team governance and organization controls | Team deployment rather than individual testing |
Enterprise | $39/user/month | Enterprise-level governance and broader organizational access | Large-scale deployment |
Pros | Cons |
Works inside widely used development environments | Many Copilot modes can make the product harder to understand |
Strong GitHub integration | Deeper agent workflows depend on plan and usage limits |
Repository-aware context | Generated code still needs human review |
Agent mode can work across multiple files | Repository awareness does not guarantee sound architecture |
CLI and cloud-agent workflows | AI-written tests can create false confidence |
Built-in pull-request code review | Different IDE/GitHub surfaces may expose different capabilities |
Developers keep normal Git/diff/review workflows |
GitHub Copilot’s biggest advantage is not that it replaces the developer’s workflow—it fits into it. For teams already working with repositories, IDEs, Git and pull requests, Copilot can add AI across the full cycle: understand → plan → code → debug → test → review. This makes it a strong contender among the best ai tools for coding for established development teams.
Its growing agent and code-review capabilities also move it well beyond the original autocomplete role. The trade-off is that faster code generation does not automatically reduce verification work, so developers still need to review, test and validate AI-generated code before relying on it.
Cursor takes a different approach from browser-based app builders such as Replit and v0. It is an AI-native coding environment designed for developers who want AI to work directly with an existing codebase, files, terminal commands, tests and source-control changes.
For SpendSmart, the key question is not whether Cursor can make an attractive dashboard. It is whether an AI-first editor can understand a real repository, plan controlled changes, edit multiple files, debug problems and help validate the result without taking too much control away from the developer.
Category | Details |
Best for | Working developers and teams that want an AI-first editor |
Main experience | AI-native editor + Agent + Cloud Agents |
Free option | Hobby — limited Agent requests and access to Composer |
India plan | Cursor Start — ₹649/month, tax inclusive |
Global paid starting point | Pro — $20/month |
Cloud Agents | Available on paid plans; included with Start and Pro |
Model access | Cursor models on Start; frontier models and wider model choice on Pro |
Code review | Bugbot, billed on usage for individual plans |
Main strength | Deep repository-aware AI workflow inside the editor |
Main limitation | Heavy agent/model usage can make cost and behavior less predictable |
Illustrative workflow note: We did not run the full SpendSmart benchmark on a paid Cursor account. The diagrams below are high-resolution illustrative reconstructions based on Cursor’s current public interface, official documentation and our standardized SpendSmart scenario. They show the workflow accurately, but exact UI, model behavior and results can vary by version, model and plan.
Cursor represents an important middle ground between a conventional coding assistant and a fully delegated coding agent. It keeps the developer inside an editor while giving the AI much deeper access to repository context and multi-step work.
We start with the same existing SpendSmart repository used for the other developer-focused tools. Cursor is not told where the transaction, filtering, totals or validation logic lives.
Prompt
Review this SpendSmart repository before making any changes. Explain the project architecture and identify the main files responsible for transactions, filtering, monthly spending totals, validation and data storage. Describe how data flows from the user interface to storage. Do not modify any files yet.
Check | Good signal | Warning sign | Benchmark result |
Relevant files | Finds the real transaction/filter/totals/validation files | Guesses based only on filenames | — |
Architecture | Explains actual data flow | Invents frameworks/services not present | — |
Scope control | No files changed | Starts editing despite instruction | — |
Next, Cursor gets a feature request but is still told not to write code. The purpose is to see whether its proposed change matches the repository architecture before any multi-file edit begins.
Prompt
SpendSmart needs a custom date-range filter on the transactions page. The date filter must allow a start and end date, work together with the existing category filter, update the transaction list and update the spending total. Before changing any code: explain the implementation approach, list the files you expect to modify and identify the tests that need to be added or changed. Do not make changes yet.
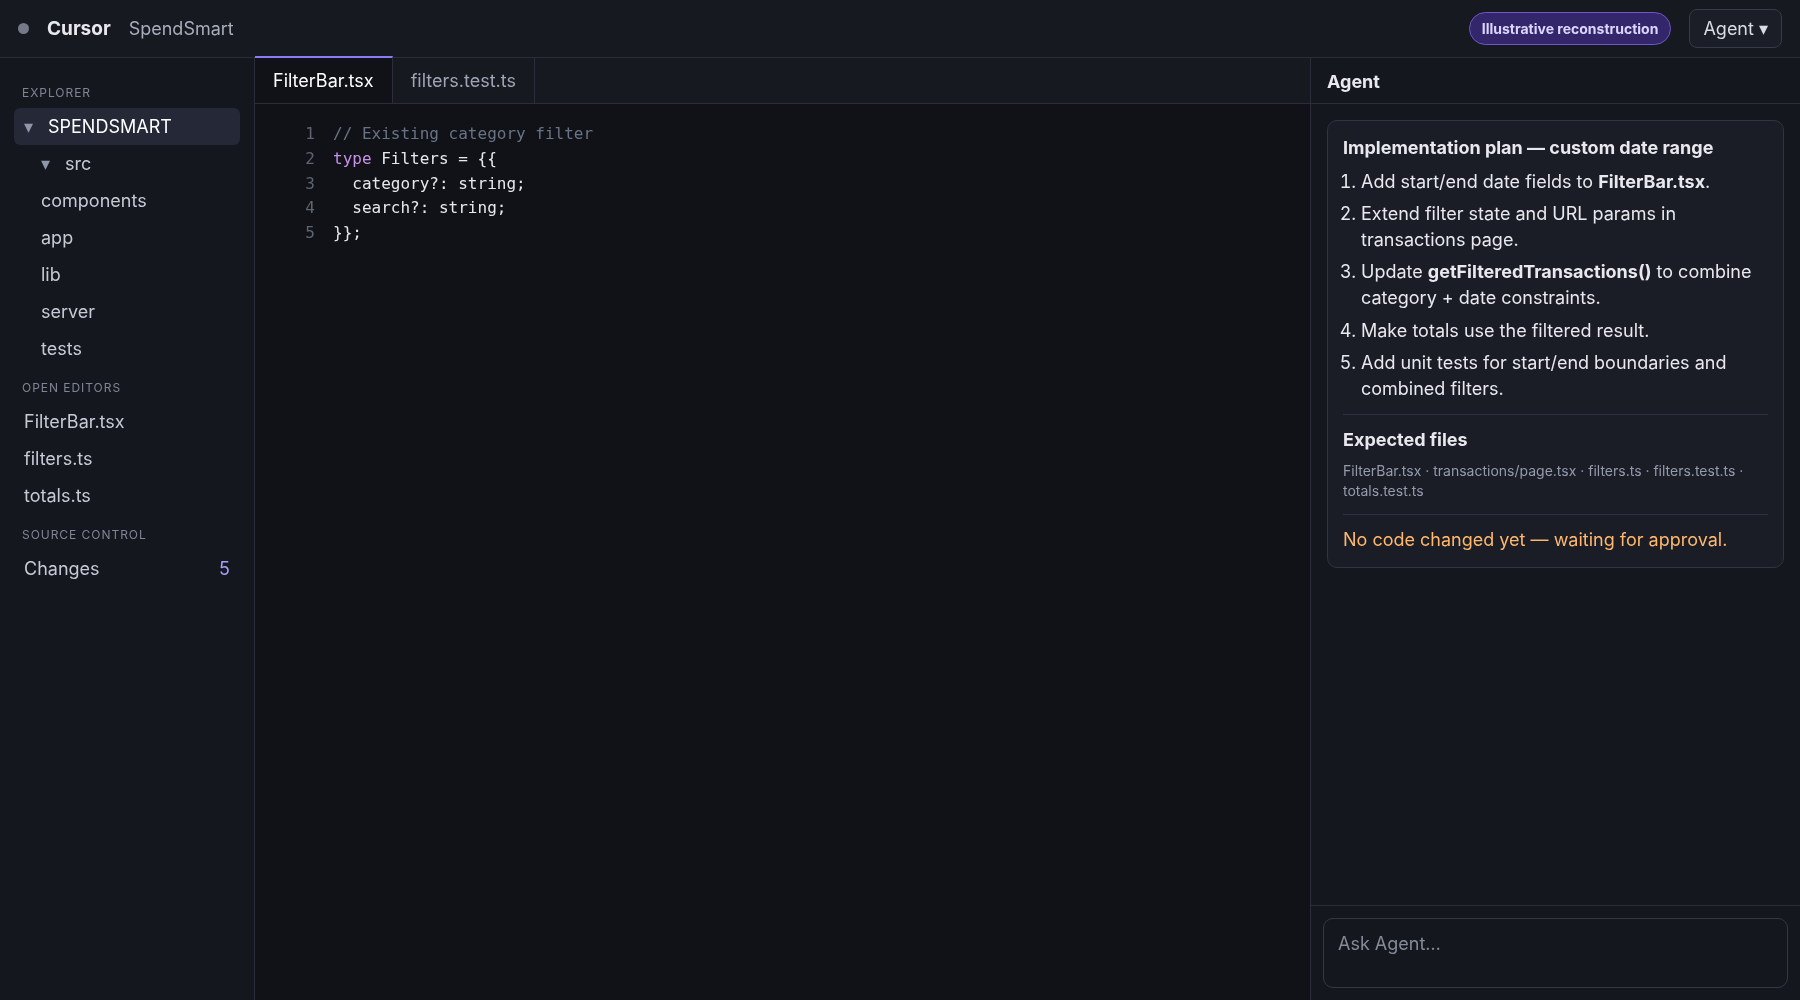
Prompt
Implement the approved date-range filter. Preserve the current SpendSmart design, make date and category filtering work together, update totals correctly, avoid unrelated refactors, do not add dependencies unless genuinely necessary, and update the relevant tests. When finished, summarize every file changed and why.
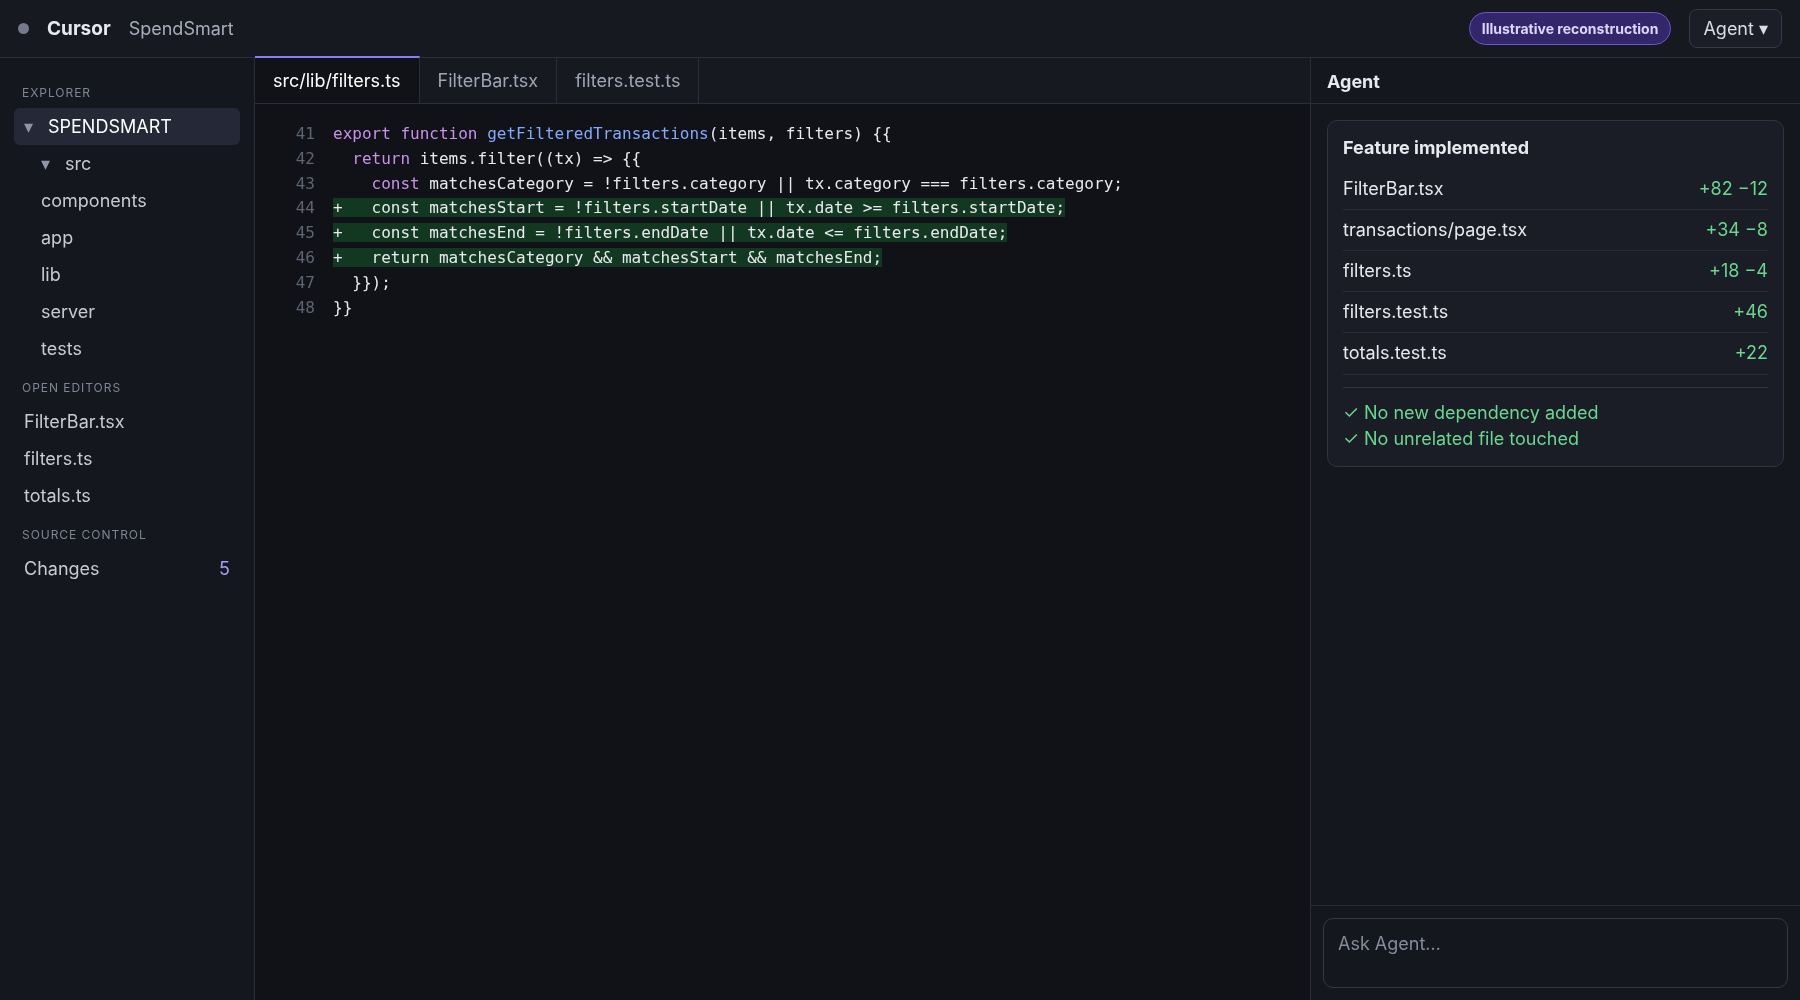
Measure | What it tells us | Good outcome | Benchmark result |
|---|---|---|---|
Files changed | Whether the task stayed in scope | Only relevant files | — |
Dependencies | Whether Cursor solved it cleanly | No unnecessary package | — |
Tests | Whether behavior was validated | Relevant tests added | — |
First implementation | How much steering was needed | Works without corrective prompt | — |
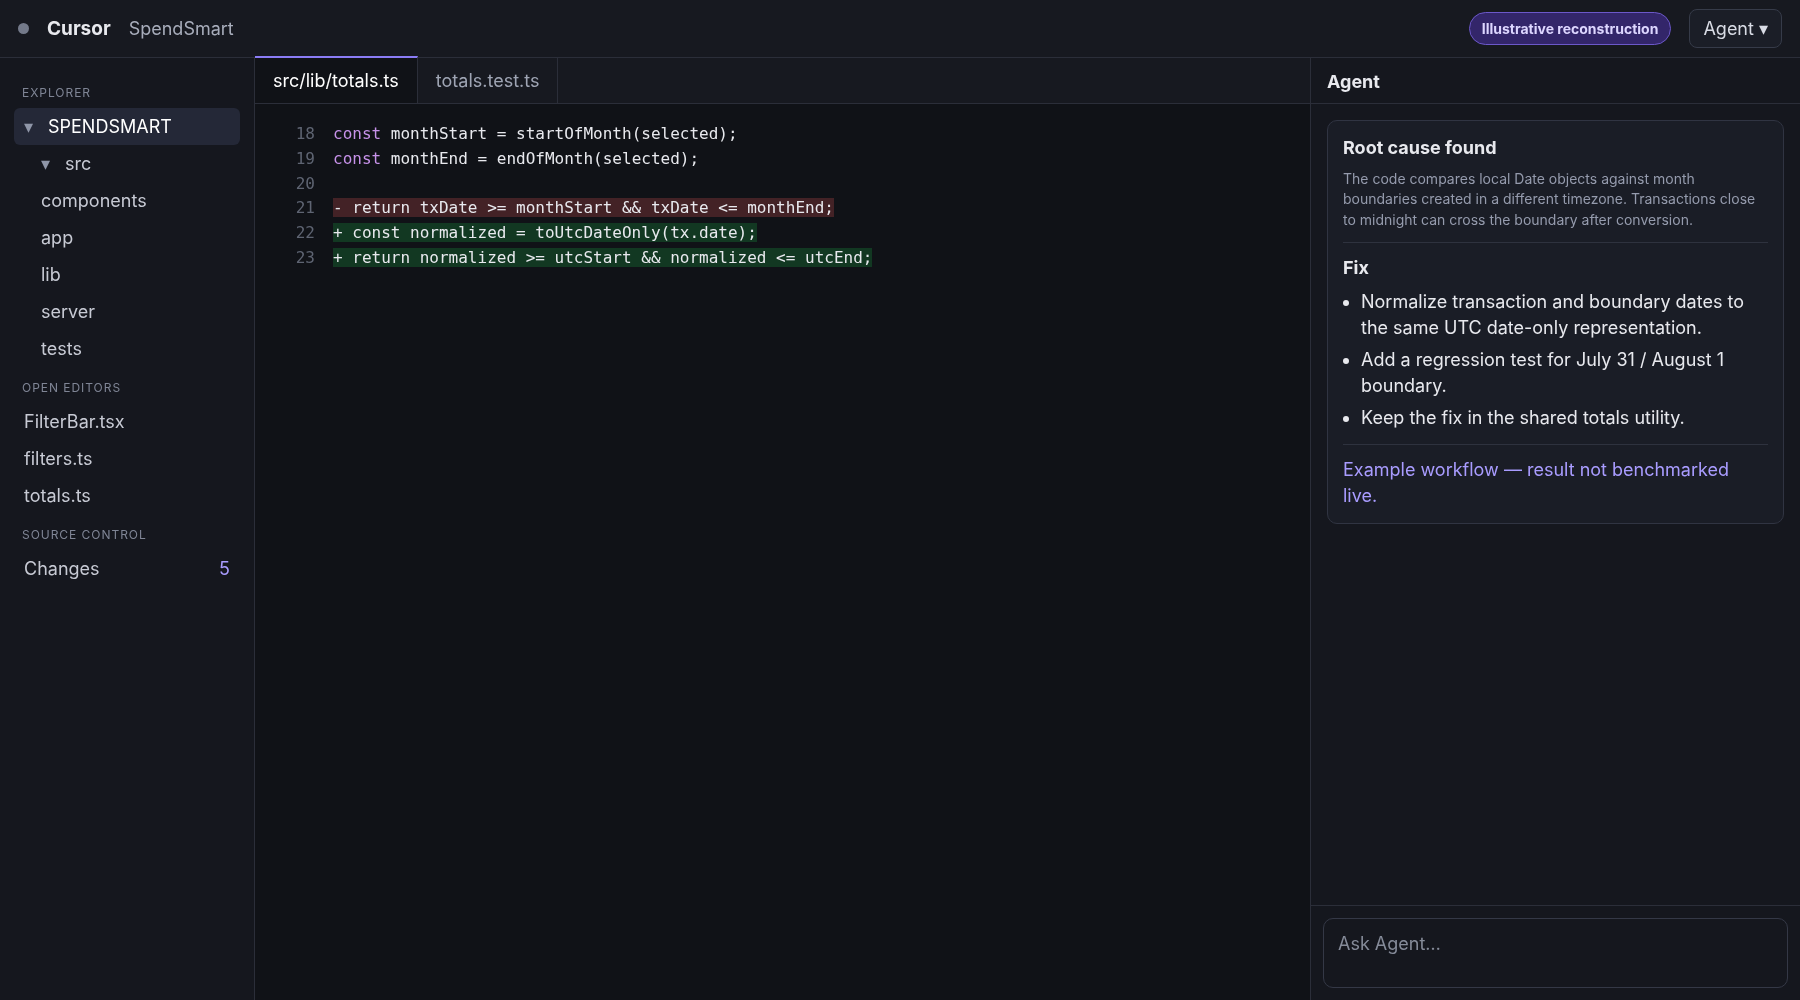
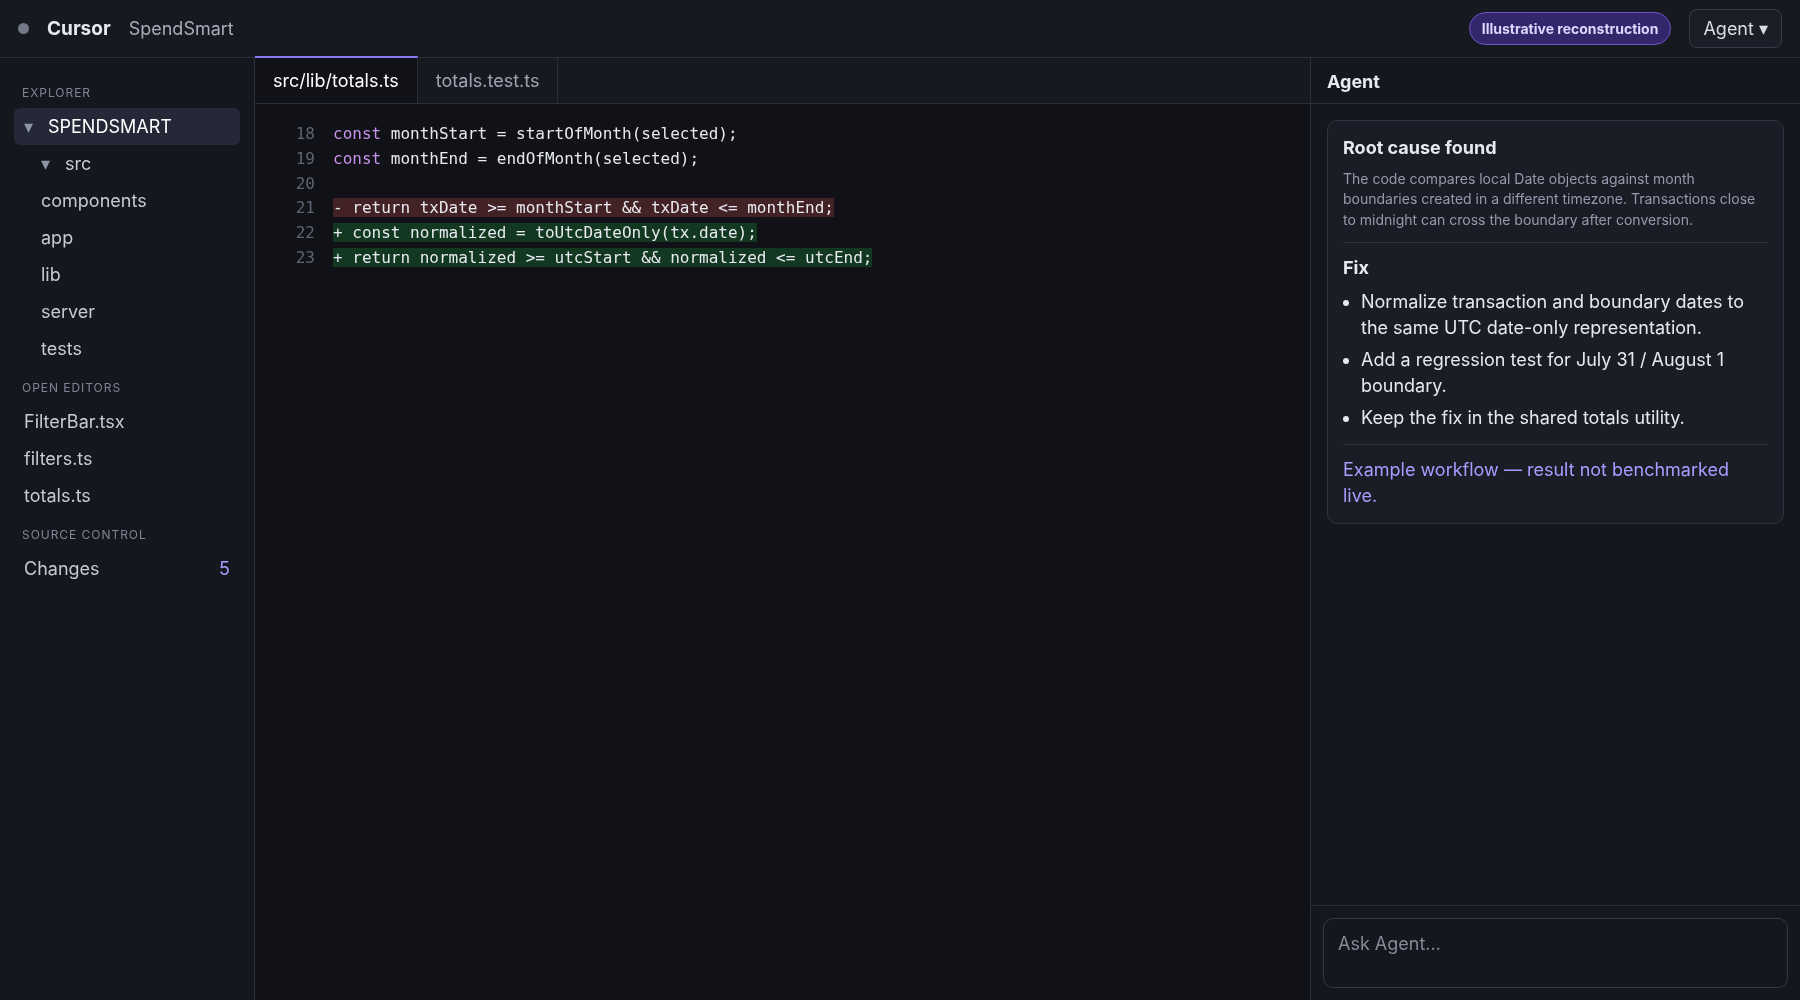
This is the strongest direct comparison with GitHub Copilot, Claude Code and Codex because each tool receives the same symptom without being told where the bug lives.
Prompt
There is a bug in SpendSmart. The monthly spending total sometimes includes a transaction from the previous month. Investigate the root cause before changing anything. Then explain why the bug occurs, fix the underlying cause, add a regression test and avoid unrelated changes. After the fix, summarize what changed.
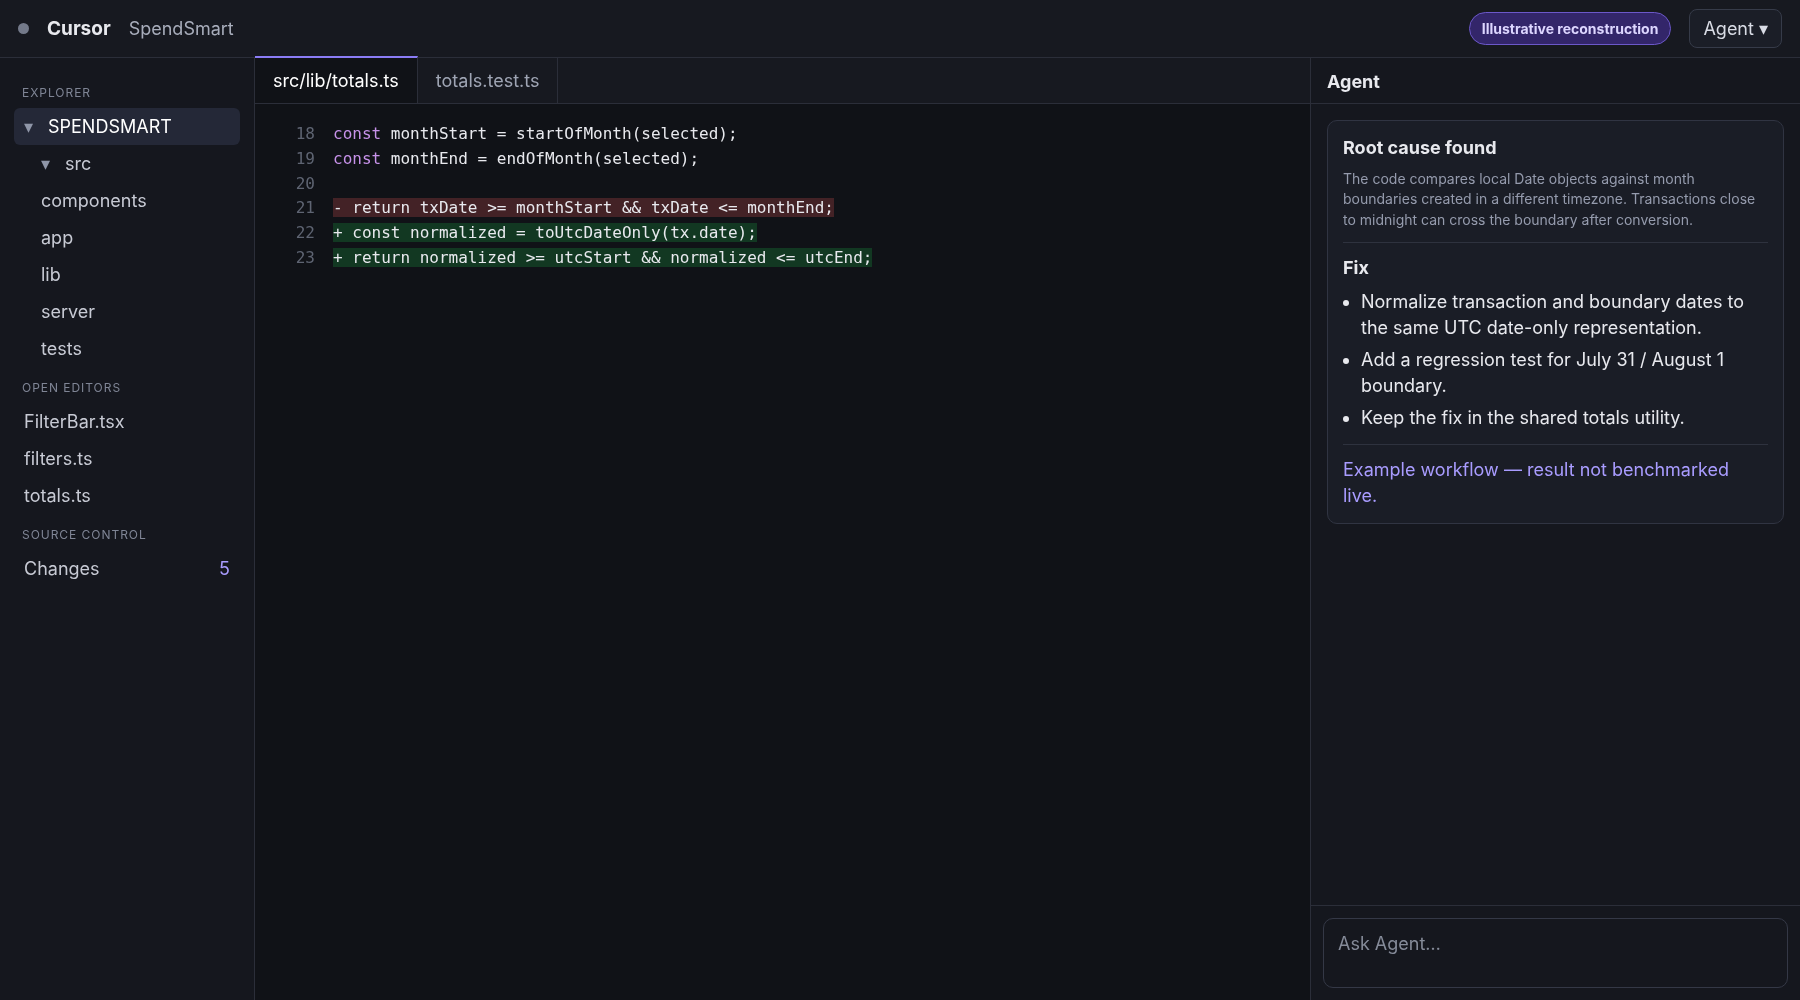
Prompt
Review the transaction-filtering implementation. Some filtering logic is duplicated. Identify the duplication and refactor it into one reusable implementation. Preserve existing behavior, avoid unnecessary abstractions and update tests where needed. Explain why the new structure is easier to maintain.
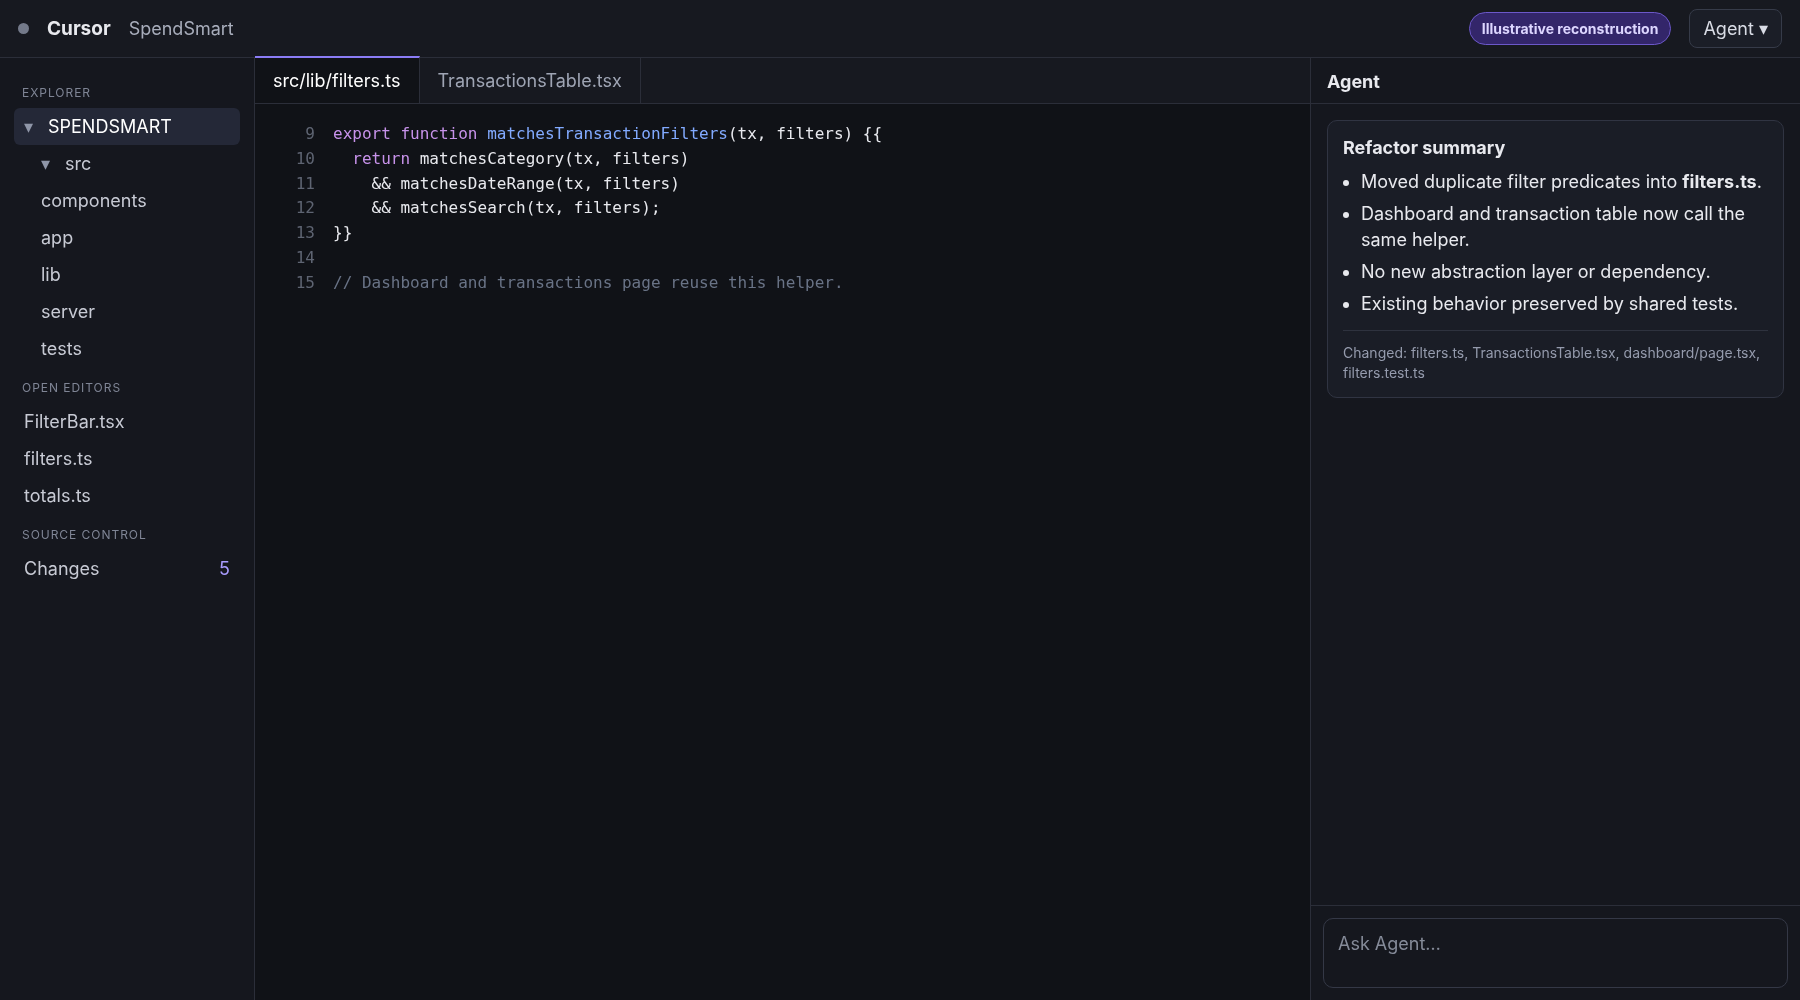
This test is less about whether Cursor can “clean up code” and more about whether it knows when to stop. Over-engineering, unnecessary utilities or broad file churn should count against it even if the final code still works.
Prompt
Run the relevant test suite, type checks and build checks. If any failures were caused by your changes, identify the cause, fix them and rerun the checks. Do not delete, skip or weaken failing tests just to make the suite pass. Report the final test and build results.
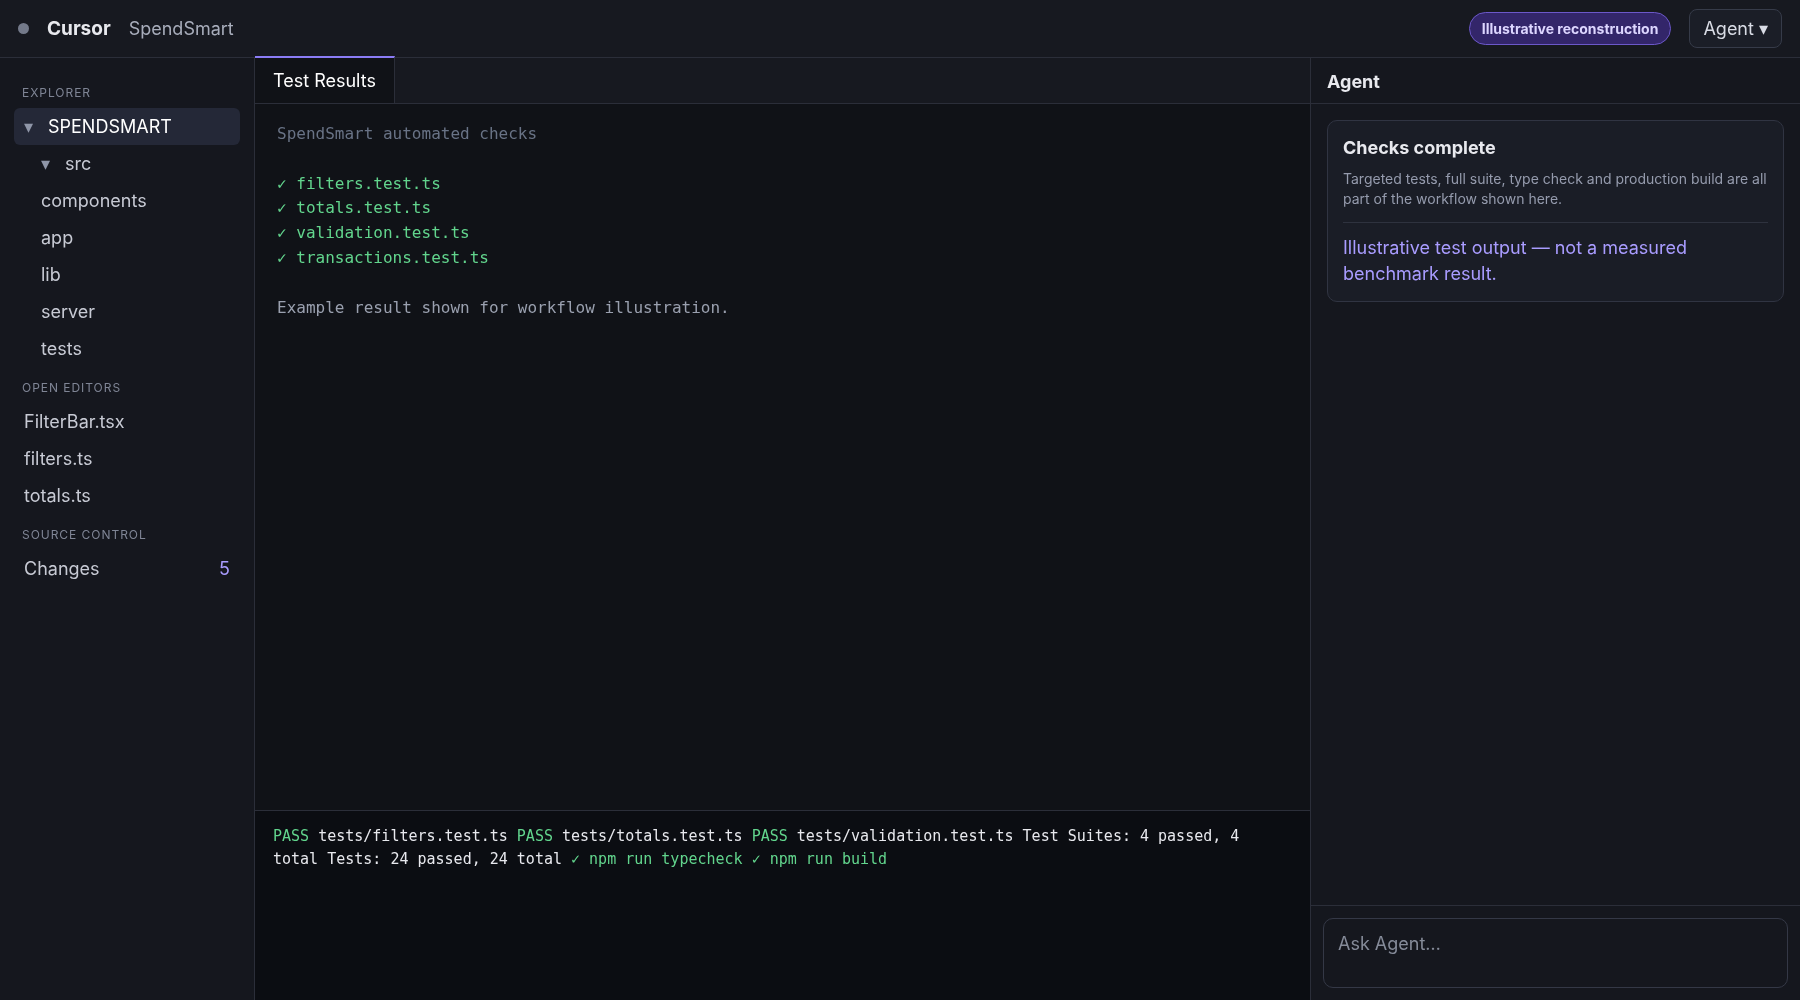
For the real benchmark, we would record baseline tests, first-run failures, final tests, build status, commands executed and any human intervention needed to finish the task.
Prompt
Review the complete SpendSmart diff as if this were a production pull request. Prioritize correctness, regressions, security, unnecessary edits, maintainability and missing tests. List anything that should be fixed before merge.
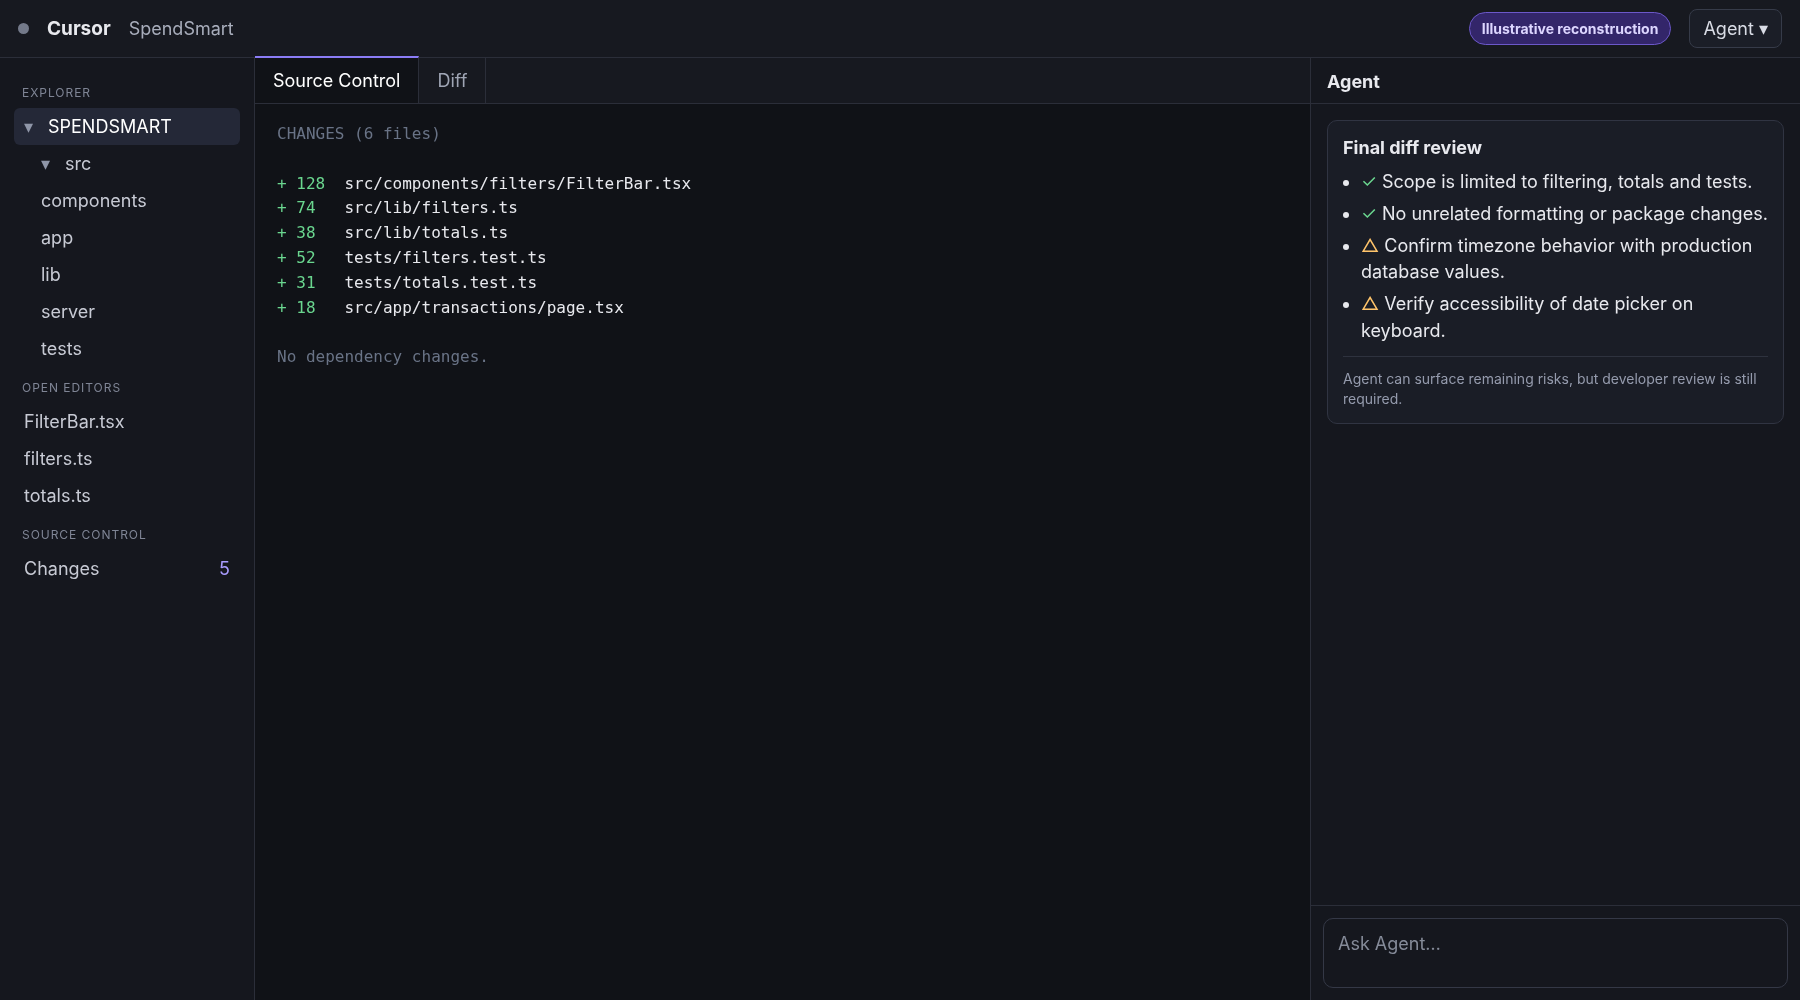
Developer control matters: A useful AI editor should make it easy to see what changed and why. The conversational summary is secondary; the diff is the evidence.
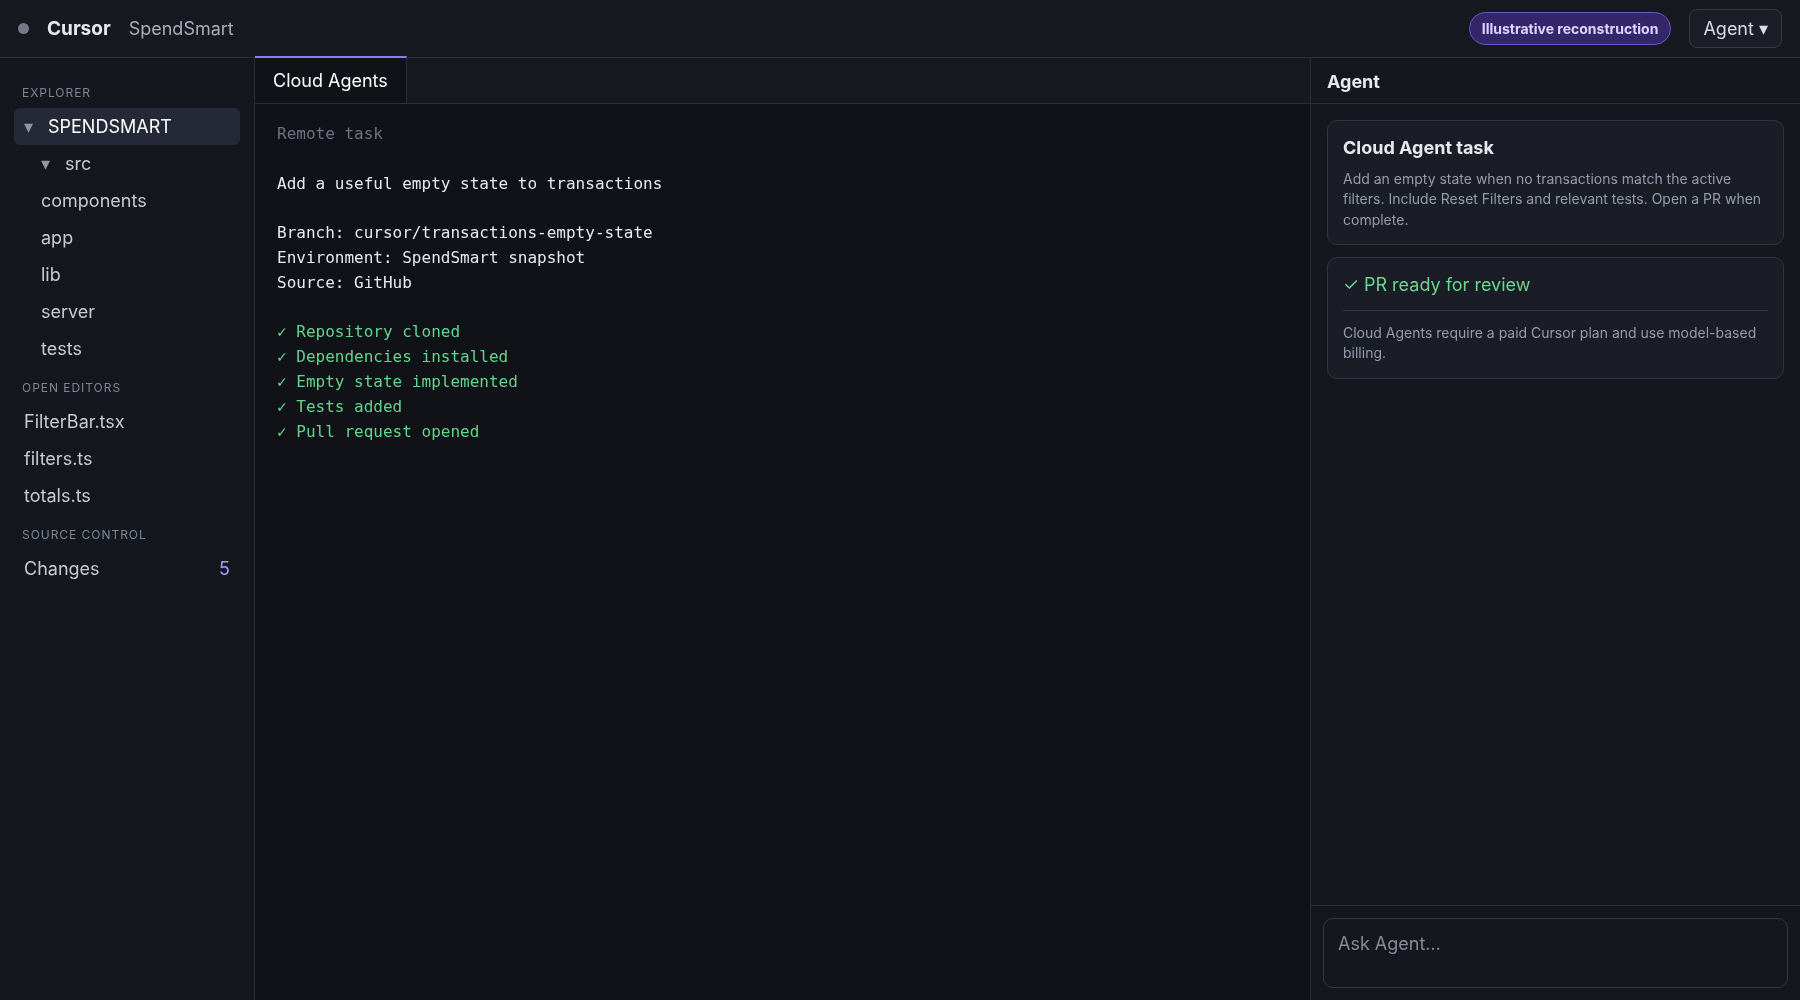
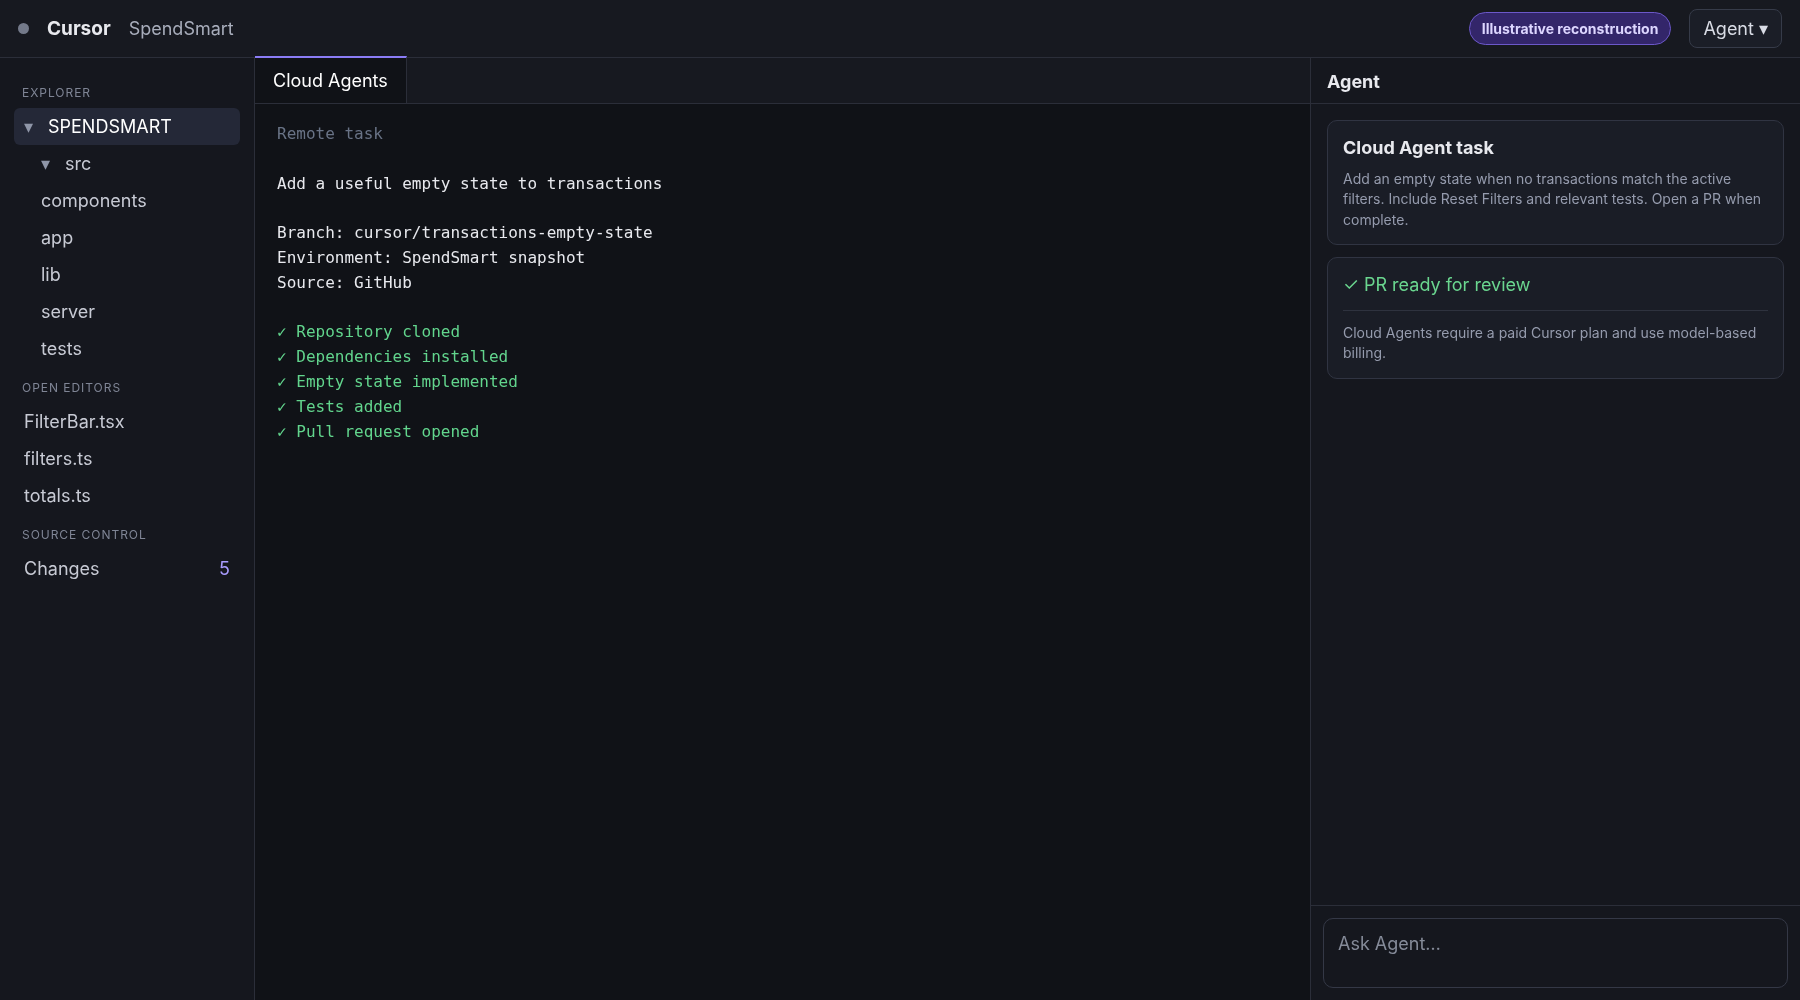
Cursor’s paid plans include Cloud Agents, which can work in remote environments while the developer continues with other work. Cursor’s documentation notes that Cloud Agents require a paid plan and are billed using API pricing for the selected model.
Prompt
Add an empty state to the SpendSmart transactions page. If no expenses match the active filters, show a helpful message and a clear Reset Filters action. Preserve the current visual style, add relevant tests and open a pull request when complete.
Cursor also offers Bugbot for pull-request review. For individual users, current documentation describes Bugbot as usage-based billing rather than a simple unlimited inclusion.
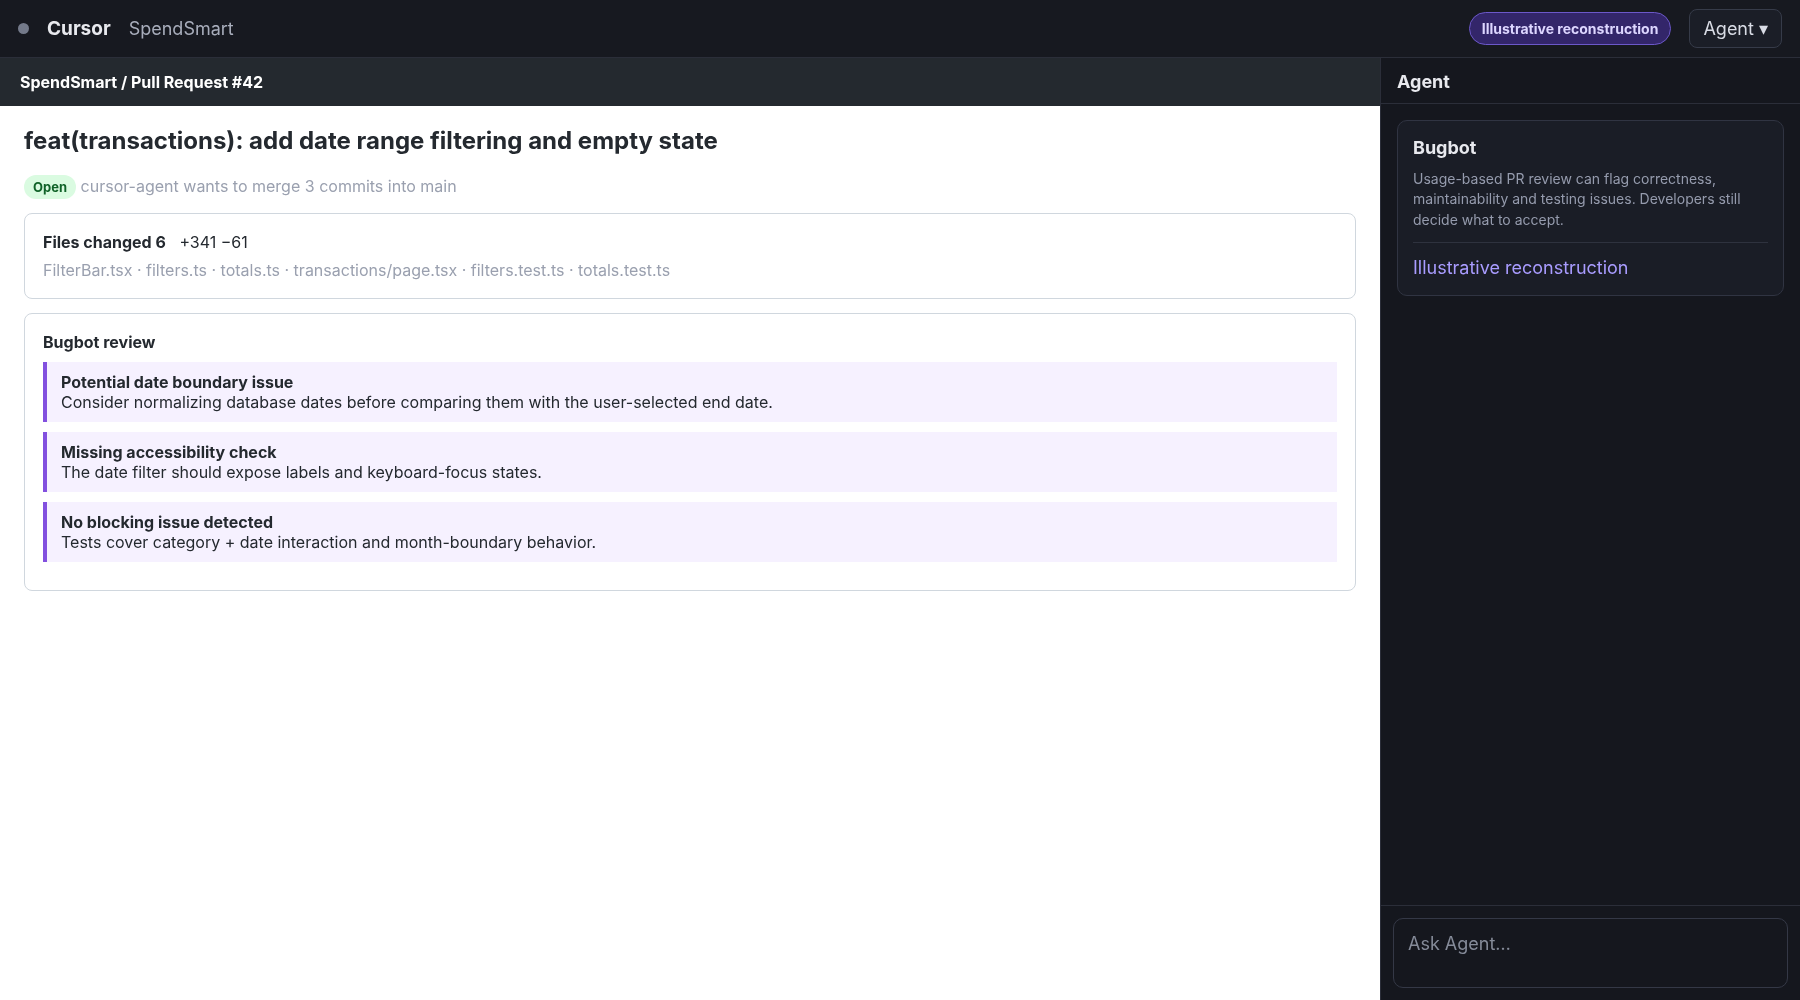
For a real review benchmark, we would count genuine issues found, false positives, useful fix suggestions and any planted issue that Bugbot misses.
Think box: Higher autonomy does not reduce the need for review; it changes what you review. With Cursor, the key control surface is the proposed plan, changed-files list, diff, commands run and returned PR.
Cursor’s pricing is especially interesting for this guide because India now has a lower-priced Start tier alongside the global Pro plans.
Plan | Current price | What changes | Review angle |
Hobby | Free | No credit card required; limited Agent requests; access to Composer | Useful for trying Cursor, but not a fair test of sustained Agent work |
Start — India | ₹649/month, tax inclusive | Cursor Models pool, more Agent usage than Free, Cloud Agents, plugins/MCP/hooks/skills | A strong India-specific entry point for daily agentic development |
Pro | $20/month | Extended Agent limits, frontier models, MCPs/skills/hooks, Cloud Agents, Bugbot on usage-based billing | Main global tier for regular Cursor use |
Pro Plus | $60/month | 3× Pro Agent limits plus higher included Other Models usage | For heavier Agent and model use |
Ultra | $200/month | 20× Pro Agent limits and priority access to new features | For very heavy individual usage |
Teams | $40/user/month | Team billing, controls and collaboration features | More relevant to organization-wide adoption |
India-specific note: Cursor Start launched on July 28, 2026 at ₹649/month, tax inclusive, with UPI/card billing, access to Cursor models and Cloud Agents. Cursor says India now has more than 3 million developers using the product and the highest agent requests per developer among its markets.
Cost caution: Do not compare Cursor plans only by the monthly subscription. Model selection affects how quickly included usage is consumed, Cloud Agents are billed at API pricing for the selected model, and Bugbot uses usage-based billing.
Cursor is one of the strongest fits in this comparison for developers who want AI to become part of the development environment itself. Rather than simply adding AI features to an existing workflow, Cursor makes an AI-native editor the center of development, making it a notable option among modern ai tools for coding.
Where GitHub Copilot can layer AI onto tools developers already use, Cursor integrates AI directly into the editor experience. That matters most when the work involves understanding a repository, planning changes, editing several files, running commands, debugging, testing and reviewing the final diff.
The trade-off is that greater autonomy makes scope control, model choice and verification more important, not less. Developers still need to decide whether the plan makes sense, whether the diff fits the project and whether passing tests actually cover the risky behavior.
Decision question: Would Cursor’s deeper AI integration save more engineering time than a Copilot-style workflow for your codebase, or would it mainly automate more steps while leaving the same verification burden? That is the comparison worth testing.
Pricing and product details verified August 20, 2026. The diagrams in this section are illustrative workflow reconstructions, not live benchmark results.
Claude Code takes a more terminal-first approach to AI-assisted development. Instead of centering the experience on a visual app builder or a dedicated AI editor, it works directly inside a project directory, explores the repository as needed, edits files, runs shell commands and can automate Git and CI tasks.
That makes it particularly relevant for experienced developers and engineering teams that want to delegate meaningful repository-level work while keeping the normal terminal, Git and development environment in view.
For SpendSmart, the central question is: can Claude Code understand a real codebase deeply enough to plan, implement, debug, test and review changes without creating more verification work than it saves?
Category | Finding |
Best for | Experienced developers, terminal-first workflows and complex repositories |
Main experience | Repository-aware coding agent in the terminal / supported IDE workflows |
Where it works | macOS, Linux and Windows; terminal-first with supported IDE integrations |
Free option | Claude Code is included with paid Claude plans; API access can also be billed separately |
Paid starting point | Claude Pro: $20/month or $17/month equivalent on annual billing |
Higher-usage plans | Max 5x: $100/month; Max 20x: $200/month |
Permissions | Plan mode, explicit allow/deny rules, Auto mode and configurable tool permissions |
External context | MCP support for approved tools and data sources |
Main strength | Deep repo exploration + terminal execution + explicit control over tool permissions |
Main limitation | Terminal-heavy workflow and usage limits shared with the broader Claude subscription |
Claude Code deserves its own place because it represents a different developer interaction model from both GitHub Copilot and Cursor.
We begin exactly as we do with Copilot and Cursor: Claude Code receives the same SpendSmart repository and must explain it before it is allowed to change anything.
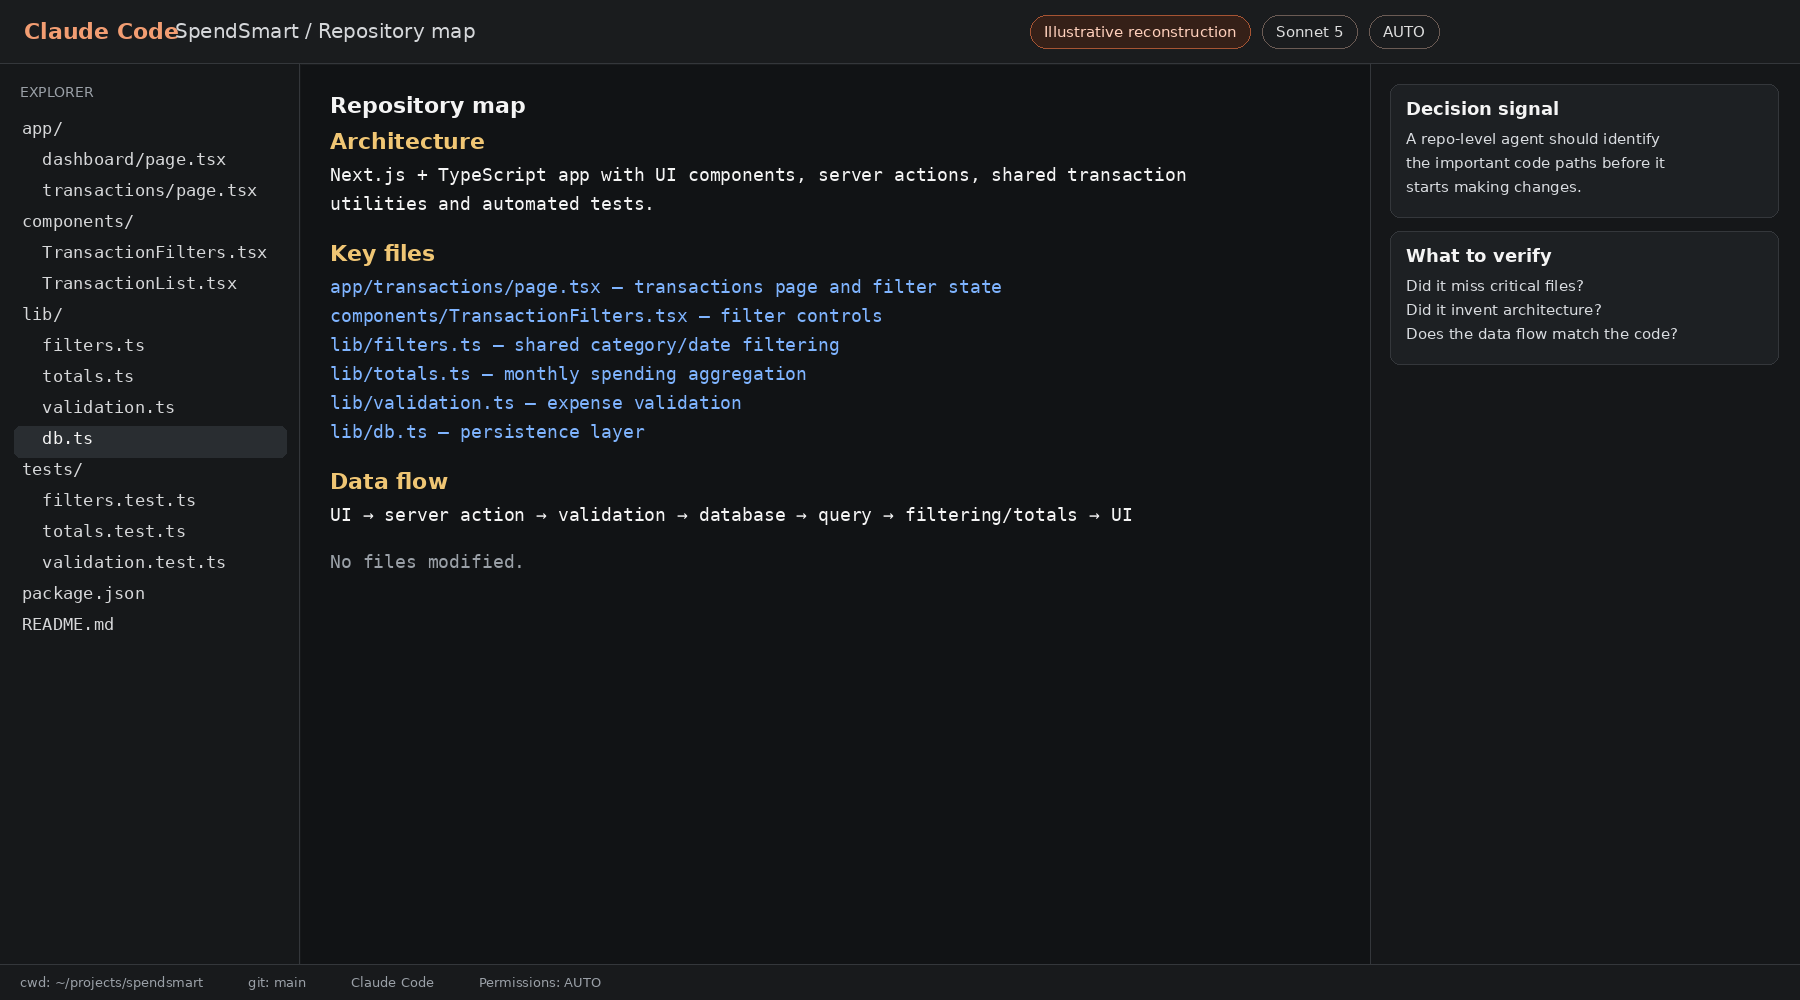
Check | What to record in a live run |
Relevant files correctly identified | Count against the known SpendSmart architecture |
Important files missed | List any important file the agent overlooks |
Incorrect assumptions | Record unsupported architecture or dependency assumptions |
Data flow explained correctly | Verify against the actual UI → logic → storage path |
Files modified despite instruction | Should remain No during this read-only step |
Claude Code’s permission system is one of its most important differences. Plan mode lets the agent analyze a task while blocking edits and command execution, which makes it useful for reviewing an approach before granting broader autonomy.
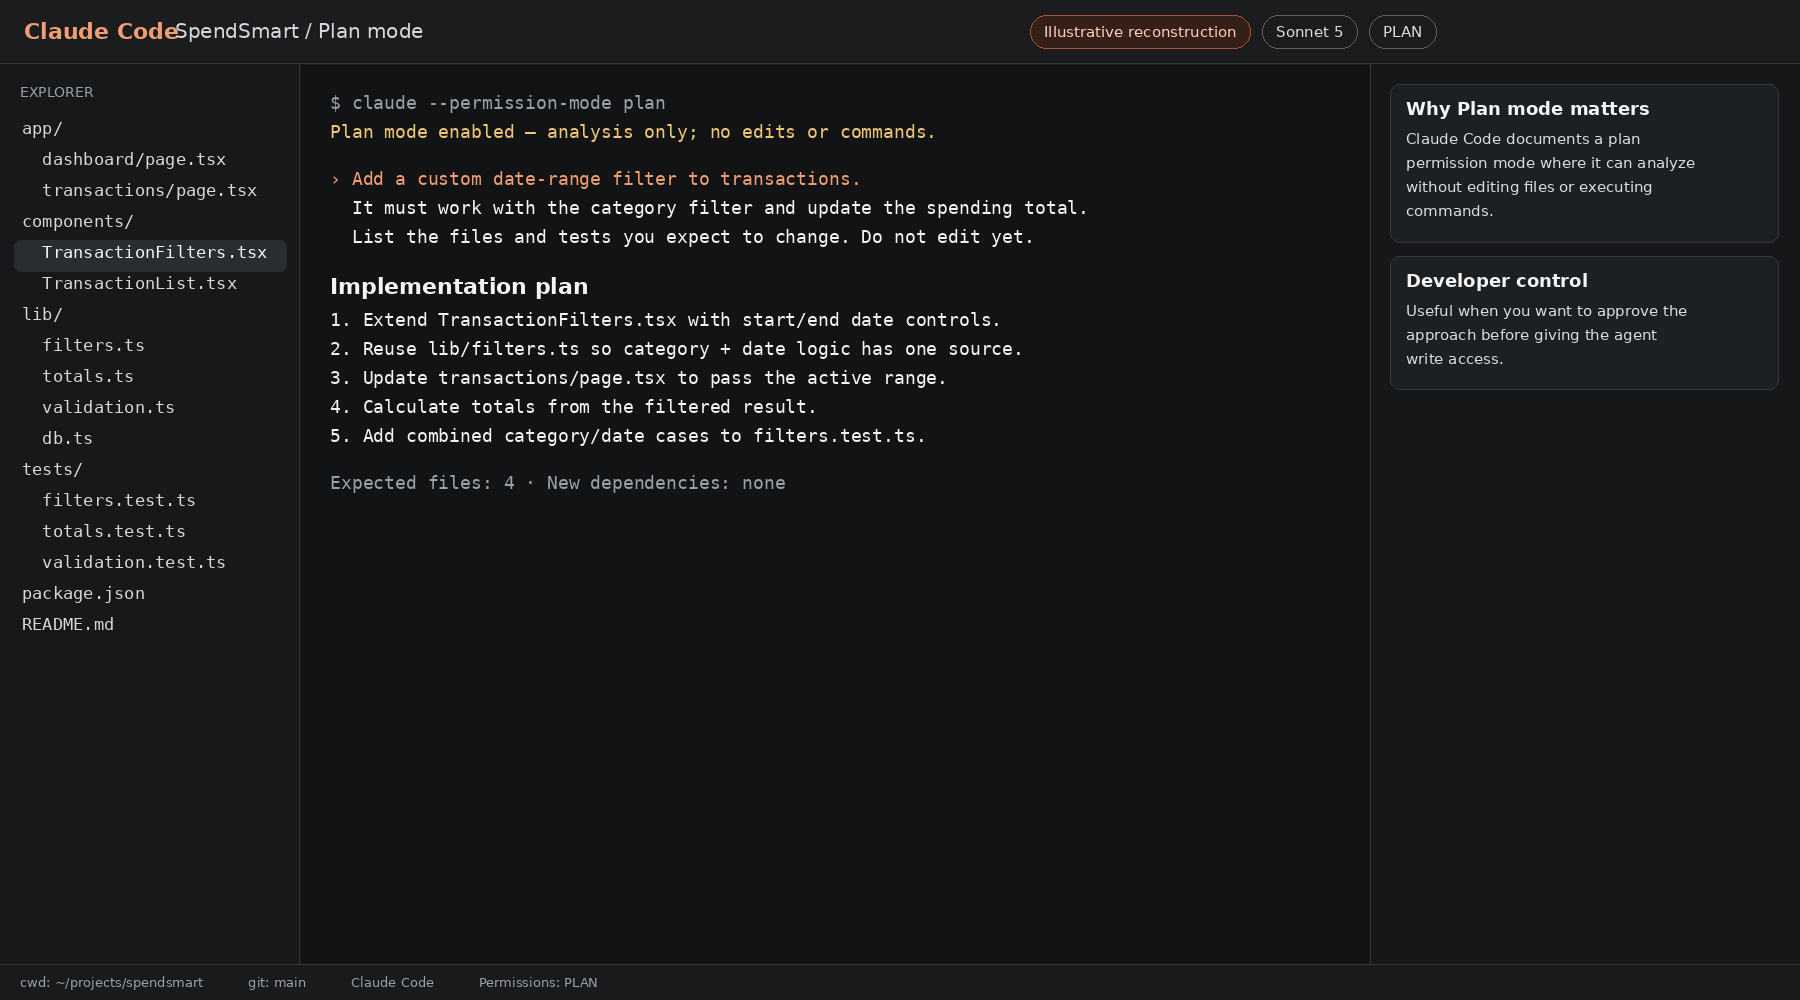
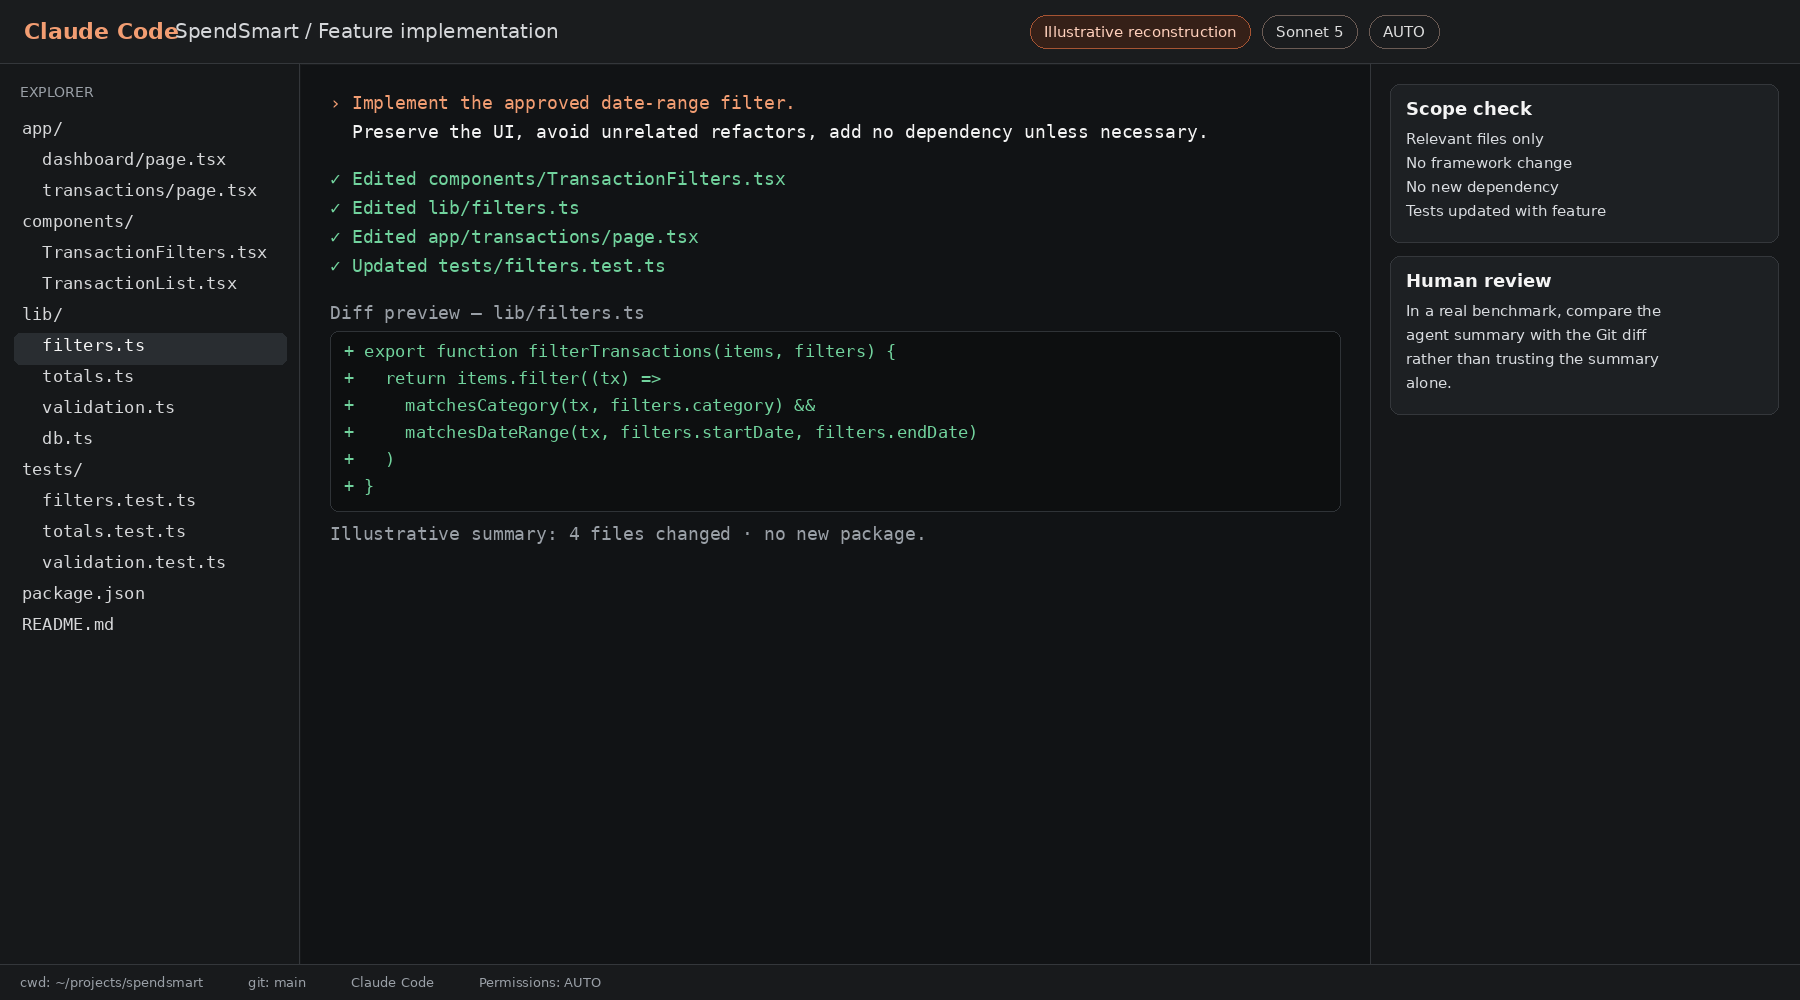
The debugging test matters more than raw code generation because the agent has to find the cause without being told where the defect lives.
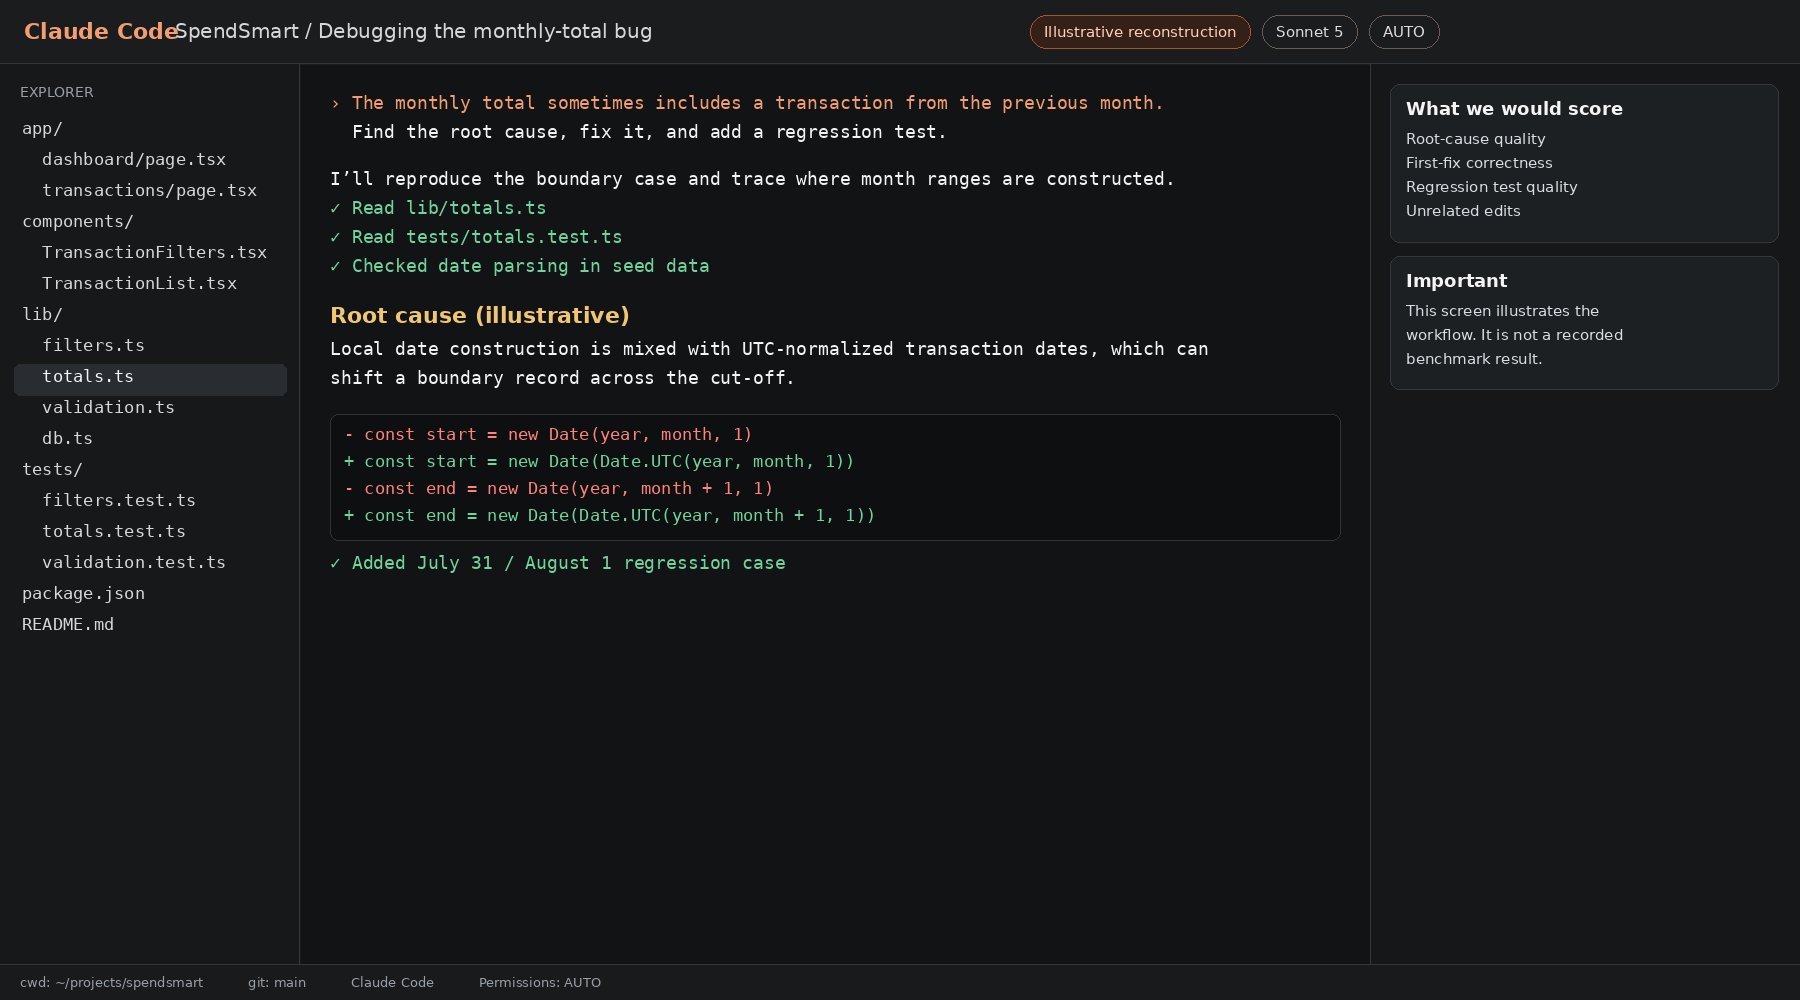
Debugging check | What to verify in a live run |
Correct root cause identified | Confirm the agent explains the actual boundary defect |
First proposed fix correct | Record whether correction is needed |
Regression test added | Confirm a test fails before the fix and protects the edge case |
Attempts required | Record the number of repair loops |
Unrelated edits | Record any scope creep |
Manual correction needed | Record whether a developer had to edit code directly |
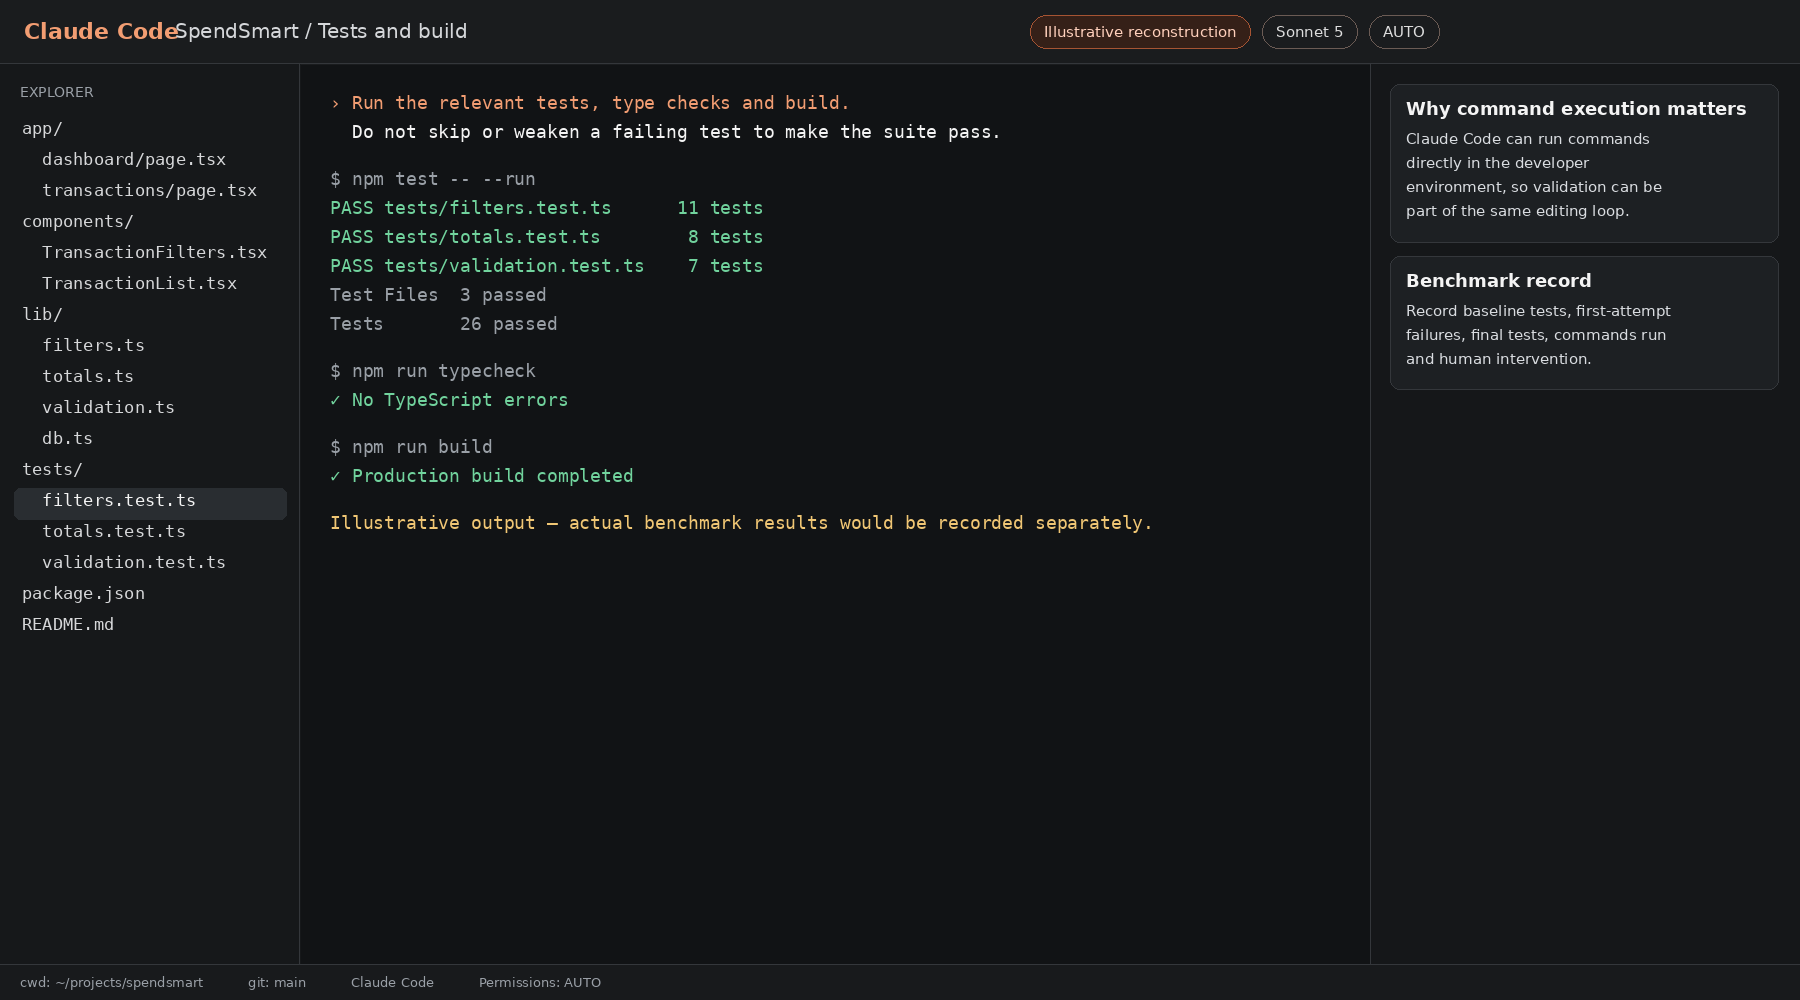
For the real benchmark, we would record baseline tests, first-attempt failures, final passing tests, commands executed and the amount of human intervention required. A green terminal alone is not enough if the agent weakened or skipped the test that exposed the problem.
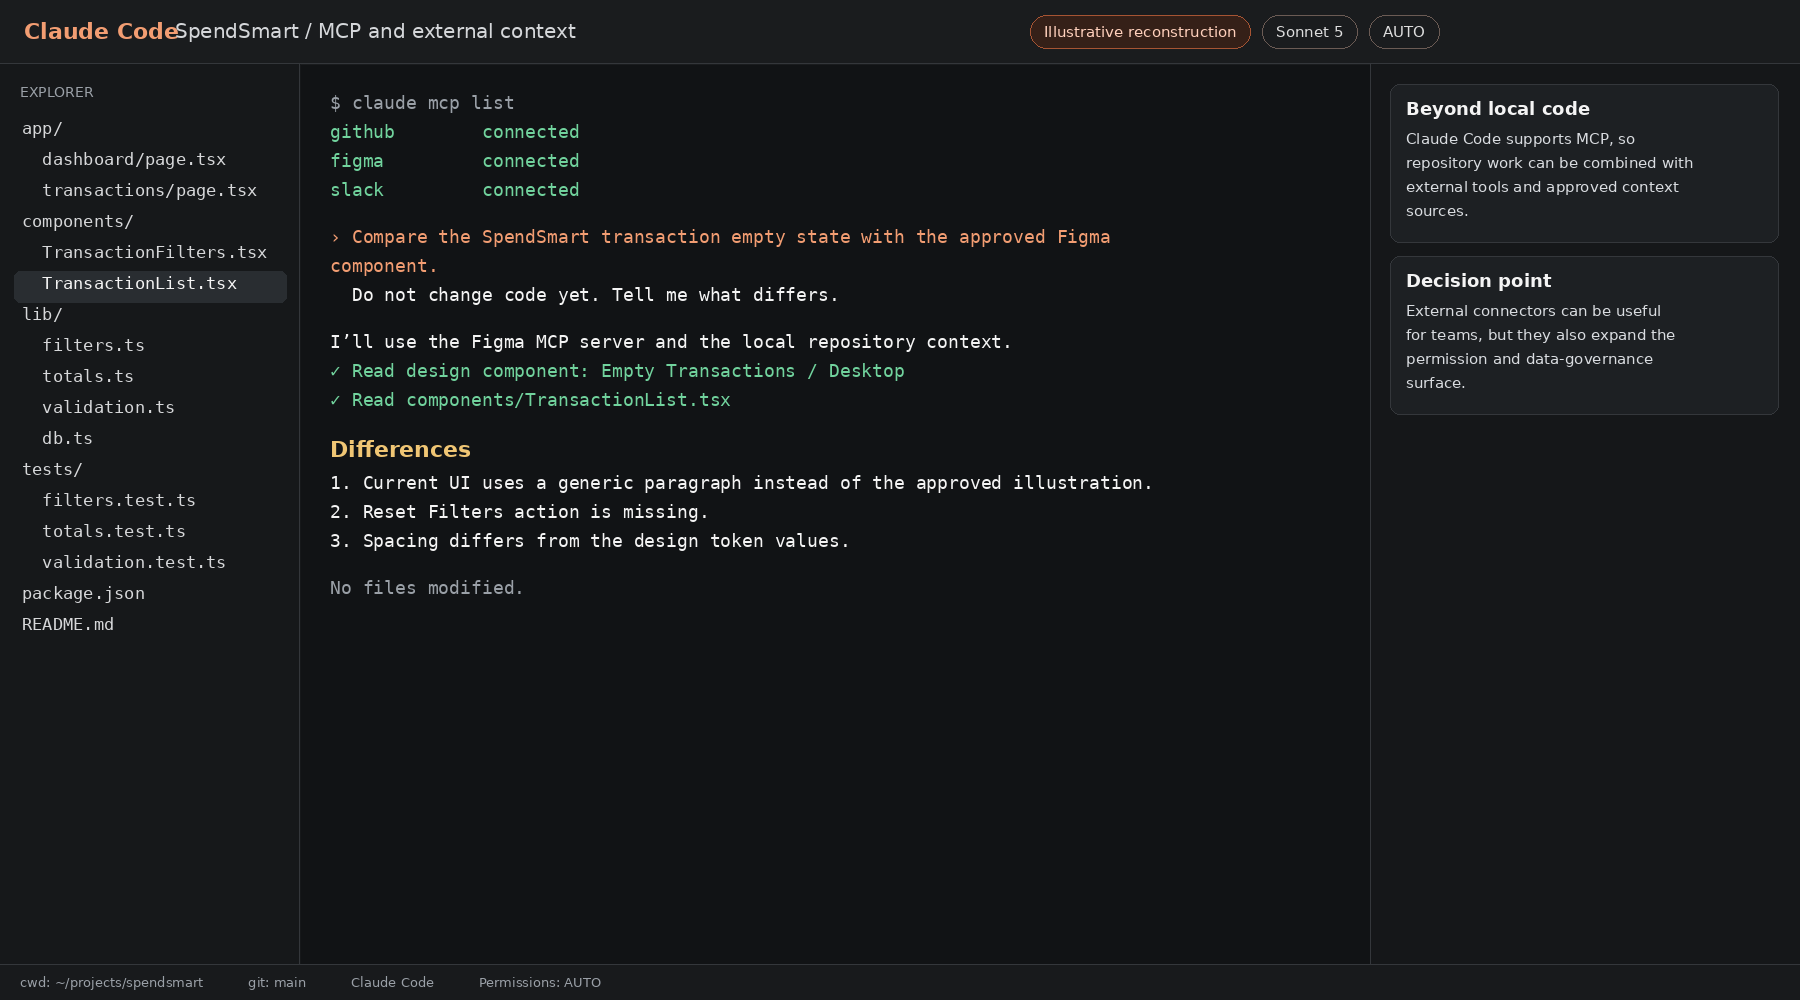
Claude Code is powerful partly because it can take real actions. That makes its permission model as important as its coding quality.
Anthropic documents explicit allow and deny rules for tools, a Plan mode for analysis-only work, and Auto mode for more autonomous sessions. As of August 14, 2026, Auto mode is the default for new Pro, Max and Team Claude Code sessions unless the user has pinned another default.
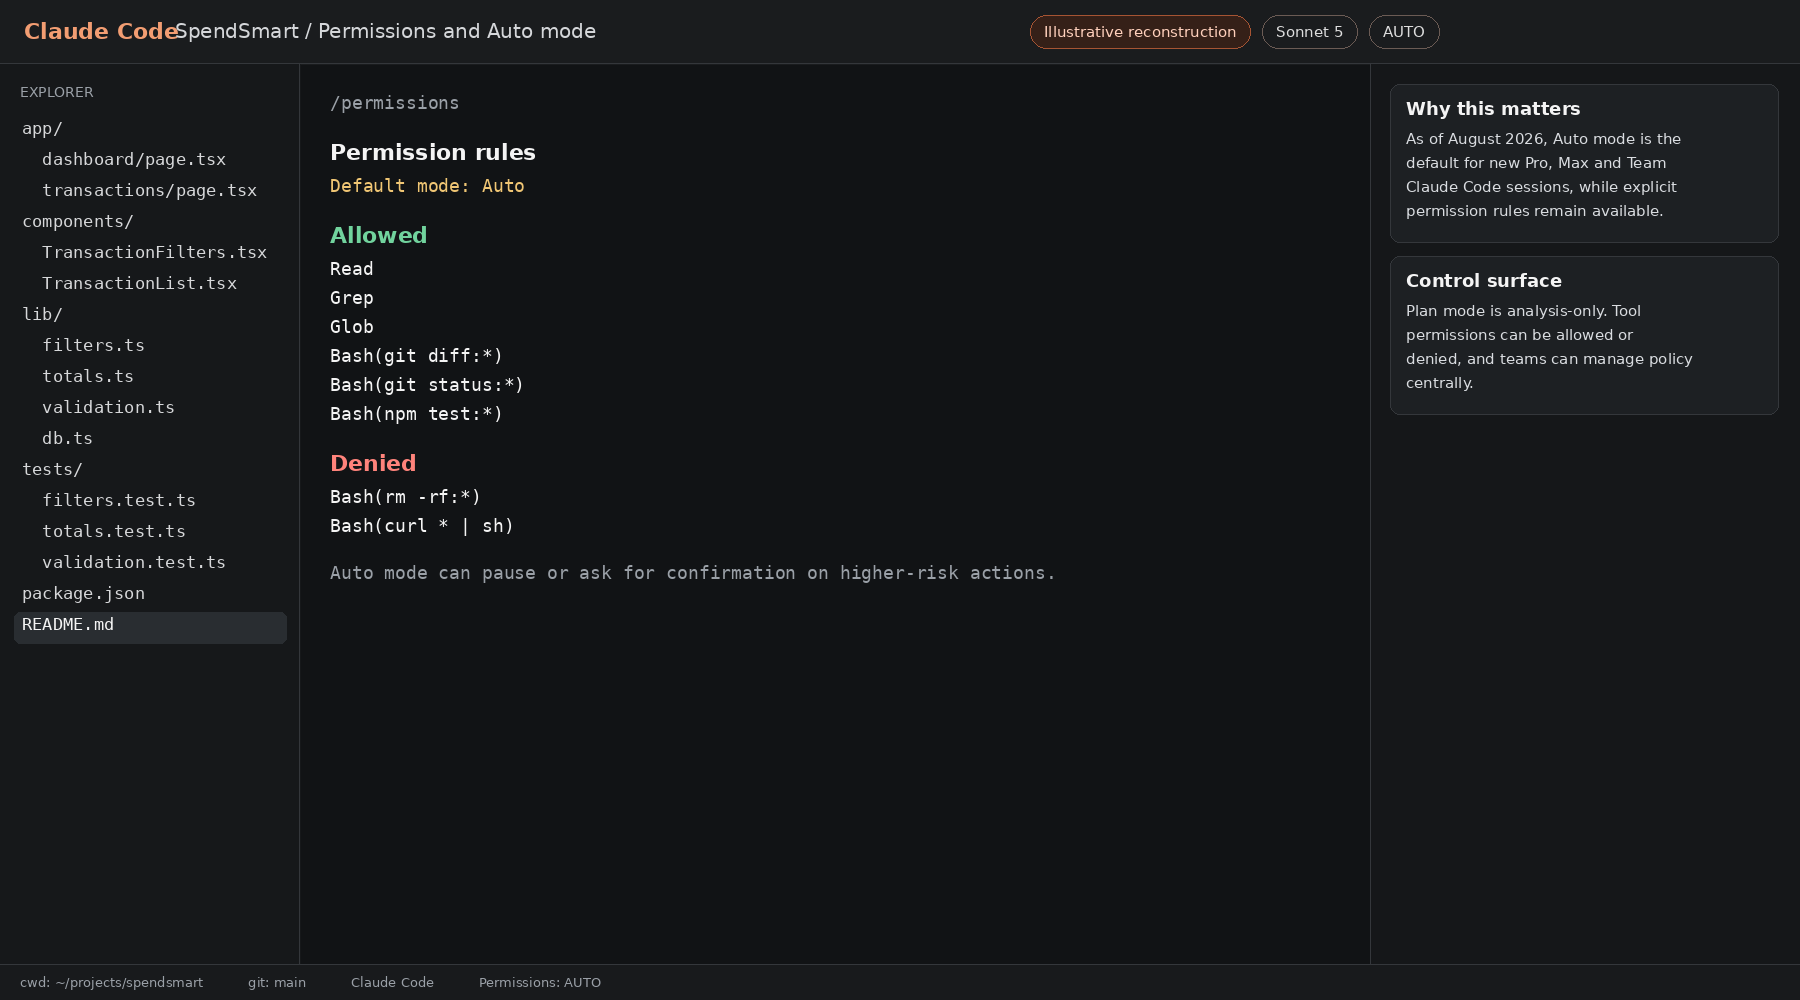
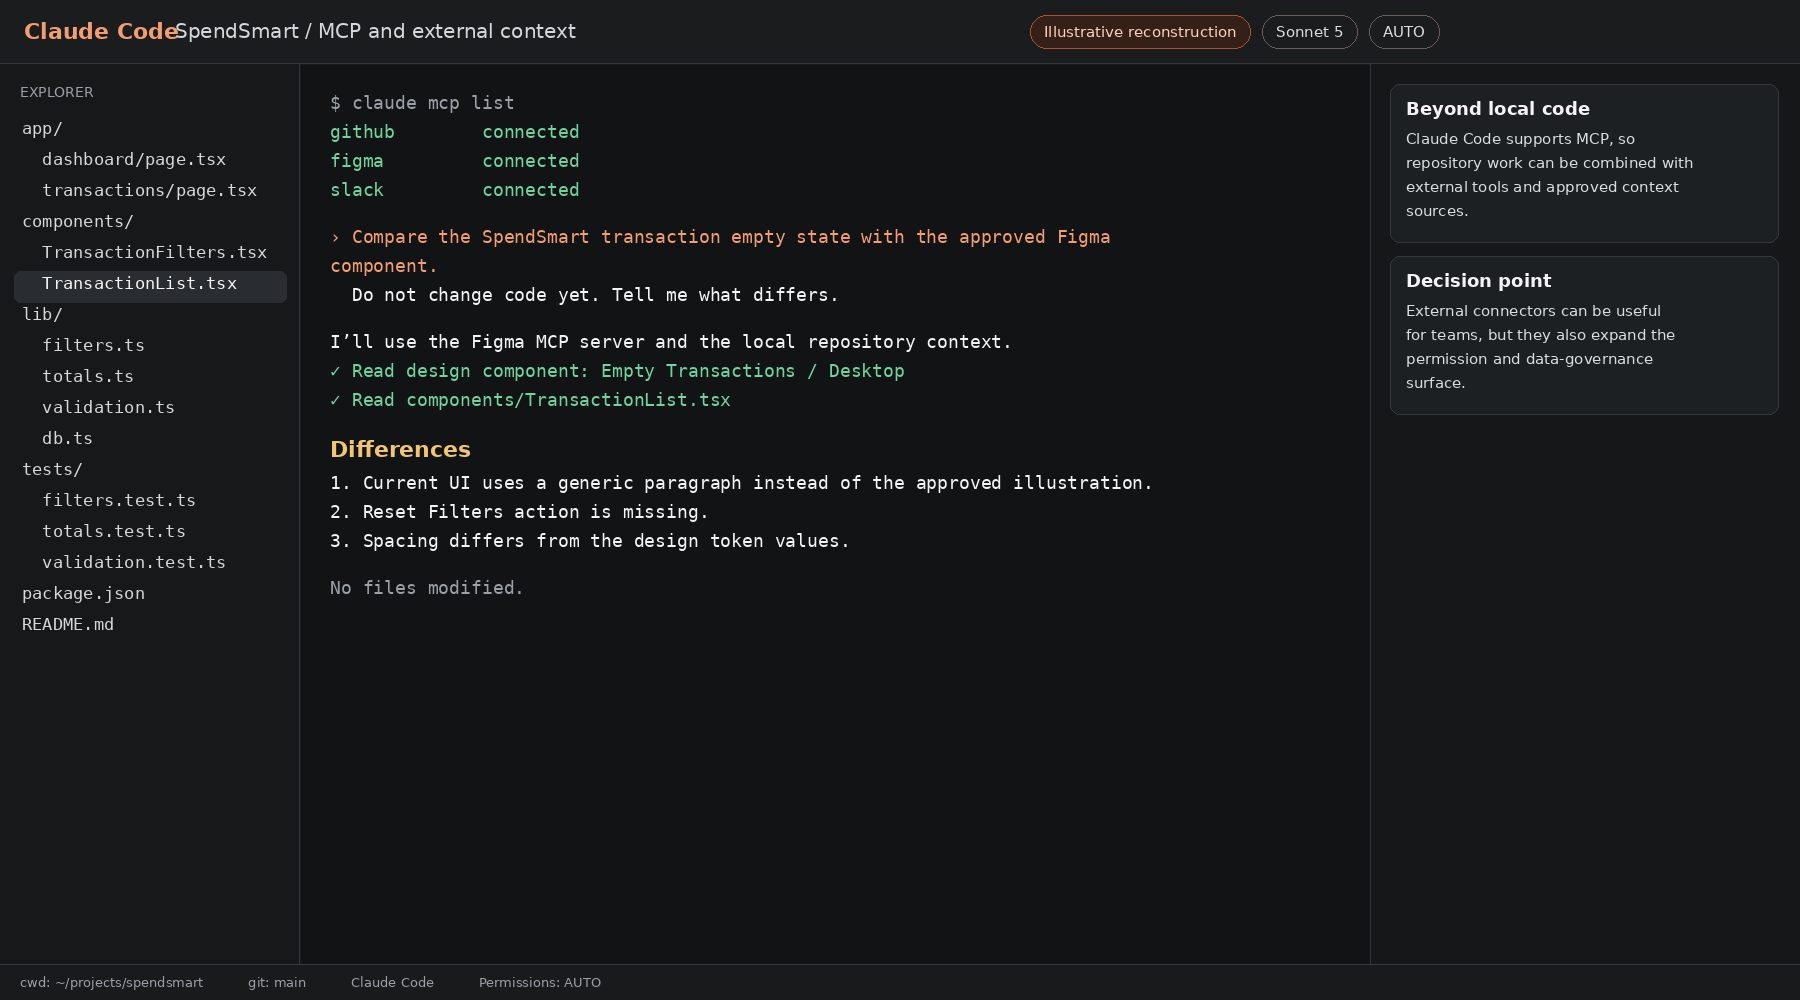
Claude Code can also work with external context through MCP. In a real team, that could mean comparing implementation against a Figma component, reading an issue from GitHub or using approved internal tools without copying everything into the prompt.
Claude Code can be used by developers at different experience levels, but its strongest value appears when the user is already comfortable with repositories, terminals, tests and Git.
User | Fit | Why |
Non-coder / founder | Low | Terminal-first workflow assumes more development knowledge than Replit or v0. |
Beginner developer | Medium | Useful for explanations and guided changes, but higher autonomy can hide concepts the learner still needs to understand. |
Working developer | High | Strong fit for debugging, refactoring, tests, Git and repo-level tasks. |
Experienced developer | Very high | Can delegate longer, multi-step engineering work while retaining tool and permission control. |
Engineering team | High | MCP, policy controls, CI and Git workflows can support team-level use when governance is configured well. |
Claude Code is included in Claude’s paid individual plans rather than being offered as a separate unlimited free coding product. The same subscription usage pool is shared across Claude chat and Claude Code.
Plan | Current entry point | Claude Code / usage reality | Review angle |
Free | $0 | Claude Code is not included in the Free plan | Useful for Claude chat, but not the plan to benchmark Claude Code. |
Pro | $20/month or $200/year | Includes Claude Code; usage resets on rolling five-hour windows with additional weekly limits | Realistic starting point for individual developers. |
Max 5x | $100/month | 5x Pro usage per session; higher output limits | For frequent Claude/Claude Code use. |
Max 20x | $200/month | 20x Pro usage per session | For developers who work with Claude throughout the day. |
API / extra usage | Pay as you go | Can continue via usage credits / API pricing when subscription limits are reached | Cost becomes model- and token-dependent rather than flat-rate. |
Anthropic doubled Claude Code’s five-hour rate limits for Pro, Max, Team and seat-based Enterprise plans in May 2026 and removed the peak-hours reduction for Pro and Max. Even so, the amount of work available in a session varies with task complexity, model choice and context size.
For pay-as-you-go use, Claude Sonnet 5 is currently priced at $2 per million input tokens and $10 per million output tokens. Anthropic originally described that as introductory pricing, then made it permanent in August 2026. Heavy repository work can therefore behave very differently from a fixed-price editor subscription because cost grows with context, model use and output volume.
Ask Claude to map the codebase and propose the files it expects to touch before granting write access. This gives you a cheap way to catch a bad assumption.
Prompts such as “do not change unrelated files,” “do not add a dependency unless necessary,” and “do not weaken tests” make the eventual diff easier to evaluate.
Review which shell commands, directories and external tools the agent can access. Permissions should be deliberate, especially with Auto mode and MCP connectors.
Claude Code supports continuing and resuming sessions, which is useful for multi-step debugging and longer repository investigations where context matters.
Use git status, git diff and normal review practices even when Claude reports that a task is complete. The codebase, not the conversational summary, is the final evidence.
Claude Code can run in non-interactive mode for scripts, CI and GitHub Actions. Treat that as a separate operational workflow with tighter allowed-tool configuration and spend controls.
Pros | Cons |
Deep repository exploration | No Claude Code access on the Free individual plan |
Terminal-native workflow for experienced developers | Less approachable for non-coders and visual builders |
Can edit files and run commands | Higher autonomy increases the permission/security surface |
Plan mode for analysis-only work | Usage is shared with the broader Claude subscription |
Explicit allow/deny tool permissions | Long sessions can hit rolling/weekly usage limits |
Git and CI automation | Results still require human code review |
MCP support for external tools/context | Connectors require data-governance review |
Session continuation and resume support | Terminal-first UX may feel less visual than Cursor or Copilot |
Works with paid Claude plans and API billing options | API/extra usage makes heavy use more cost-variable |
Claude Code is one of the strongest fits in this comparison for developers who already think in repositories, terminals, commands, tests and Git rather than visual app-building workflows.
Its main advantage is not simply code generation. It is the ability to move through a larger engineering loop: understand the repository, plan the change, edit files, execute commands, debug failures, inspect Git state and continue the same investigation over time.
The permission system also matters. Plan mode, explicit allow/deny rules and the newer Auto mode give developers different ways to balance autonomy with control. That becomes especially important when the agent can run shell commands or connect to external systems through MCP.
The trade-off is that Claude Code assumes more technical fluency than Replit or v0, and it does not remove the verification burden. A terminal agent that can change more of the repository can also create more damage if its scope, commands or assumptions are not reviewed carefully.
Testing transparency: The Claude Code diagrams in this section are illustrative reconstructions intended to teach the workflow. They should not be interpreted as measured SpendSmart benchmark results. Exact interface details, model behavior, usage limits and pricing can change over time.
Codex is OpenAI's coding agent for writing, reviewing and shipping code across ChatGPT, the desktop app, CLI, IDE and cloud environments. Unlike a conventional assistant that mainly responds inside one editor pane, Codex is designed around delegated engineering work: longer-running tasks, multiple agents, isolated worktrees, background execution and review-oriented handoff. This makes it a notable option among the best ai tools for coding for developers who want AI to handle more substantial repository-level work.
For SpendSmart, the question is not simply whether Codex can generate code. We want to understand whether it can take a meaningful repository-level task, work through the implementation and return changes that are easy for a developer to inspect, test and merge. That distinction is important when evaluating an AI coding agent beyond basic code generation.
Category | Current position |
Best for | Developers and teams delegating repo-level engineering work |
Main experience | Coding agent across ChatGPT, desktop app, CLI, IDE, cloud and mobile steering |
Free access | Included on ChatGPT Free and Go for a limited time; limits can change |
Paid starting point | ChatGPT Plus — $20/month |
Pro | ChatGPT Pro — $200/month |
Business | ChatGPT Business — $20/user/month billed annually; $25 monthly |
Parallel work | Built-in multi-agent workflows with isolated worktrees |
Cloud tasks | Agents can run in isolated cloud environments and return reviewable changes |
Code review | GitHub pull-request review workflows supported |
Main strength | Delegation, long-running tasks and parallel engineering work |
Main limitation | Higher autonomy and token-based usage make review discipline and cost tracking important |
Desktop app | Available on macOS and Windows |
Project customization | Skills, project instructions and repository-specific workflows |
Background work | Supports longer-running and recurring/automated agent work |
Copilot mainly adds AI to an existing developer workflow, Cursor makes the AI-first editor the center of the workflow, and Claude Code is strongly terminal-oriented. Codex is most differentiated when the unit of work becomes delegation: several agents can work across projects or isolated worktrees while the developer supervises, reviews and integrates the results.
Capability | What it means in practice | Why it matters |
Parallel agents + worktrees | Run separate tasks in isolated copies of the same repository. | Lets teams explore or execute multiple tasks without constantly colliding with local Git state. |
Cloud tasks | Let work continue in an isolated remote environment. | Useful for longer tasks that should not occupy the developer’s local machine. |
Skills + project instructions | Encode repeatable standards, scripts and workflows. | Reduces the need to re-explain repository conventions on every task. |
Background/automated work | Use Codex for recurring work such as issue triage, monitoring or CI/CD tasks. | Moves the product beyond one-off coding prompts. |
Code review + review handoff | Review pull requests and inspect diffs before merge. | Keeps human or agent review as a separate control point from code generation. |
We begin by giving Codex the existing SpendSmart repository and a deliberately narrow instruction: understand the project before touching it. This tests whether the agent can orient itself inside an unfamiliar codebase without needing the developer to manually point out every relevant file. A good result should make the architecture and likely scope visible before any edits begin.
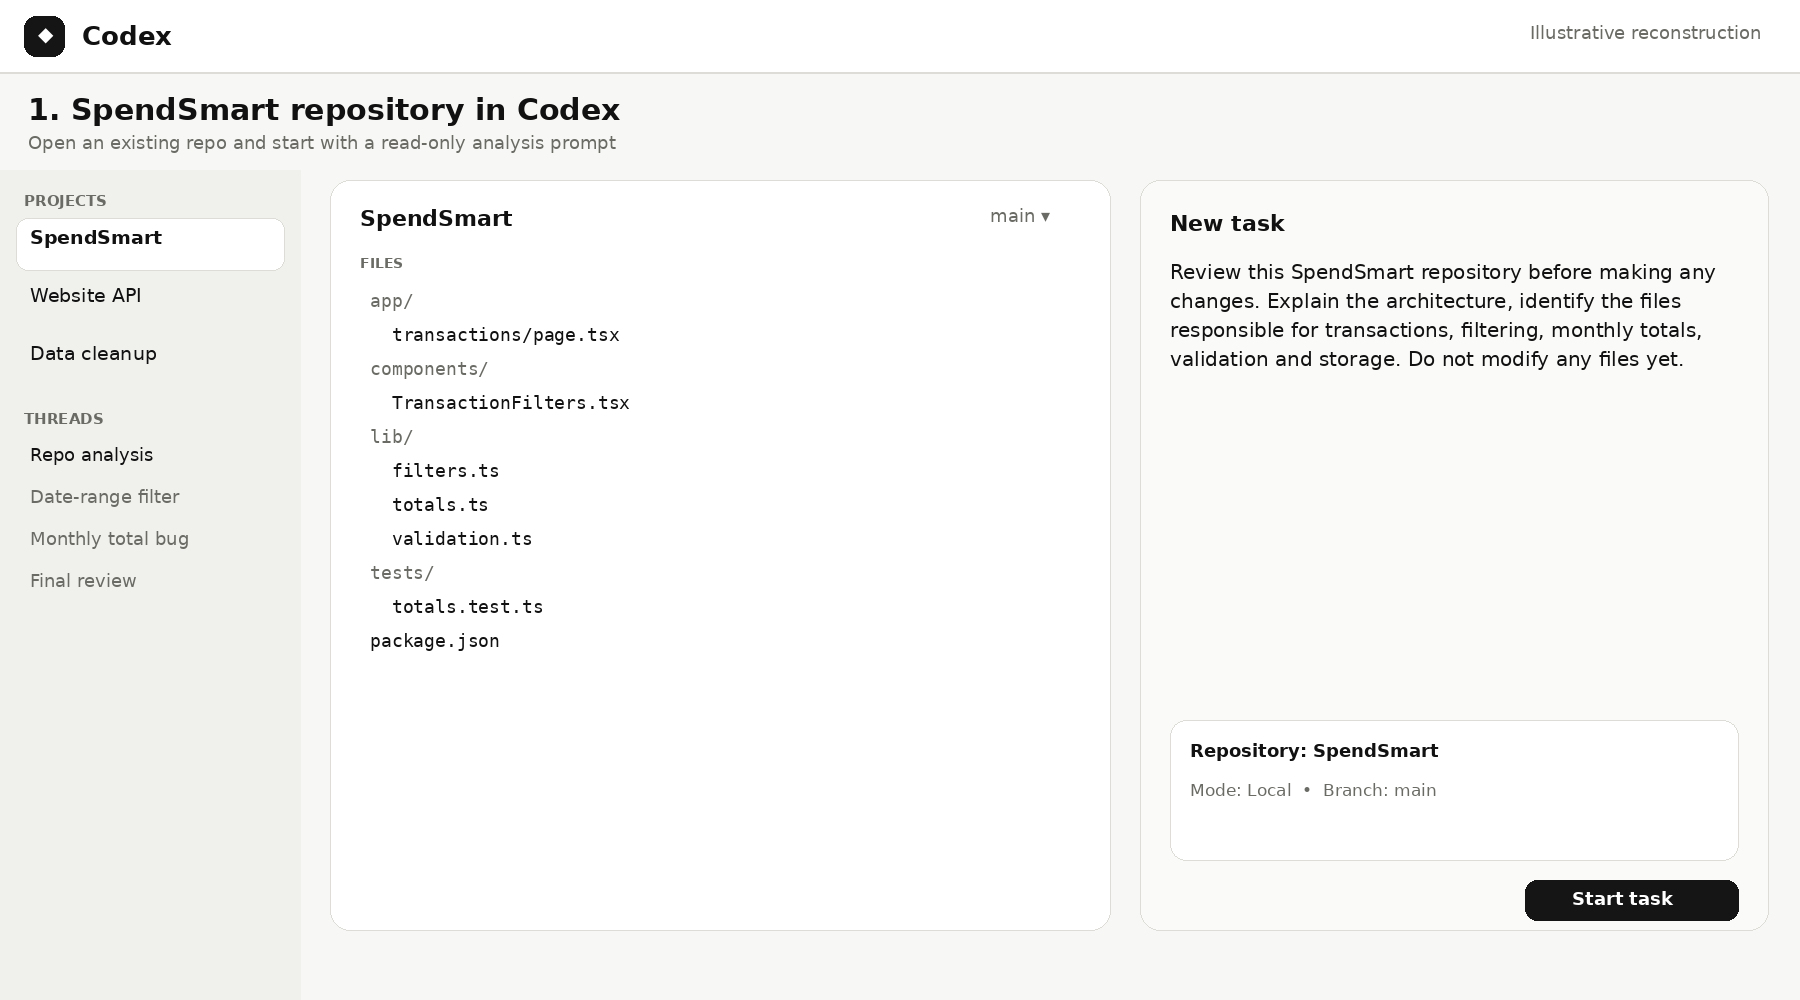
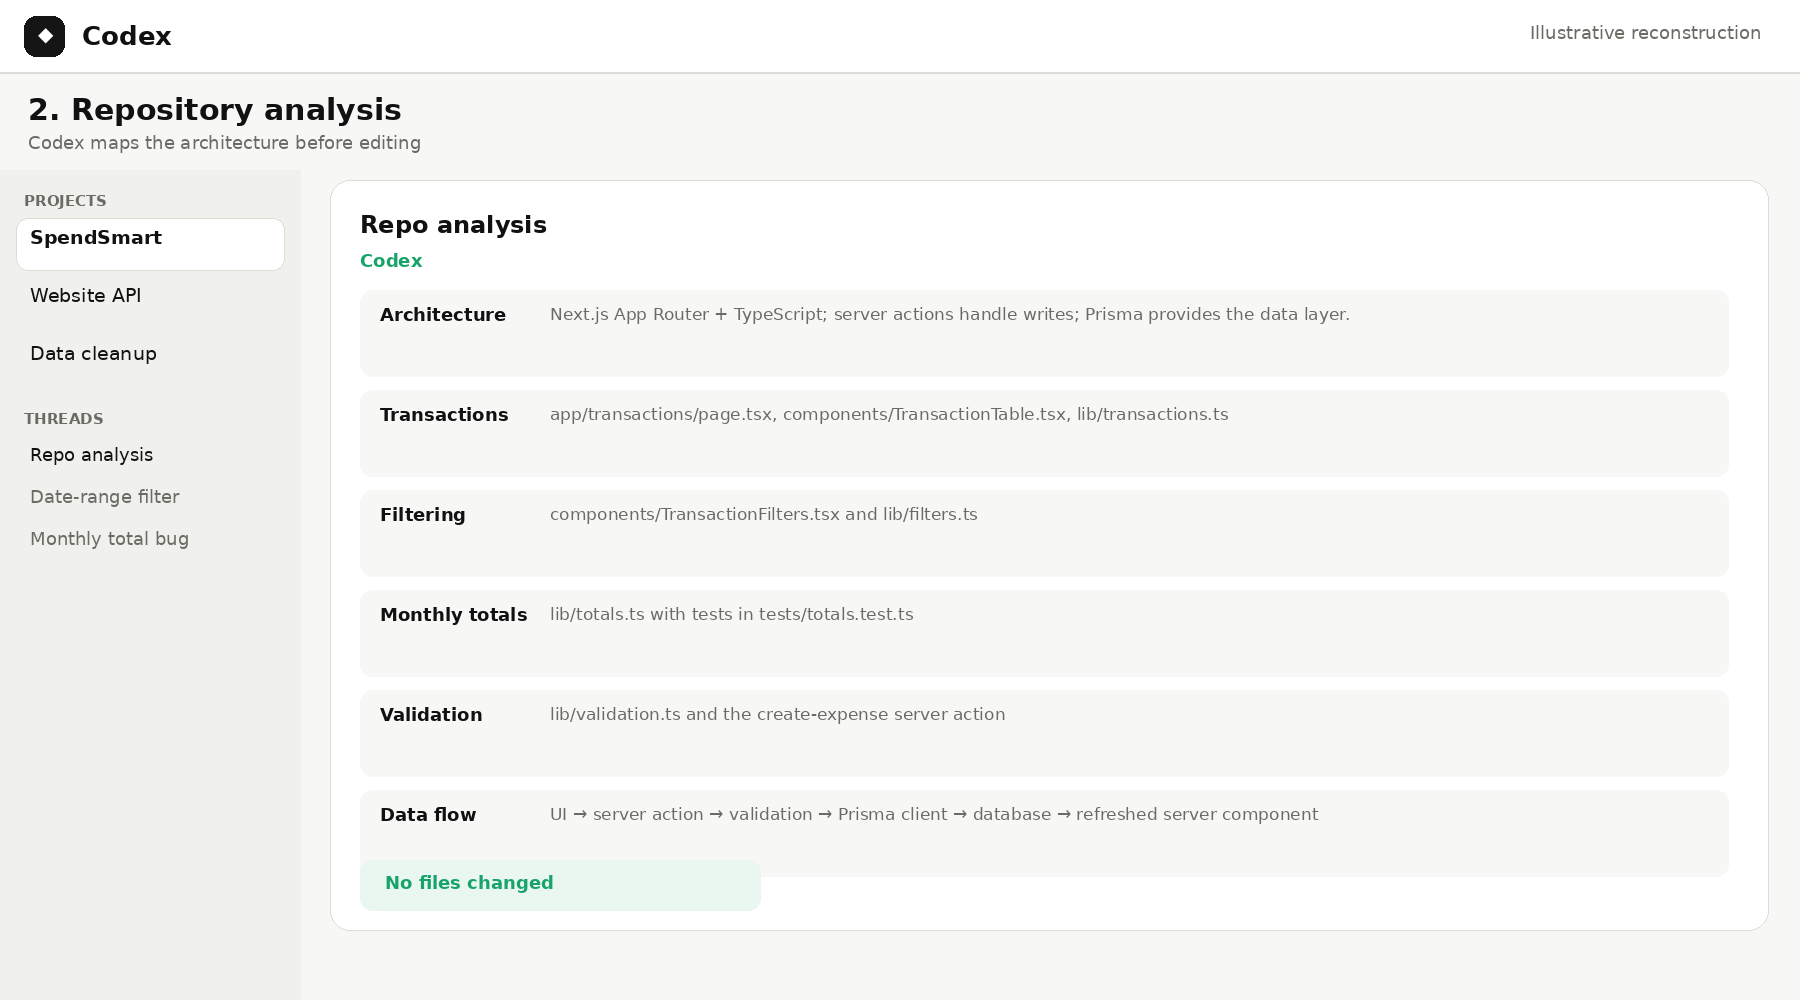
Repository context is only useful if the agent interprets it correctly. Here we look for a clear map of the transaction flow, filtering logic, totals, validation and persistence layer, along with any dependencies between them. The purpose is to expose Codex's assumptions early, when they are still cheap to correct. We keep this stage read-only so any architectural misunderstanding is visible before it turns into a code change.
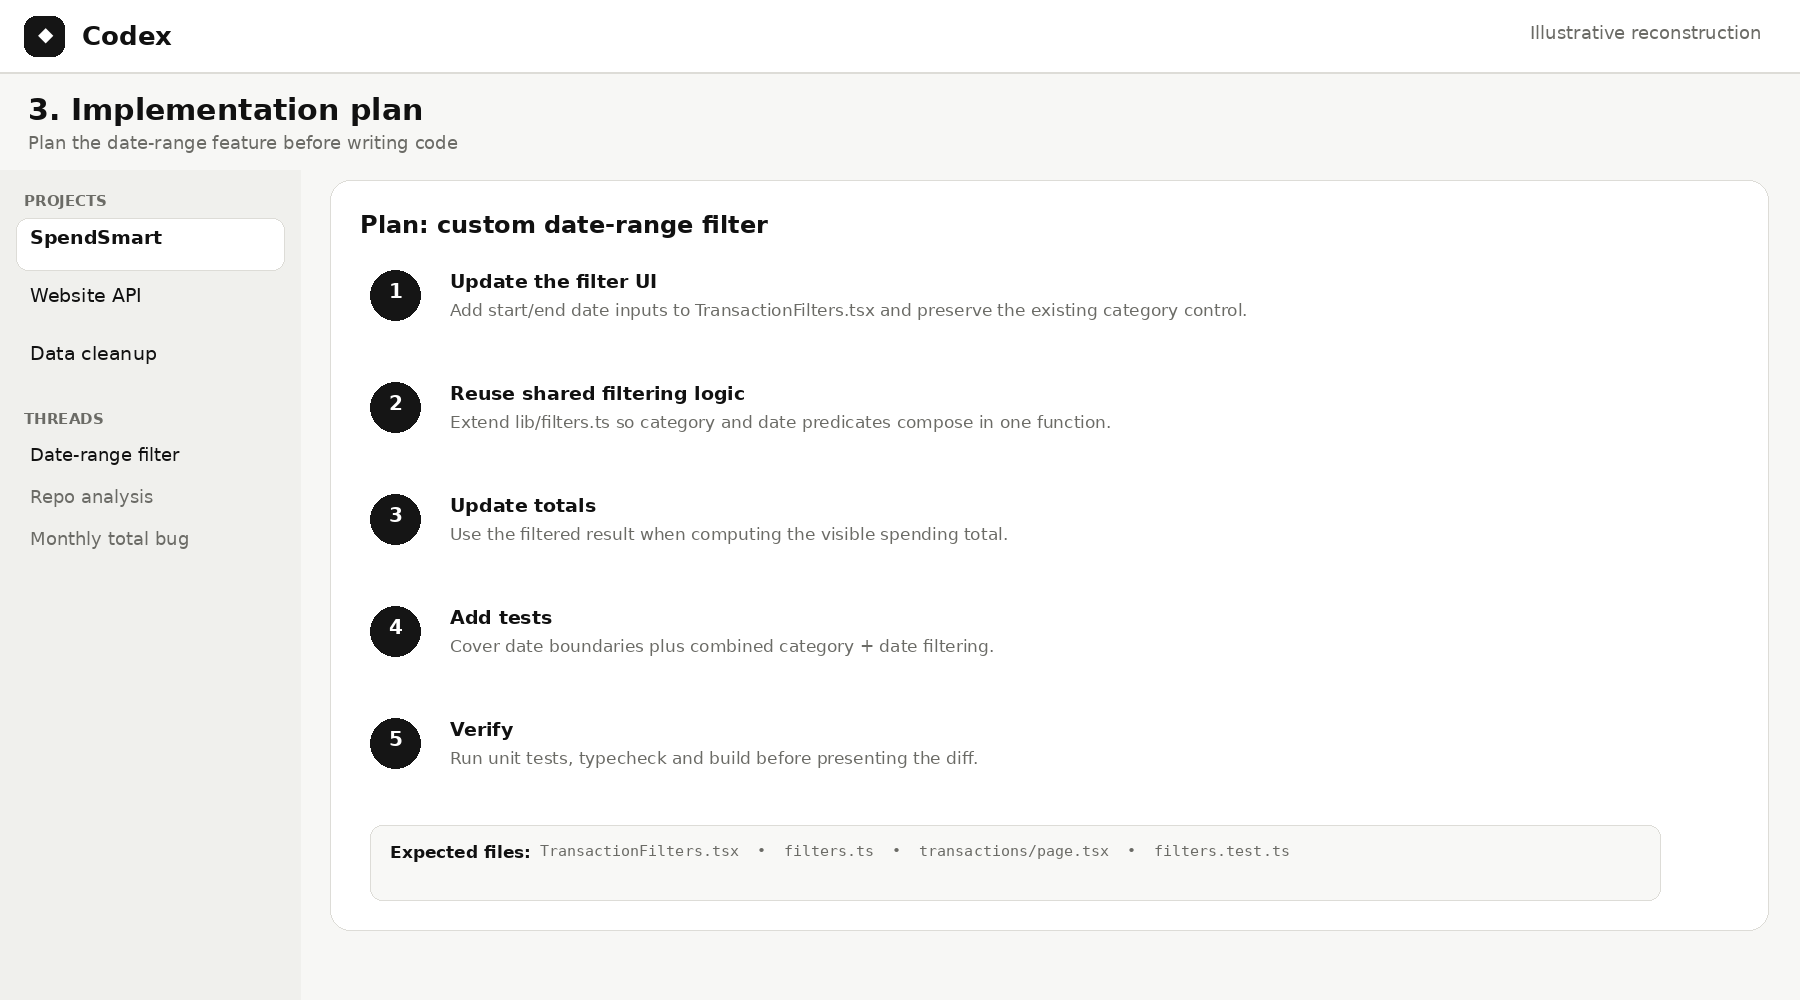
Before asking Codex to implement anything, we make it propose a compact plan for the new date-range filter. This separates reasoning from execution and gives the developer a chance to reject unnecessary files, dependencies or abstractions before they become code. The plan should also identify the tests that need to change.
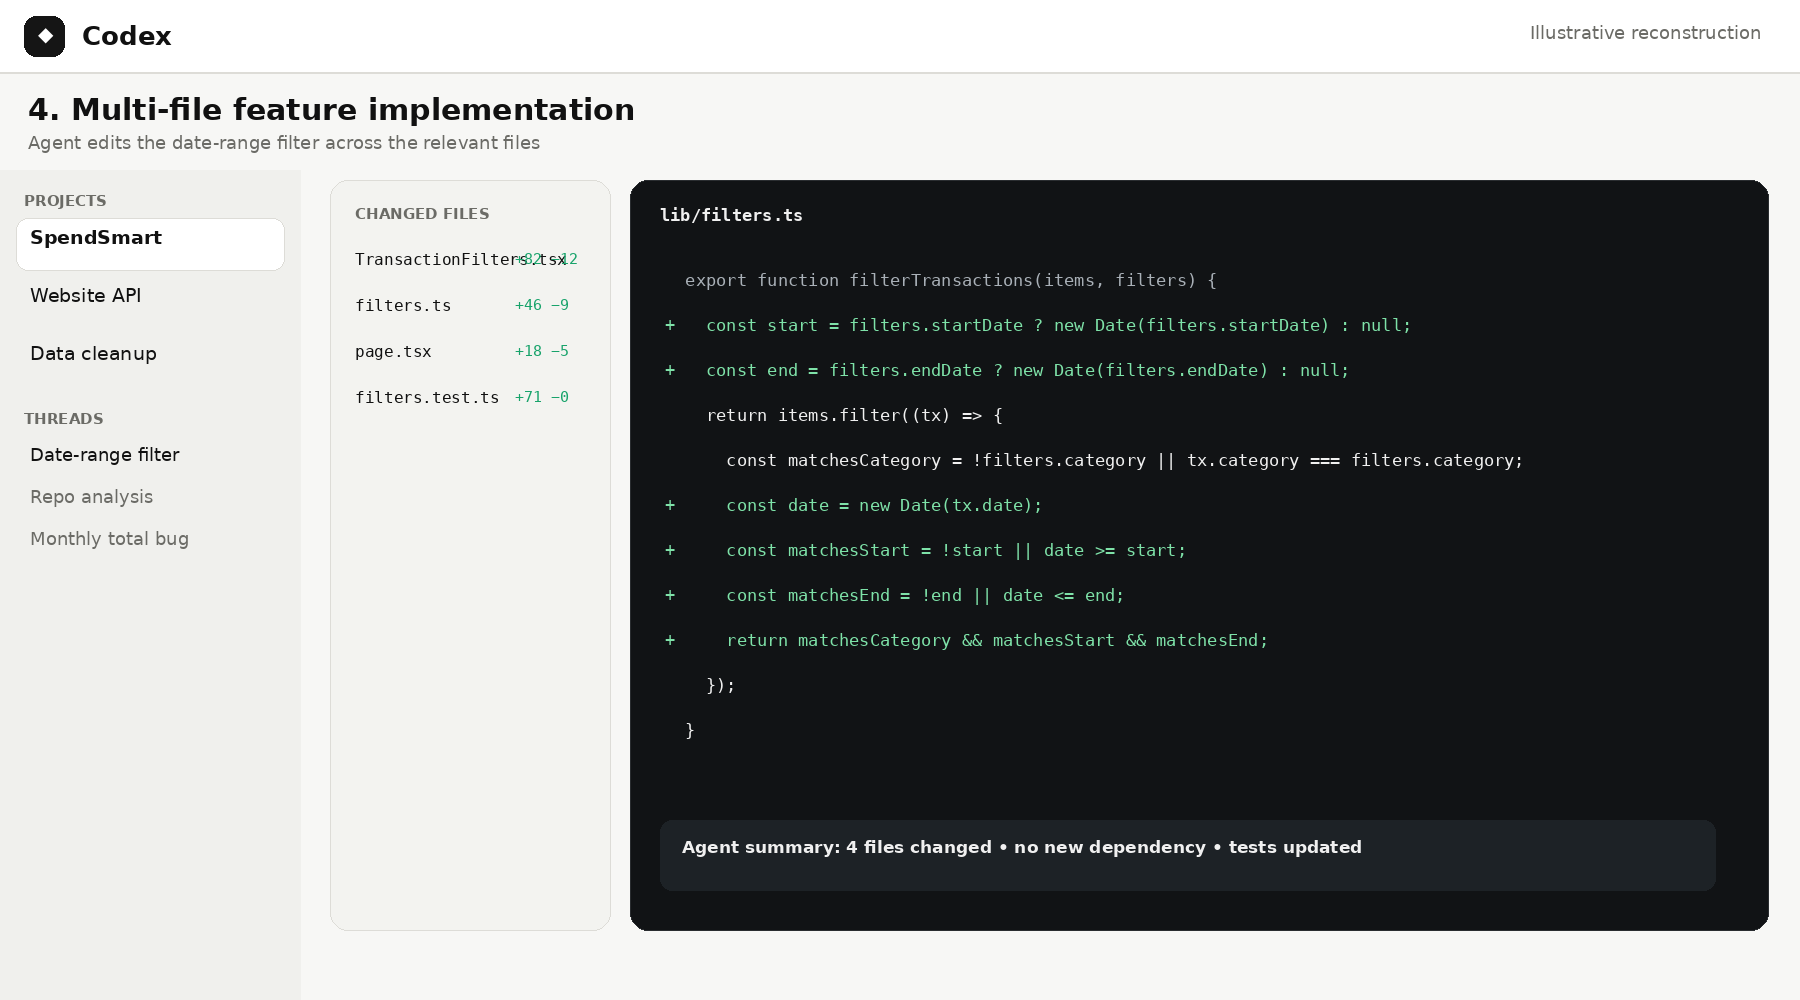
Now Codex is allowed to make the feature real. The benchmark is not about how many files it can edit; it is about whether the agent can change the minimum set of files needed while preserving the current SpendSmart UI and behavior. This is where scope discipline becomes as important as raw code generation.
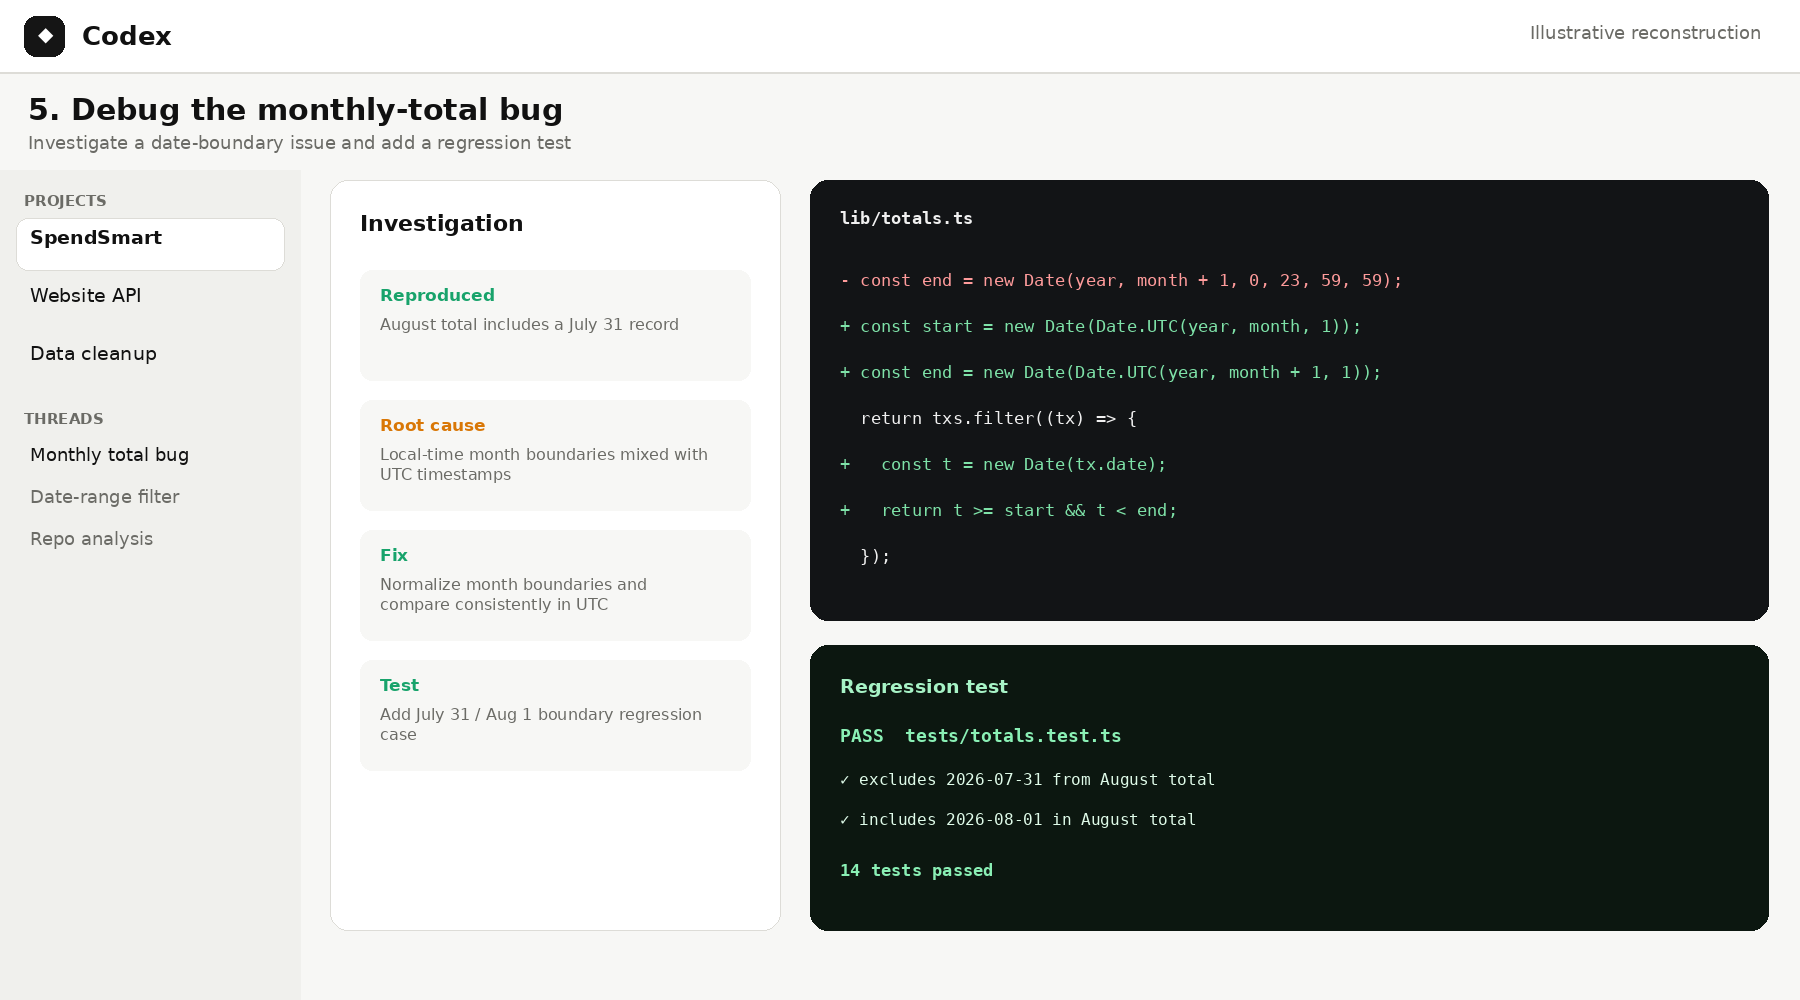
A useful coding agent should be able to investigate a symptom without being told exactly where the defect lives. We therefore give Codex only the observable problem: a previous-month transaction occasionally appears in the current monthly total. The expected workflow is reproduce → trace → explain → fix the source logic → add a regression test.
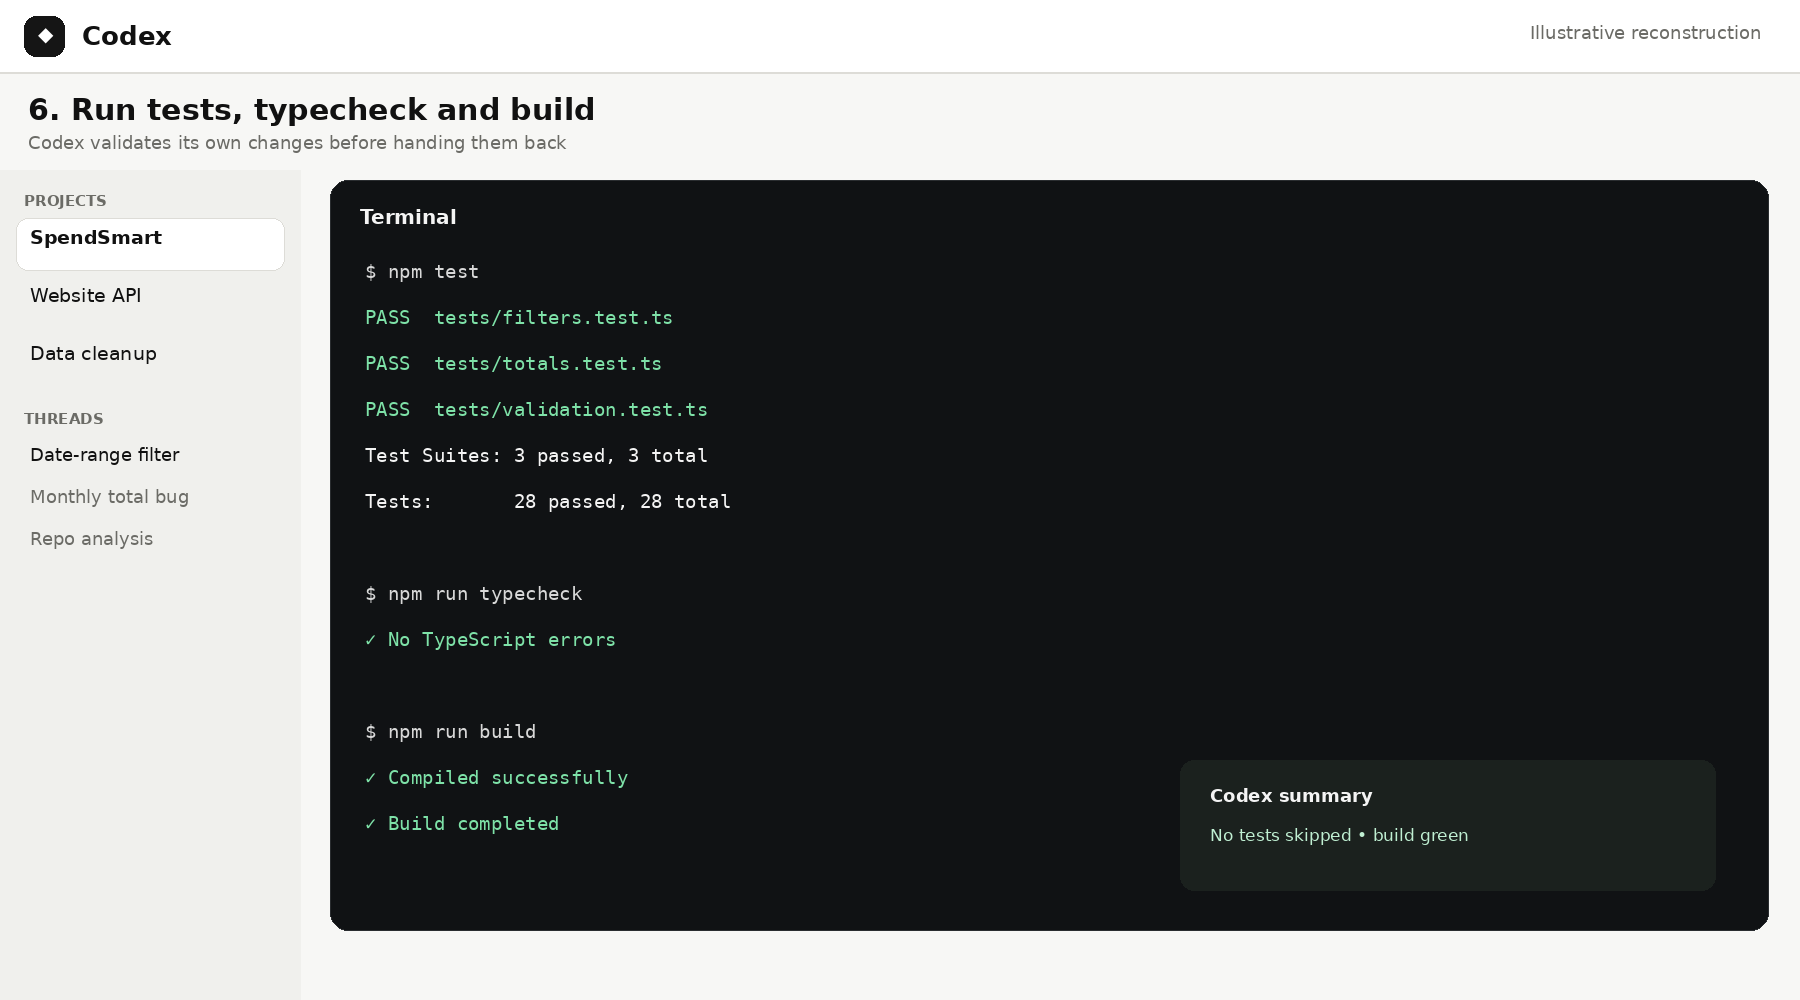
Generating code is only part of the engineering loop. In this step, Codex is expected to run the relevant tests, type checks and build commands, respond to failures and verify that its own changes did not break the project. This helps distinguish an agent that writes plausible code from one that can validate a working change.
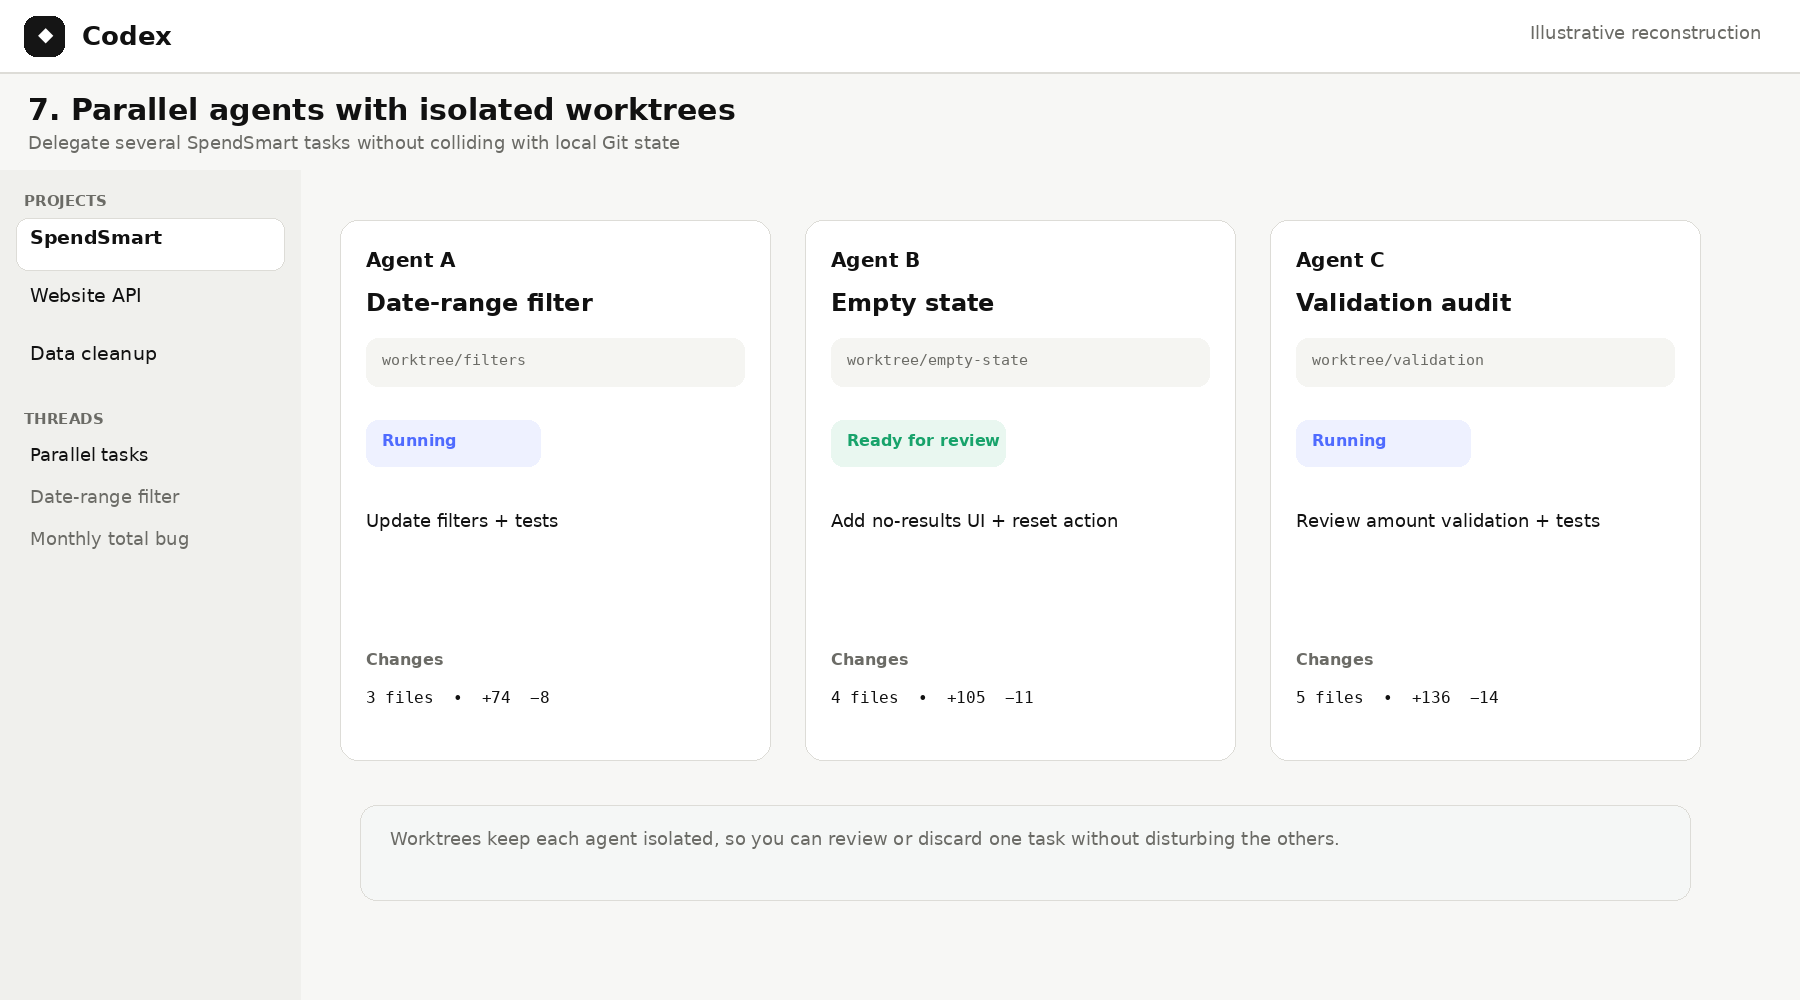
Parallel execution is one of the clearest differences between Codex and a conventional coding assistant. Instead of queueing every task in one conversation, separate agents can take independent SpendSmart jobs in isolated worktrees. The developer can then compare, continue or discard those branches without letting one task overwrite another.
For the illustration, separate agents handle independent SpendSmart tasks such as filtering, an empty state and a validation audit, each isolated in its own worktree.
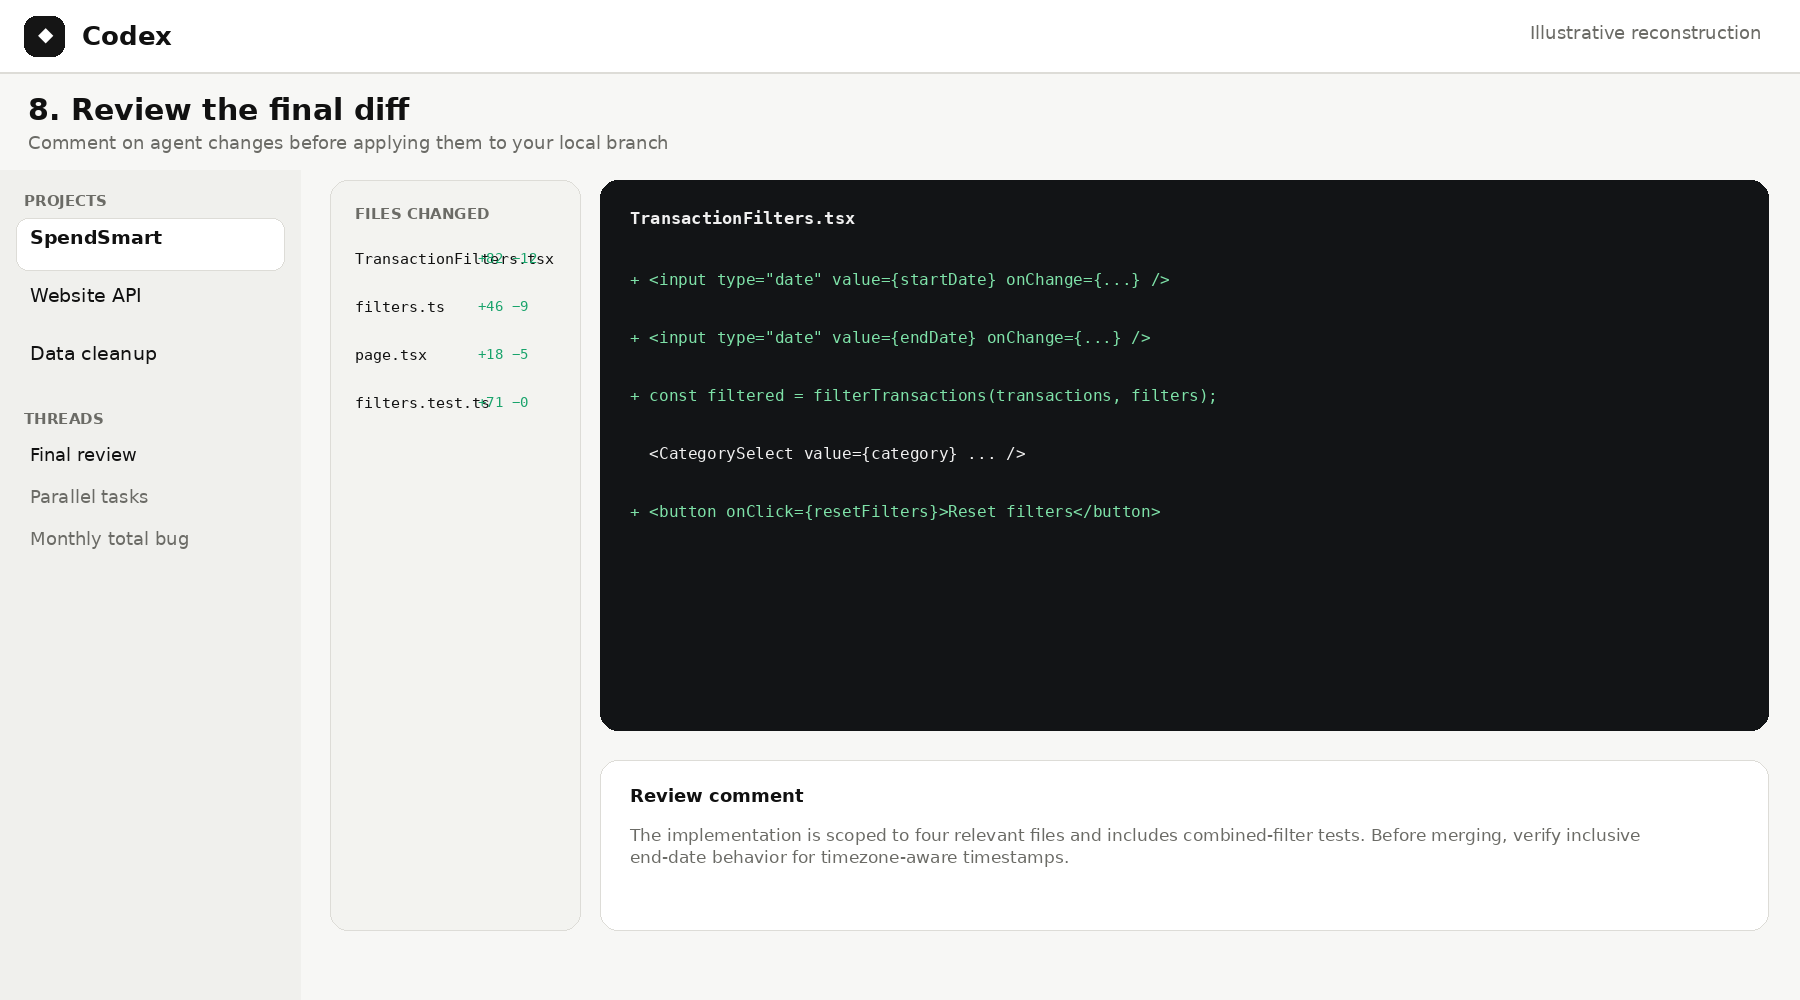
Higher autonomy makes the final diff more important, not less. Before anything is merged, we review whether the implementation stayed within scope, whether the summary matches the actual code and whether the agent acknowledged unresolved risks. This is the handoff point where generated work becomes a normal engineering review decision.
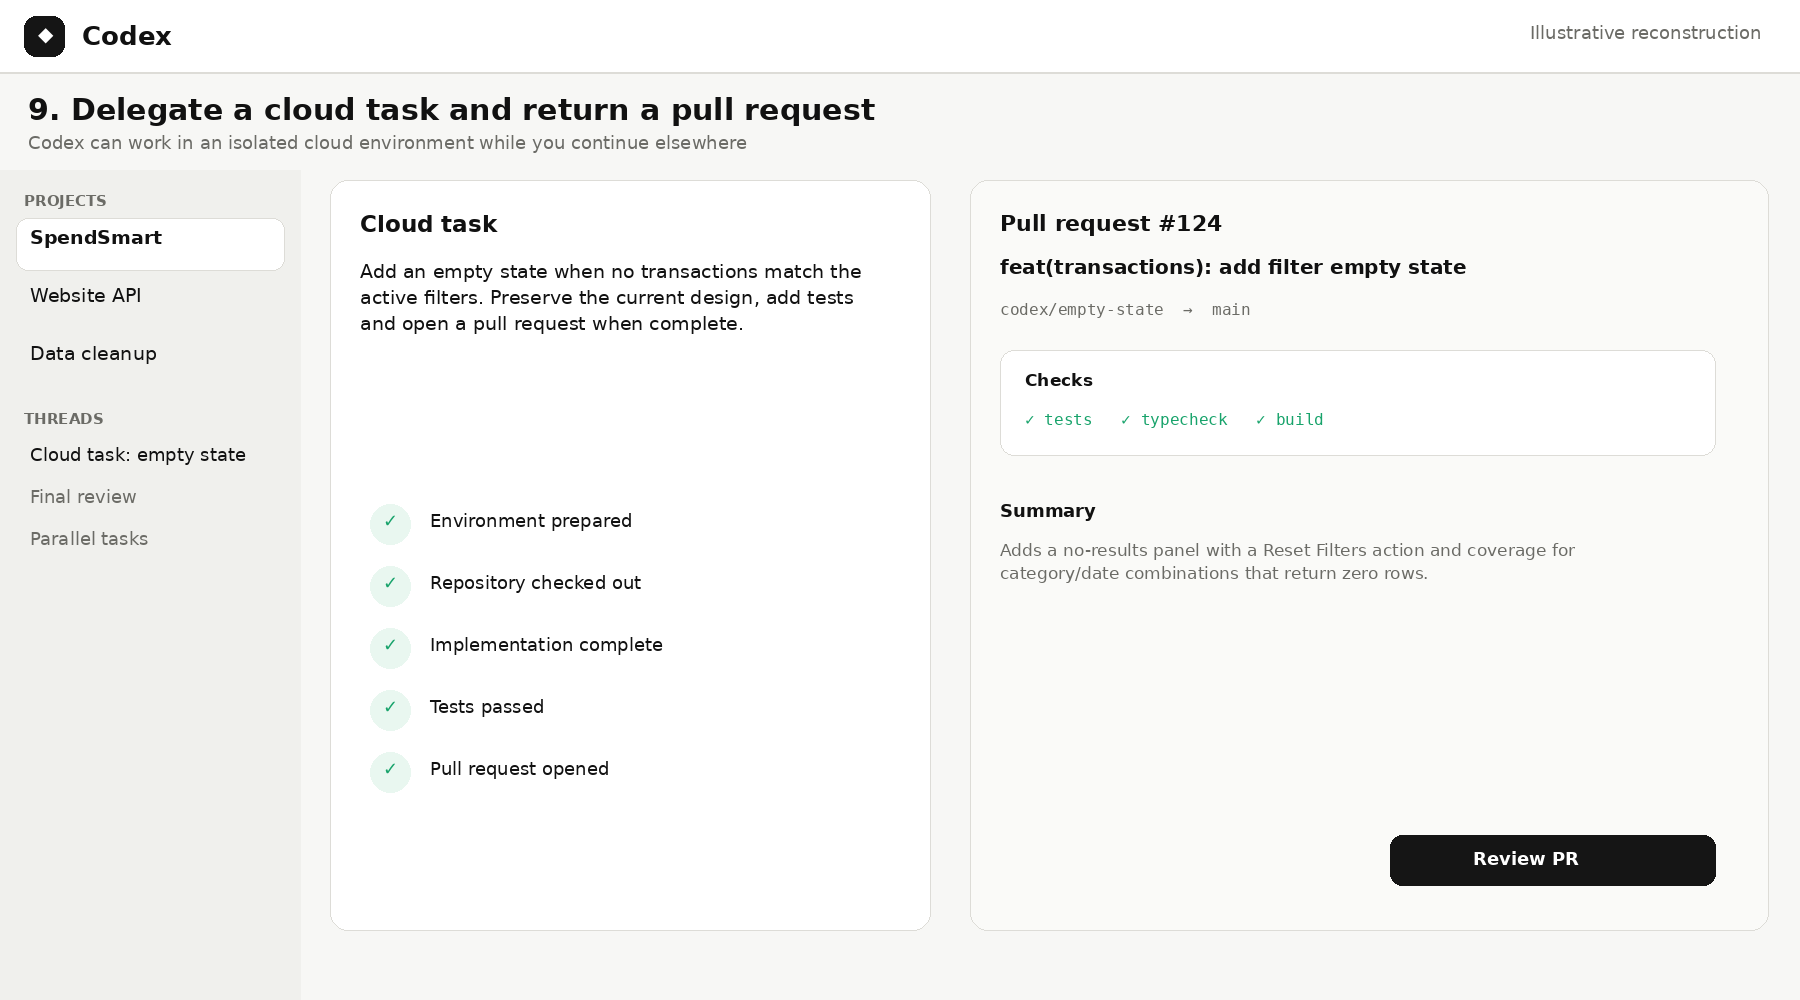
Cloud tasks test whether Codex can keep working when the local editor is no longer the center of the session. We delegate a small but complete SpendSmart change, expect the agent to work in an isolated environment, run checks and return a branch or pull request. The key measure is how cleanly the work returns for review.
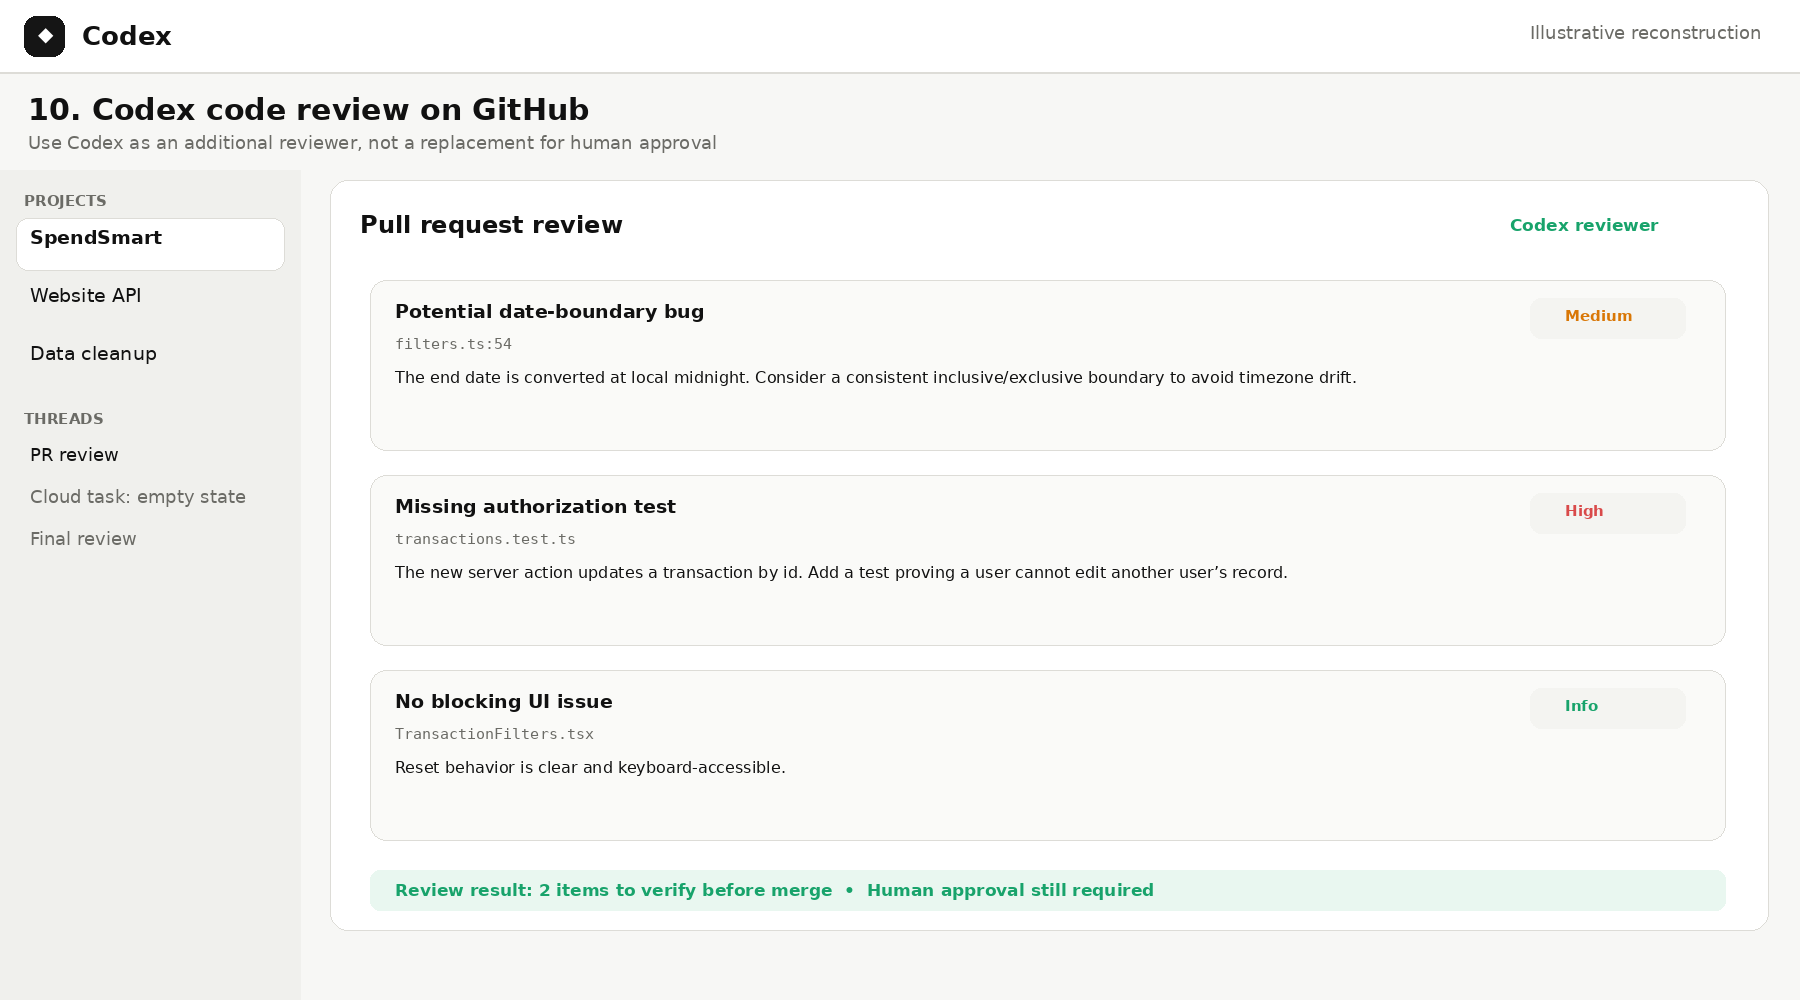
Codex can also sit on the other side of the development loop as a reviewer. We use the same SpendSmart pull request and ask it to focus on correctness, regressions, security and missing tests rather than style trivia. The point is to see how an agentic review layer can complement, not replace, human approval. We use the same SpendSmart PR for this illustration so the review is grounded in the exact change being prepared for merge.
Agentic coding can consume very different amounts of usage depending on context size, model choice, reasoning depth and whether several agents run in parallel. So cost has to be measured as part of the workflow, not only from the subscription price. The usage dashboard is where a developer can see whether a long-running task or multi-agent experiment is becoming expensive. For a real benchmark, the useful comparison would be usage before and after a longer task or parallel-agent run, rather than the plan price alone.
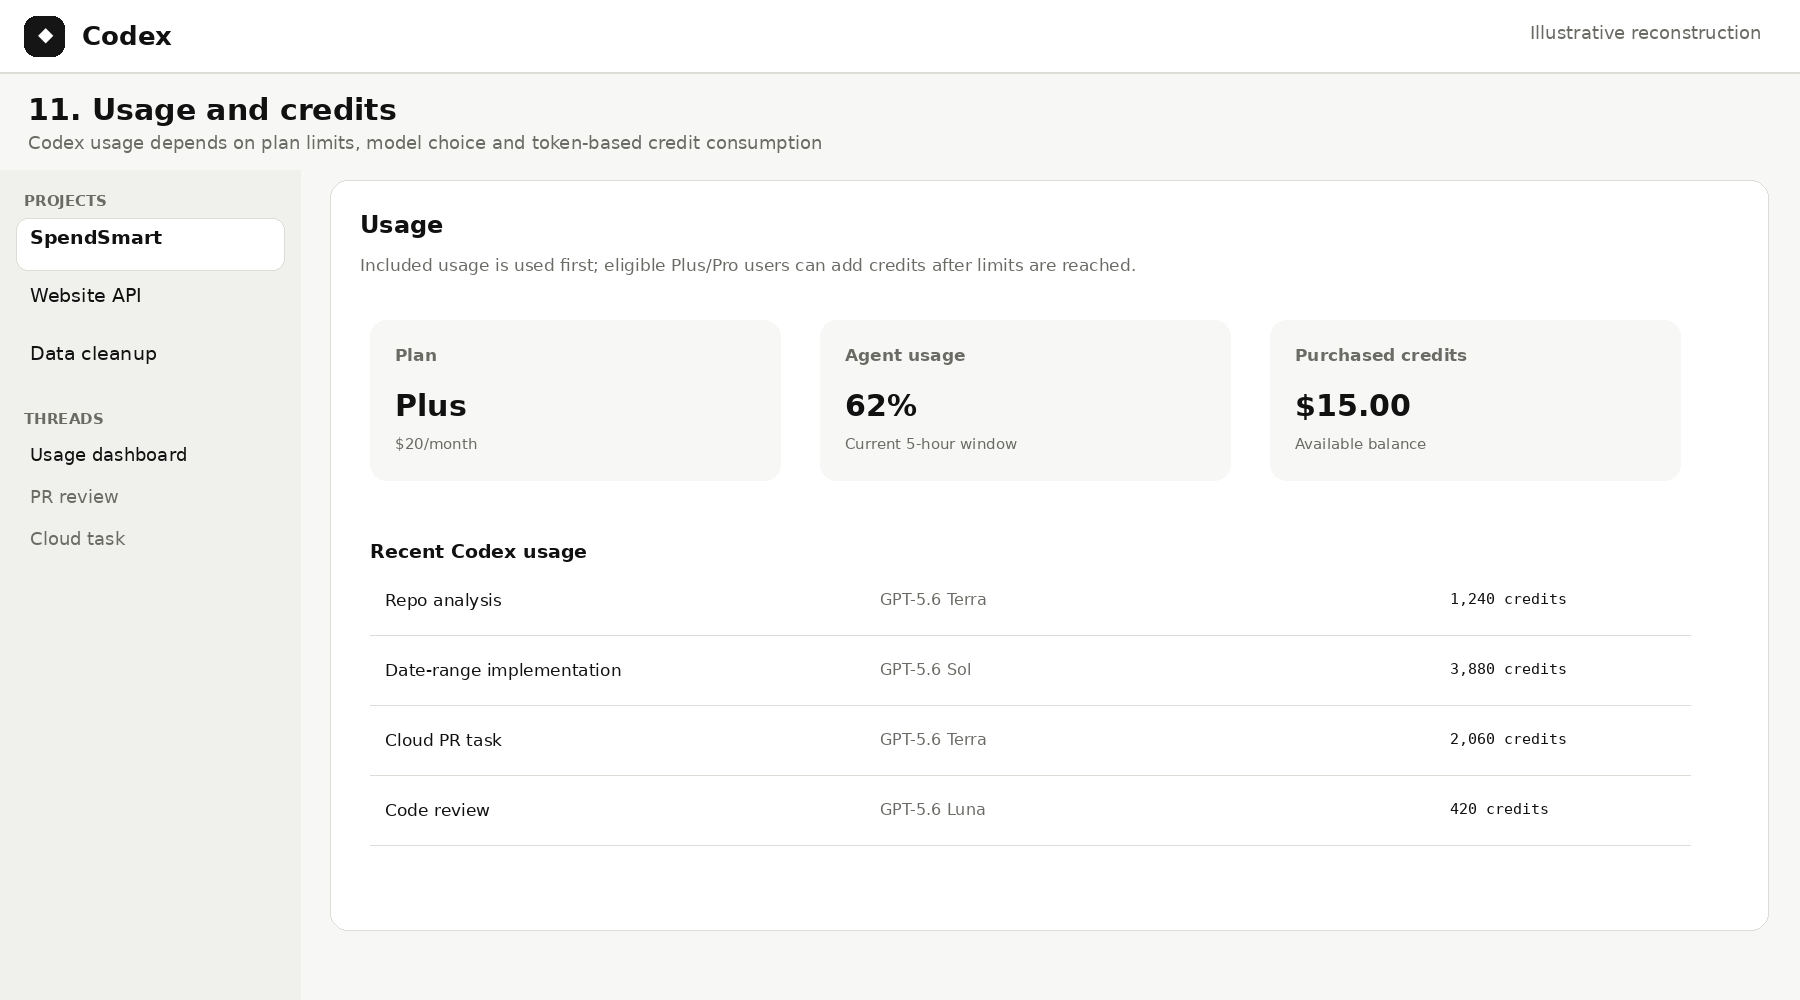
Codex is accessed through ChatGPT plans and uses included plan limits plus flexible credits for additional eligible usage. OpenAI moved Codex credit accounting to token-based pricing in April 2026, which means context size, model choice, reasoning depth and output volume can materially change consumption. For users comparing ai tools for coding, this makes usage patterns an important part of evaluating the overall cost of an agentic coding workflow. Plus and Pro users use included agentic allowances first and can buy additional credits when eligible; Business and Enterprise workspaces can also use workspace-level credits and spend controls.
Plan | Current entry point | Codex access | Review angle |
Free | Free | Codex included for a limited time | Useful for trying the workflow; availability/limits are promotional and can change |
Go | $8/month in the U.S. | Codex included for a limited time | Low-cost access, but not the tier to judge sustained engineering throughput |
Plus | $20/month | Codex included; eligible users can add credits after included limits | Natural starting point for individual developers |
Pro | $200/month | Much higher included agentic usage; additional credits supported | Designed for heavier multi-project agent usage |
Business | $20/user/month annually; $25 monthly | Standard seats include ChatGPT + Codex with workspace controls | Best fit when teams need admin, privacy and spend controls |
Enterprise / Edu | Custom | Expanded controls and credit-based options | For organization-wide deployment |
Business-plan note: Standard ChatGPT Business seats include Codex baseline access. OpenAI stopped offering new Codex-only seats to new Business workspaces (and workspaces that had never added one) on June 24, 2026; eligible existing workspaces can continue managing those usage-based seats.
Pros | Cons |
• Strong fit for delegated repo-level work | • Higher autonomy increases review responsibility |
• Parallel agents with isolated worktrees | • Usage is harder to compare by subscription price alone |
• Cloud execution and background tasks | • Parallel agents can multiply both output and review burden |
• CLI, IDE, desktop and ChatGPT access | • Token-based credits make heavy usage less predictable |
• Skills/project instructions for repeatable standards | • Some advanced workflow value is greatest on higher-usage plans |
• Can run commands, tests and builds | • Generated tests and reviews still require independent judgment |
• GitHub code-review workflows | • Product capabilities and model lineup are changing quickly |
• Useful for long-running engineering tasks |
OpenAI Codex is the strongest fit in this comparison for developers and teams that want to move from “AI helps me code” toward “I delegate engineering work and review the result.” Its strongest case is not a single autocomplete or chat interaction; it is the ability to organize longer tasks, parallel agents, isolated worktrees, cloud execution and review-oriented handoff inside one agentic workflow.
That does not make it automatically better than Cursor, Copilot or Claude Code. It changes the unit of work. Instead of asking whether the assistant can complete a function, the more relevant question becomes whether an agent can own a meaningful task without creating more coordination and verification work than it saves.
The SpendSmart benchmark therefore needs to answer: Can Codex delegate more of the engineering loop while still giving developers enough visibility and control to trust the handoff?
Product capabilities and pricing in this section were re-checked against OpenAI sources on August 21, 2026. Because Codex is changing quickly, plan limits, model availability and credit rates should be verified again before purchase or publication.
Testing transparency: The Codex diagrams in this section are illustrative reconstructions based on the current product and official documentation. They demonstrate the workflow accurately but are not evidence that Codex produced the exact shown code, timings, test counts or review findings in a live SpendSmart run.
After reviewing the same SpendSmart scenario across all six platforms, the biggest difference is not simply how much code each AI can generate. It is where the AI sits in the development process and how much work the user is expected to understand or control.
Replit and v0 are strongest when the starting point is an idea. GitHub Copilot and Cursor are designed around an existing development workflow. Claude Code and Codex become more relevant when the user wants to delegate larger repository-level tasks to an agent.
How to read the scores: 5 = excellent fit, 4 = very good, 3 = capable with noticeable limitations, 2 = limited for that use case, and N/A = not a core use case. These are editorial fit scores, not vendor ratings or claims of identical live benchmark conditions.
Tool | Ease of use | Build from idea | Existing codebase | Debugging & testing | Agent autonomy | Developer control | Fit for intended user |
|---|---|---|---|---|---|---|---|
Replit Agent | 5/5 | 5/5 | 3.5/5 | 3.5/5 | 4/5 | 3.5/5 | 4.5/5 |
v0 | 4.5/5 | 5/5 | 3.5/5 | 3.5/5 | 3.5/5 | 4/5 | 4.4/5 |
GitHub Copilot | 4.5/5 | 3/5 | 4.5/5 | 4.5/5 | 4/5 | 5/5 | 4.5/5 |
Cursor | 4/5 | 3/5 | 5/5 | 5/5 | 4.5/5 | 4.5/5 | 4.7/5 |
Claude Code | 3/5 | N/A | 5/5 | 5/5 | 5/5 | 4.5/5 | 4.6/5 |
OpenAI Codex | 3.5/5 | N/A | 5/5 | 4.5/5 | 5/5 | 4.5/5 | 4.6/5 |
Category | Our pick | Why |
|---|---|---|
Best for non-coders | Replit Agent | Lowest setup barrier from idea to working app |
Best for designers / product managers | v0 | Strongest visual and product-first workflow |
Best for beginners learning development | GitHub Copilot | AI stays close to real code and familiar IDE workflows |
Best for existing GitHub workflows | GitHub Copilot | Deep connection with repos, PRs and GitHub review |
Best AI-first editor | Cursor | Repo-aware Agent workflow is central to the editor |
Best for complex repositories | Claude Code | Strong terminal-first repository reasoning and multi-step execution |
Best for delegated engineering | OpenAI Codex | Parallel agents and longer-running task delegation |
Best for rapid prototyping | Replit Agent / v0 | Replit emphasizes app infrastructure; v0 emphasizes product/UI iteration |
The pattern across all six: As AI autonomy increases, the need for human technical judgment usually increases too. The more work you hand over to an agent, the more important it becomes to review the plan, changed files, tests, permissions and final diff.
The scorecard is useful for comparison, but the simplest decision usually starts with your current workflow. Use this shortcut before comparing individual features.
If your starting point is... | Start with | Why |
|---|---|---|
“I have an idea but I do not code.” | Replit Agent | It removes the most setup between a prompt and a deployable app. |
“I care most about product design and fast prototyping.” | v0 | It is strongest when visual iteration and editable generated UI matter early. |
“I already use VS Code / GitHub and want AI without changing my workflow.” | GitHub Copilot | It fits into IDE, Git and PR workflows developers already use. |
“I want the editor itself to be AI-first.” | Cursor | Agent work, repository context and multi-file editing are central to the environment. |
“I live in the terminal and work on complex repos.” | Claude Code | It is designed around repo-level reasoning, command execution and permissions. |
“I want to delegate multiple engineering tasks in parallel.” | OpenAI Codex | Its strongest value is task delegation, cloud work and parallel agents. |
Think about fit, not just power: The most autonomous coding agent is not automatically the best choice. A founder may get more value from Replit than Claude Code, while a team maintaining a large production codebase may reach the opposite conclusion.
Generating code and validating code are different jobs. If AI is increasing the volume of changes entering a repository, a separate review or security layer can be valuable. CodeRabbit, Snyk and SonarQube overlap in places, but they solve different validation problems.
Tool | Best for | What stands out | Watch-out |
|---|---|---|---|
CodeRabbit | Context-aware PR and IDE review | Agentic PR/CLI reviews, one-click fixes, pre-merge checks, integrations and free IDE reviews with rate limits | Primarily a review layer; paid private-repo workflows start at Pro and deeper security is a separate add-on |
Snyk | Application security across code, dependencies, IaC and containers | SAST, SCA, IaC and container scanning in IDE/CLI/SCM; free tier available | Security-first rather than a general maintainability reviewer; usage/test limits vary by product |
SonarQube | Quality gates and consistent standards for AI-generated code | AI Code Assurance, quality gates/profiles, reliability/security rules and project-level assurance | More governance/analysis oriented; not a conversational coding agent or PR assistant |
CodeRabbit currently lists Pro at $24/user/month billed annually and Pro Plus at $48/user/month; Snyk’s Team plan starts at $25 per contributing developer per month; SonarQube Server pricing is based on edition and lines of code rather than a simple per-seat AI subscription.
Best way to use them: Treat these products as a second layer. Let your coding tool produce the change, then use review/security tooling to challenge assumptions before merge.
The six main reviews cover the workflows we wanted to examine in depth. The tools below are important alternatives that appear in competitor comparisons or serve distinct use cases, but we have not scored them against the full SpendSmart benchmark. Use this section as a shortlist for further comparison rather than as additional ranked winners.
Tool | Category | Best for | Why consider it / current note |
|---|---|---|---|
Devin Desktop (formerly Windsurf) | Agentic IDE / agent command center | Developers comparing AI-first editors | Windsurf was renamed Devin Desktop. The current product keeps the IDE foundation while adding local/cloud agent management and multi-agent workflows; it remains a direct Cursor alternative. |
Lovable | Prompt-to-app builder | Founders and non-technical product teams | Full web-app building through chat, visual edits and credit-based plans; Pro currently starts at $25/month. |
Bolt.new | Browser app builder | Fast full-stack prototypes | Runs app generation in the browser, exposes the code and includes hosting; Free has token limits and Pro starts at $25/month. |
Firebase Studio | Cloud IDE / prototyping | Existing Firebase Studio users | Useful Gemini-powered prototyping and coding workflows, but new signups/workspaces were disabled in June 2026 and the product sunsets March 22, 2027. |
Devin | Autonomous coding agent | Teams delegating migrations, refactors and ongoing engineering work | Strong emphasis on complex tasks, PR workflows, migrations and agent fleets. |
OpenHands | Open-source / hosted coding agent | Developers who want model choice or self-hosting | Open source locally; hosted Individual tier is free with BYOK or at-cost model usage; enterprise can self-host. |
Augment Code | Enterprise coding agent / context engine | Large codebases and teams | Strong codebase context and team-oriented agent workflows; Standard currently starts at $20/month flat for up to 50 seats, while Business is $100/month with a larger included usage pool. |
Tabnine | Enterprise AI development | Teams prioritizing governance, privacy and deployment control | Code Assistant and Agentic Platform emphasize governance, self-hosting and enterprise controls. |
Amazon Q Developer | AWS-oriented developer assistance | Existing Q Developer customers / AWS-heavy teams | AWS announced end of support for Q Developer IDE plugins and paid subscriptions on April 30, 2027; new signups stopped May 15, 2026, with Kiro as the migration path. |
Zed | Fast editor with optional AI | Developers who want a lightweight editor and BYOK/external agents | Editor is free; Pro is $10/month with hosted models and token credit, while personal users can use their own keys or external agents. |
Google Antigravity | Agent-first development platform | Developers wanting editor + terminal + browser agents | Google’s current agentic development platform combines an AI editor with autonomous agents that can plan, execute and verify work across the editor, terminal and browser. |
Kiro | Spec-driven agentic IDE / CLI / web | Teams that want requirements and plans before code | Kiro turns prompts into structured requirements, design and implementation tasks, then lets agents execute and verify them. It is especially relevant for developers who prefer a spec-driven workflow over free-form vibe coding. |
Cline | Open-source coding agent | Developers who want open tooling and model choice | Cline is an open-source agent runtime available in the IDE and terminal. It is worth considering when control, transparency and bring-your-own-model flexibility matter more than an all-in-one subscription. |
Aider | Open-source terminal pair programmer | Terminal users and budget-conscious developers | Aider works directly with local Git repositories, supports many model providers, maps codebases and can lint/test after edits. It is a strong lightweight alternative for developers comfortable managing their own model/API access. |
The terminology is messy because products increasingly overlap. These definitions are useful as a starting point rather than rigid categories.
Term | Typical behavior | Example use |
|---|---|---|
AI coding assistant | Suggests, explains or edits code while the developer remains in control of each step | Explain a function, generate a test, suggest a refactor |
AI-first editor | Makes repository-aware AI a central part of the coding environment | Plan a feature, edit several files and run commands inside the editor |
AI coding agent | Takes a multi-step engineering task and works through files, commands, tests and review with more autonomy | Investigate a bug, implement the fix, run tests and return a diff/PR |
AI app builder | Starts from product requirements and handles much of the initial stack, UI and deployment | Describe a SaaS dashboard and turn it into a working prototype/app |
AI code review / security tool | Analyzes existing changes for defects, security risks and quality issues | Review a PR, enforce a quality gate or scan dependencies |
The most important limitation is not that AI sometimes produces obviously broken code. The harder problem is code that looks plausible, passes a quick check, and is still subtly wrong.
Think box: Treat AI-generated code like a pull request from another developer—not like finished code that becomes trustworthy simply because it compiles.
AI has lowered the barrier to building software, but it has not removed the difference between generating code and being able to evaluate it. A beginner can now create something functional much earlier, yet may have less ability to recognize weak validation, insecure authorization, poor architecture or hidden edge cases.
For learning, the best AI coding workflow is not the one that hides the most code. It is the one that lets the learner ask what changed, why it changed, how to test it and what could fail.
Good beginner habit | Why it matters |
|---|---|
Ask the AI to explain before rewriting | Builds mental models instead of replacing them |
Request small changes | Makes cause and effect easier to understand |
Read the diff | Shows exactly what the AI changed |
Run tests and try edge cases | Separates plausible output from working behavior |
Ask for alternatives | Prevents treating the first generated solution as the only valid design |
Get human review for security, payments or sensitive data | Some mistakes are too costly for trial-and-error learning |
Rule of thumb: If the application handles money, authentication, personal data, permissions or other high-impact logic, a beginner should get an experienced developer to review it before production.
Once an AI coding tool can read repositories, execute commands or work in cloud environments, privacy and security become part of the buying decision—not a separate enterprise concern.
Question to ask | Why it matters |
|---|---|
Where is my code processed? | Local, vendor cloud and remote-agent execution expose different risk and governance profiles. |
Is my code/prompts used for model improvement? | Free and paid tiers can have different data-use defaults; check the current policy for the plan you use. |
Can I restrict repository or command access? | Agent permissions determine how much damage a mistaken command or prompt could cause. |
How are secrets handled? | Environment variables, API keys and credentials should not leak into prompts, client code or logs. |
Can the product run in a private VPC / self-hosted environment? | This can matter for regulated or proprietary codebases. |
Who owns generated output? | Ownership may be clear, but responsibility for accepted code still remains with the user/team. |
Can I export the project and leave the platform? | Code ownership is more useful when the project is not trapped in a proprietary runtime. |
What audit and governance controls exist? | Teams may need usage analytics, RBAC, SSO, model policies and review trails. |
For example, Amazon Q Developer Pro states that customer content is not used to improve the service or train underlying foundation models, while its Free tier provides an opt-out mechanism. Firebase Studio’s current documentation separately warns that users who want to block prompt/response use for training should avoid its generative AI features and can disable code completion/indexing for code-use controls. These examples show why plan-specific policies matter.
A simple monthly price comparison is increasingly misleading. The real cost can combine the subscription with model usage, tokens, credits, agent compute, cloud execution and infrastructure.
Cost layer | What to check |
|---|---|
Base subscription | Is the advertised price monthly, annual or per seat? |
Credits / tokens / premium requests | How quickly does a real multi-file task consume the included allowance? |
Model choice | Do higher-end models consume more credits or require a higher tier? |
Cloud / background agents | Is remote compute included, metered separately or limited by plan? |
Hosting and database | App builders can add infrastructure cost after generation. |
Team pricing | Per-seat pricing can dominate at scale; some vendors instead pool usage across a team. |
Add-ons | Code review, security or higher agent limits may sit outside the core subscription. |
Overage behavior | Can you top up, does work stop, or must you wait for the next billing cycle? |
Cost warning: The cheapest monthly plan is not necessarily the cheapest tool to use heavily. Our Replit and v0 tests both showed how quickly practical usage limits can matter during full-app generation.
Product capabilities and pricing change quickly. We used official product pages and documentation wherever possible, supplemented by the research sources below. Pricing and plan details should be rechecked immediately before publication.
The SpendSmart benchmark is used as a common product scenario. Where live account access was available, we used actual account screens and recorded account-limit behavior. Where a full paid workflow was not available, diagrams are clearly labelled as illustrative reconstructions based on the current public interface, official documentation and our standardized SpendSmart scenario. Illustrative visuals demonstrate the workflow being evaluated; they are not presented as measured benchmark results.
There is no universal winner. Replit is easier for non-coders, v0 is strong for product/UI work, Copilot fits existing IDE/GitHub workflows, Cursor is an AI-first editor, Claude Code suits terminal-first complex repos, and Codex is strongest when task delegation and parallel agents matter.
GitHub Copilot is a strong learning-oriented option because it works beside real code in familiar IDEs. Replit is easier if setup is the main barrier, while Cursor becomes more useful once the learner is comfortable navigating a repository.
Replit Agent is the most straightforward of the six reviewed tools for a non-programmer starting from an idea. v0 is especially attractive when the product experience and interface are the priority.
Cursor is more AI-native and emphasizes repo-aware Agent workflows. Copilot is often easier to adopt if you want AI inside the IDE and GitHub workflow you already use. The better choice depends on whether you want to change the development environment itself.
Claude Code is particularly strong for terminal-first repository work and permission-aware execution. Codex is especially compelling for delegated, cloud and parallel-agent workflows. Both require experienced review for substantial engineering tasks.
For prompt-to-app building, start with Replit Agent or v0. Replit emphasizes the full browser workspace and app infrastructure; v0 is especially strong for product/UI iteration and Vercel-oriented workflows.
Several have useful free entry points: Replit Starter, v0 Free, GitHub Copilot Free and Cursor Hobby. Open-source options such as Cline, Aider and OpenHands can also be free to install, although model/API usage may still cost money unless you use a free or local model. Free plans usually cap agent work, credits, requests or model access, so compare the limit that affects your actual workflow—not just the $0 headline price.
They can automate meaningful parts of development, but generated changes still need product judgment, architecture decisions, testing, security review and accountability. The more autonomous the agent, the more important the review process becomes.
They can be, but the answer depends on the plan, data-use policy, deployment model and permissions. Teams should check retention/training defaults, cloud execution, secret handling, repository access and enterprise governance controls.
GitHub Copilot is the most direct choice if you want to remain in VS Code. Other products may integrate through extensions or external agents, but Copilot is designed around the GitHub/VS Code ecosystem.
Vibe coding usually implies describing intent and letting AI produce substantial code with limited manual implementation. AI-assisted development is broader and can include autocomplete, explanations, targeted refactors, tests and review while the developer remains closely involved.
Not automatically. Production readiness depends on testing, security, authorization, data handling, maintainability and operational behavior—not on whether the AI completed the task or the demo looks correct.

Explore the best AI tools for students for research in 2026. This comprehensive guide compares leading AI research assistants, academic search tools, literature review platforms, and citation managers, helping you find credible sources, summarise research papers, organise references, and complete academic projects faster, smarter, and with greater confidence.
Read More
Protecting your online accounts starts with choosing the right password manager. With cyber threats becoming more sophisticated, a reliable password manager helps you generate, store, and manage strong passwords securely. In this guide, you'll learn the essential features to look for, including encryption, cloud backup, password generation, multi-device compatibility, and data recovery options, so you can confidently select a solution that keeps your sensitive information safe.
Read More
Discover the 15 best AI video generator tools in 2026, including both free and paid platforms for creators, marketers, businesses, and educators. This comprehensive comparison covers features, pricing, pros, cons, and ideal use cases for leading tools like Google Veo 3, OpenAI Sora, Runway Gen-4, Synthesia, HeyGen, Canva AI Video, and more. Whether you need realistic text-to-video generation, AI avatars, or social media video creation, this guide helps you choose the right AI video generator for your workflow.
Read More
Maintaining the same voice across multiple scenes, episodes, or translated videos is essential for creating professional, immersive content. This guide reviews the 8 best AI tools for voice and audio consistency, comparing their voice-cloning quality, multilingual capabilities, pricing, and ideal use cases. Whether you're producing marketing videos, podcasts, audiobooks, or branded content, these platforms help keep narration natural and consistent from start to finish, making it easier to build audience trust and deliver a seamless viewing and listening experience.
Read MoreGet into details now? View all posts